When my DVD player stopped working, I definitively proved to myself (and to people I know) that if there is a simple and effective solution to a problem and a complex one which promises unpredictable results, I always choose the second option. Instead of buying a new DVD/DivX/MP3 player for the modest price of $40-50, I decided to build a home-made device that would allow me to record the TV, receive podcasts, watch my favorite movies, view webtv, play games, and a lot of other things that I considered cool. So my modest adventure with Freevo, GNU/Linux and a lot other free software begins...
Introduction
A media center is a special type of computer conceived for your living room rather than for your office. There are several models of media center available on the market and most of them are based on the Microsoft Windows Media Center Edition. Differently from a traditional personal computer, the interaction with a media center mainly flows through the remote control and the television screen. It is of course possible to add a wireless keyboard for writing text but most of the time a media center is used by one or more users enjoying content from separate sources such as DVD, Video CD, digital video cameras, FM radio, analog/digital terrestrial TV or satellite TV, network streaming and, of course, the local hard disk.
Differently from a traditional personal computer, the interaction with a media center mainly flows through the remote control and the television screen
What hardware you need
Assuming you want to build your own media center, the ingredients you need are of three types: hardware, software and connectivity. Your media center will gain a lot from a LAN connection which is useful for management tasks and for receiving media streams from the internet. Regarding the hardware the essential components are: motherboard, CPU, RAM, disk, video card with TV/OUT, audio card, TV/FM card, network card, CD/DVD player and a remote control with IR receiver. Of course you can add a lot of optional components like a DVD writer and USB memory readers.
To build an effective system you need a minimum CPU power for video encoding/decoding. Buying an Intel Core Duo with 2GB of RAM is a viable choice, but in my experience you can save a lot of money reusing some old hardware. I’ve assembled a system with Pentium III processor with 320MB of RAM and I found that for video encoding/decoding this configuration is powerful enough. If you don’t have any old PC to cannibalize, you can buy a mobo/CPU/RAM for less than 100$ on eBay and get your system done.
I’ve assembled a system with Pentium III processor with 320MB of RAM and I found that for video encoding/decoding this configuration is powerful enough
GNU/Linux helps to make your old hardware run again. It’s always possible to optimize GNU/Linux, while Windows XP is too resource consuming. Another proprietary alternative for old hardware is, as usual, Windows 98, but would you venture to make it your OS? I wouldn’t. Thus, for my media center I’ve acquired the following:
- Microstar mother board with Intel P3/800MHz
- 320MB of RAM
- Matrox Millennium graphics card G400 with dual head
- A DVD/CD combo player
- A PCI network card 10/100
I also added some special purpose components for the media center:
- Technisat TS35 Remote control with IR receiver
- Hauppauge WinTV GO tuning card
The distro the kernel and the screen
Inside the galaxy of GNU/Linux I have chosen Fedora. The reasons behind this choice are absolutely disputable: my first Linux installation was a Red Hat 4 and I’m too lazy to evaluate other distros. About the screen, unless you want to buy a 26” VGA LCD you need to use your TV. Driving the TV out from the Linux kernel may cause some problems. First, you need a video card with TV out (this is obvious); second you need to activate the TV-out function in Linux (not so simple). After some searches on the net I discovered that among old cards, the Matrox Millennium G400 TV out setup is well documented. To use the G400 with TV out I needed three main tools:
- kernel sources to be recompiled (sigh)
- fbset
- matroxset
The TV out can be activated using the framebuffer device, and for this reason I needed to recompile the kernel. Recompiling the kernel is not a difficult task, but making the wrong changes in the configuration can cause your machine to become unbootable. This is not irreversible, because you can always reconfigure the system to boot from an older kernel, but this recovery may require some knowledge. Please refer to online documentation. In my kernel compilation I needed the followings settings:
- Code maturity level options→Prompt for development...
- Processor type and features→MTRR support
- Character Devices→I2C support→I2C support
- Character Devices→I2C support→I2C bit-banging interfaces
- Character Devices→I2C support→I2C device interface
- Character Devices→Matrox g200/g400
- Console drivers→Frame-buffer support→Support for frame buffer devices
- Console drivers→Frame-buffer support→Matrox acceleration
- Console drivers→Frame-buffer support→G100/G200/G400/G450 support
- Console drivers→Frame-buffer support→Matrox I2C support
- Console drivers→Frame-buffer support→G400 second head support
You can find these settings in different positions depending on the version of the kernel you are recompiling. I’ve statically compiled every piece of the kernel that dealt with the Matrox card; however, doing so is not strictly necessary. After rebooting with the new kernel, I have configured the framebuffer devices in the following way:
matroxset -f /dev/fb1 -m 0

# this disconnects fb1 from outputs


matroxset -f /dev/fb0 -m 3

# this connects fb0 to both outputs


matroxset -f /dev/fb0 -o 1 1

# this sets fb0 to PAL output
With these settings the dual head card sends the output signal to the TV. To adjust the screen resolution you can use the fbset tool.
fbset -fb /dev/fb0 -xres 800 -yres 600
Now you get the TV PAL signal correctly generated and driven by the Linux kernel. As you can see, getting this card to work is not a trivial task and this is a common problem with Linux.
The tuning card
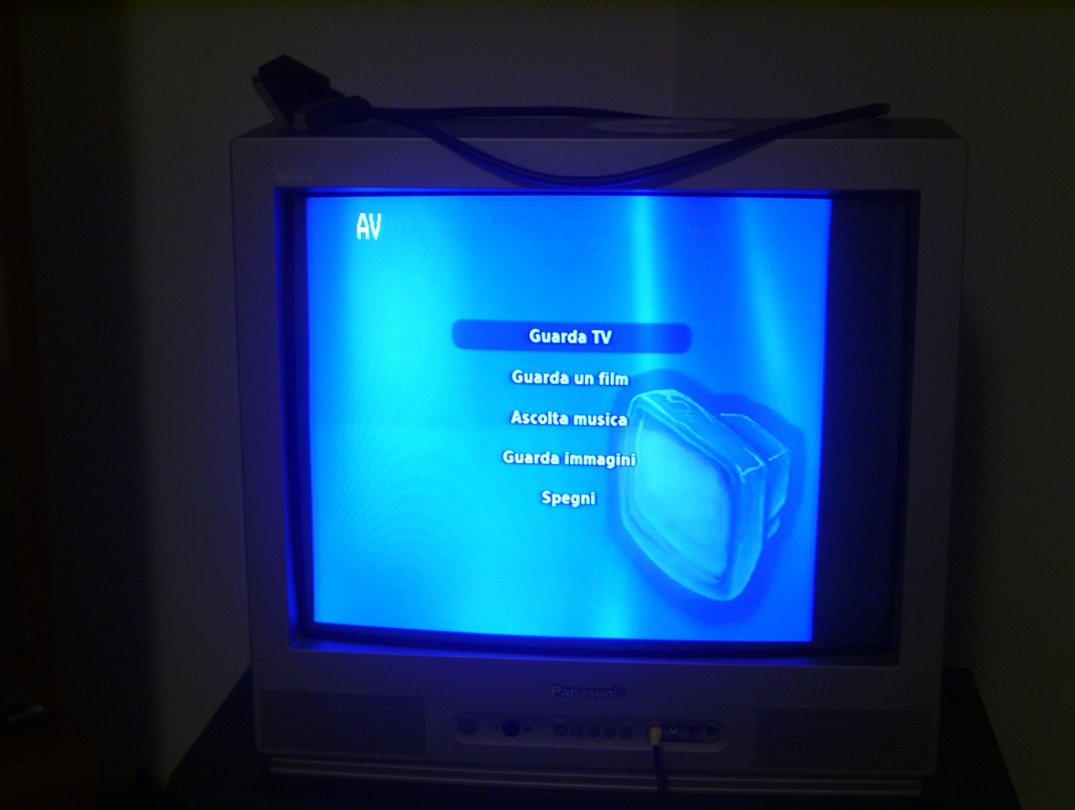
The tuning card is the component which receives the TV radio signal from the aerial and makes audio/video available to the system. Tuning cards with BT878/BT848 chipset are well supported—keep this in mind if you have to buy a card. A great site to visit if you want to know more about Linux and TV is linuxtv [1]. In this site you can also find a large list of cards with BT878/BT848 chipset [2]. In my case, I’ve purchased (from eBay) an analogic TV board: Hauppauge WinTV Go. In Italy, analog terrestrial, digital terrestrial and digital satellite TVs are now available. Satellite TV broadcasters offer better TV shows, sport events and recent movies but they are quite expensive. The digital terrestial has not yet replaced the old analog system which still carries the main TV shows. Once you have plugged your tuning card into the system you can simply test it using tvtime (figure 1).

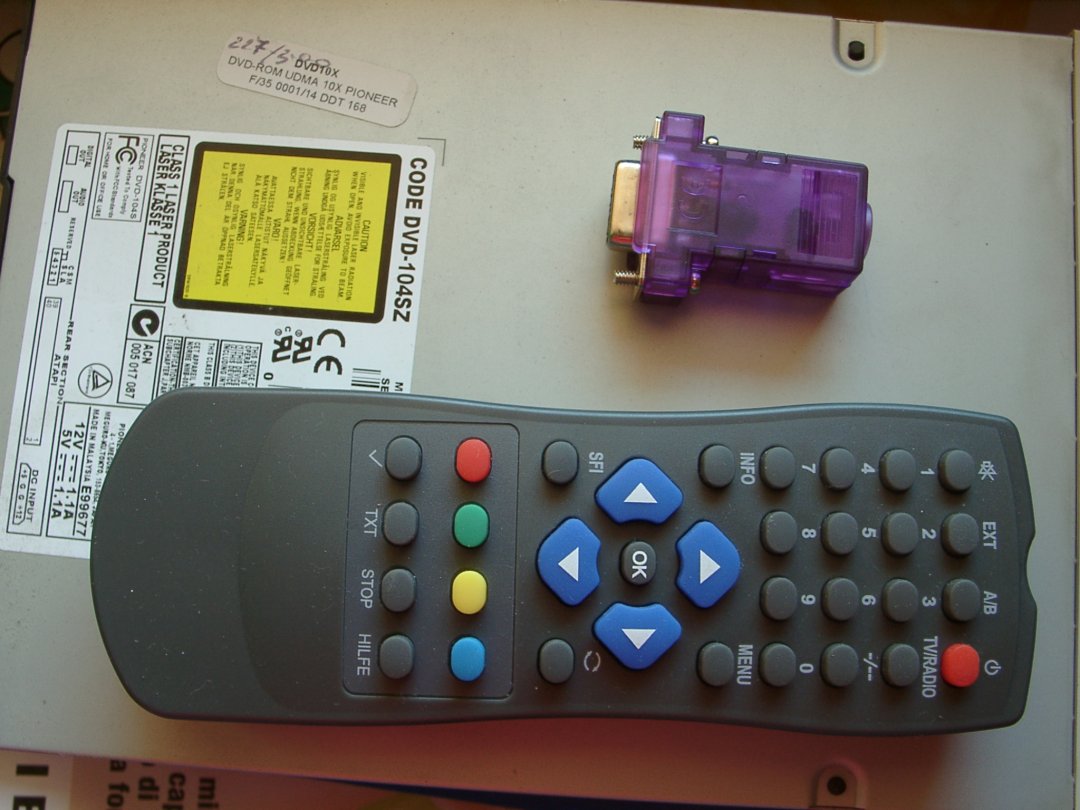
The remote control
You need a remote control for your media center. Although there are some solutions to control the system via bluetooth or wi-fi, I’m convinced that IR control is the best. So I’ve retrieved a Technisat remote bundled with a IR receiver to be plugged in the serial port (figure 2). To get an IR receiver like that you have two options: you can either build it yourself following the instructions available in several blogs, or you can buy a receiver already assembled. If you don’t have enough time to build your own homemade receiver, have a look here. To make your remote/receiver work with GNU/Linux you need to install the Lirc driver [3] which is packaged for the main distributions. In my installation I’ve installed:
lirc-lib-0.7.2-49.rhfc3.atlirc-devices-0.7.0-1.rhfc3.atlirc-0.7.2-49.rhfc3.atlirc-lib-devel-0.7.2-49.rhfc3.atlirc-kmdl-2.6.12-1.1378_FC3-0.7.2-49.rhfc3.at
Notice that lirc-kmdl-2.6.12-1.1378_FC3-0.7.2-49.rhfc3.at is good for my kernel because I have that exact version (2.6.12-1.1378). Once you have lirc installed you should find among your devices:
/dev/lirc
or maybe
/dev/lirc0
If the device is not listed in the /dev directory then there is a problem with the driver loading. To face this problem I typed:
modprobe lirc_serial
and I got resource busy. Googling back and forth I found that the command:
setserial /dev/ttyS0 uart none
was a good fix. Then by retyping:
modprobe lirc_serial
I’ve successfully created the device /dev/lirc0. At this stage I launched:
mode2 /dev/lirc0
and started to press the remote control buttons getting some printouts in the console:
pulse 871

space 839

pulse 848

space 840

pulse 848

space 839

pulse 848

space 90856

pulse 850

space 843

pulse 902

space 788
Bingo! My remote/receiver set was working. mode2 displays the features of the wave form received by lirc. If you prefer a graphical user interface you can use the xmode2 tool.
Freevo
Once you have the hardware working with GNU/Linux, you need a good front-end to control the media center. In the GNU/Linux world there are two options which differ mainly for the design choices and for the internal implementation: MythTV [4] and Freevo [5]. MythTV is a solid piece of software written in C++, while Freevo is a python wrapper which delegates a lot of work to external tools. For example, Freevo uses mencoder for TV recordings, xine for DVD playing, tvtime for watching and mame for videogaming. MythTV implements most of the media playing functionality itself and among its features it performs live TV time-shifting, allowing the user to skip commercials or to pause the show in case of phone ringing or roast burning. These two features would be enough for the average couch potato to choose MythTV. Nevertheless, Freevo is a very interesting and modular platform. This also allows beginner programmers to hack Freevo and to participate in the development. For these reasons, I decided to install Freevo.
Freevo and MythTV are the two main platforms for PVR (Personal Video Recording) under GNU/Linux
Freevo is packaged for mainstream distros and it is easy to install from sources too. The main dependencies are:
- python2.4
- pygame
- mmpython
- egenix
- twisted
- libexif
- tvtime
- mplayer
- xine
- pylirc
- lirc
- xmltv
- aumix
- lsdvd
Once installed and launched, Freevo shows a user interface with a very nice skin. From the menu you can activate the main functionalities like watching a video or setting a TV recording.
Freevo also provides a web server, which is very useful for browsing the disk, working on media files, or setting new TV recordings from a laptop connected to your domestic LAN. It is especially useful to work on the system while the TV screen is busy with a movie or a game. Having Freevo connected to the LAN also allows you to receive podcasts, webcasts, and allows maintenance and any futher adjustment via SSH.
TV recordings and XMLTV
One of the main components of Freevo is the recordserver. It runs in background and is based on mplayer/mencoder. In the file local_conf.py, you have to set a number of options for mencoder to effectively record your favorite shows. An example of mencoder settings is shown below:
VCR_CMD = ('/usr/bin/mencoder ' +

           'tv:// -tv driver=v4l2:input=0'+

           ':norm=PAL' +

           ':channels=%(channel)s' +

           ':chanlist=italy'    +

           ':width=320:height=240' +

           ':outfmt=yv12' +

           ':device=/dev/video0' +

           ':adevice=/dev/dsp' +

           ':audiorate=44100' +

           ':forceaudio:forcechan=1:' +

           ' -ovc lavc -lavcopts ' +

           'vcodec=mpeg4' +

           ':vbitrate=1500:' +

           'keyint=10 ' +

           '-oac copy ' +

           '-ffourcc divx ' +

           '-endpos %(seconds)s ' +

           '-o %(filename)s.avi ')
No commercial/closed solution can give you the power and control to add and remove features like a GNU/Linux based media center
The resolution of 320x240 is quite low. Nevertheless, the size of generated AVI files is quite big: about 1GB for less than one hour of TV show. The encoding may appear ineffective if you are used to encoding an entire movie in a single 700MB volume. But consider that, in this case, the encoding is performed on-the-fly while DVD to DivX/Xvid encoding is usually performed in two steps (and can therefore be much more efficient in terms of size).
In Freevo you can schedule a future show for recording in two ways: manually saving date, channel and duration of the TV show, or by using the XMLTV listings. The first option is clumsy and tedious to do with your remote control (it is a little better using the web interface), while the second is much more user-friendly.
XMLTV [6] is a toolset that grabs TV listings from the web and convert the information into a unified XML format. Grabbers are Perl modules which connect to various web sites (the data sources). XMLTV acts as an interface between the data sources and the applications. These are supposed to take the XML and present the listings through the most appropriate user interface.
Conclusion
I have successfully installed and integrated a podcast reader, a list of webtv, an email reader and the mame emulator
Building a media center from scratch is a fun activity. In my box, I have successfully installed and integrated a podcast reader, a list of webtv that are browsed exactly like other media, an email reader and the mame emulator.
It was an enjoyable exercise of design, practice and hacking. But, I won’t venture to say that it’s easy and inexpensive, because, even if you save money reusing some old computer components, you spend a lot of time reading docs and trying to get everything working. Moreover, the results I got were not at the same level as with an off-the-shelf media player. For instance, my G400 lacks some brightness, the screen resolution is not optimal, and every now and then the system crashes. Another negative remark is that my Freevo box is based on a common PC architecture; thus, the power consumption, the cooling system and boot time are affected. All these issues can be successfully addressed by buying fanless hardware specifically designed for multimedia computers (like Via EPIA motherboards, which come with native mpeg2/4 coding).
The positive aspect is about features: no commercial/closed solution can give you the power and control to add and remove features like a GNU/Linux based media center. Furthermore, all of the above problems can be solved by further hacking the system or upgrading the hardware. And they have not prevented my family from being happily entertained through the use our home-made Freevo box.