In Part One and Part Two of this blog, I looked at Beagle and its alternative interfaces (Peagle, Yabi and Peagle). In this last part, I want to take a look at three other search engines as viable replacements for Beagle: Tracker, Recoll, Strigi, and Deskbar, an applet written in Python, which has some very handy scripts written for it and, which can extend its functionality well beyond the immediate desktop itself.
Tracker: sluething, hard on the heels of Beagle
In Part One, Beagle was under the microscope. Two main criticisms could be levelled at it: memory hogging and being Mono/Net-based and, therefore, tapping into the evil MS/Novell empire. Tracker, by contrast, can boast no such incriminating baggage.
Strictly speaking, the proper name is Metatracker but it is more popularly known as Tracker, so I’ll stick with that from here on in. The official homepage is no shrinking violet. It makes many claims for itself; not least that it indexes “at ludicrous speed”. It not only finds files by name and location but searches file content and metadata. Tracker is written in C and is stable with not too many dependencies: sqlite, libdbus, dbus-glib bindings, glib, Zlib and GMime. Like Beagle, Tracker can utilise inotify but it is disabled by default and as I described it in Part One you can enable it in /etc/fstab/ if you wish. Where Beagle uses Lucene as the search backend, Tracker has Sqlite3, which supports databases up to 2 tebibytes. So that should keep all desktop users happy for the forseeable future as well as most system administrators! Tracker claims to be positively anorexic when it comes to memory usage: typical RAM usage is cited as between three and nine megabytes which may be a boon for anyone who runs a system with low memory.
So, what can Tracker index? Currently, support is available for the following formats: videos, images, music, files, documents, texts and development files. It is planned to add support for other formats too, including e-mails, contacts, applications, bookmarks and history amongst others. There is a very nice table of supported formats as well as a list of those to come. This is not as extensive as Beagle (yet) but, as with many things in life, Tracker has compensating virtues. As with most things GNU/Linux, depending on your personal preferences and machine specs, Tracker can be run from either the command line or the GUI—or a combination of both—which gives you the best of both worlds. Tracker may be a GNOME project but it will run on KDE too if that is your preferred desktop environment. If you find it a bit slow to load in contrast to a GNOME desktop you can always load up a small GNOME application and minimise it to the taskbar. This is true for others application too if you are running a KDE app. on GNOME or vica versa.
Where can I get Tracker?
Whatever version of GNU/Linux you’re running, check the software repositories first to see what’s available. Third-party deb or rpm binaries may be on offer elsewhere; but, if there are dependencies the package manager should, all other things being equal, pull them all in. I installed it from the Fedora Core 6 repositories and it ran without complaint; but, on my current version of Mepis, synaptic drew a blank. I resorted to stand-alone Debian packages but ran into dependency problems. Serves me right for not keeping my package manager up to date!
If your package manager fails you (however up to date it is), and if installing from source is not to your taste or skills, then the kind people at Tracker have provided binaries. Under the “Getting Started” section you will see that binary packages are indicated for various versions: Debian(!) in Sid, Ubuntu’s Fiesty and Dapper, Gentoo in Portage, Fedora Core5 and 6 (in extras) and the just released Fedora 7 has Tracker binaries too. Mandriva users (including me) are not left out either as Tracker is included in the contrib section of Cooker (the development distro).
Tracker—the GUI and the Command Line
At last we are down to the nitty gritty. To start Tracker on the command line and get it to start indexing simply type (as normal user): trackerd, which will start the daemon. But, if you prefer to begin on the GUI, it will be done for you automatically. If all has been installed properly you can either start this process from the main menu or from a desktop icon if you have set one up. For command-line affecionados tracker-search-tool will do the trick.
The one glaring omission you notice when you first run the Tracker GUI is the lack of any advanced configuration so you will have to delve into the command line again if you want to add any directories other than the home directory, which are id indexed by default. Navigate to ~/.Tracker/tracker.cfg in your favourite editor and list all the directories that you want to index or exclude in the WatchDirectoryRoots field, separated by a semicolon. Once you have started Tracker you can open a terminal and type tail -f ~/.Tracker/tracker.log if you want to view its progress. There are other command line options, but I do not believe that the average desktop user would need them. However, if you really want to exercise fine, granular control, look at the documentation on the website.
Just as Beagle works with many applications, Tracker integrates with the following apps: Catfish, Affinity, Deskbar (and, as Deskbar is written in Python you can download Python scripts for it, including one for Tracker—see the section “Python Scripts for Deskbar”), Daze (like Tomboy but less powerful), Kio-find and Nautilus. Nautilus is particularly interesting: it does not integrate out of the box but if you are compiling it from source it is possible to add configuration for it and there is even a Nautilus-enabled Debian package for it. But, if you install it, you will remove beagle support in Nautilus. If you decide to install it, you will also have to restart Nautilus with Alt + F2 and type nautilus -q. That’s it you are good to go. All you need to do now is to open Nautilus and click on the “search for files” button, type in your search term and view your results.
The main screen for Tracker is relatively uncluttered (due to, as I said earlier, a lack of an advanced graphical configuration option). You can start experimenting with search terms and, as you will see from the screenshots below, Tracker produces some impressive results from some simple search terms. In all of these searches, I found Tracker fast (faster than Beagle) and stable—I could not fault it for stability—and when used in conjunction with the Catfish interface some added value features were available.
Doubtless, someone, somewhere, is presently tearing out their hair trying to get it to work on some other GNU/Linux build and failing, due to internal bugs or dependency problems. I sympathise. As with all reviews and howtos it is always wise to add the caveat: it worked for me, but your mileage may vary. If it isn’t working for you, rest assured that I’m not indulging in schadenfreude. My last section—“Captains Log: Supplemental”—will be a heart-rending and cautionary tale that most readers will recognize from their own experiences. That said, I am running Tracker on Fedora Core 6, Ubuntu Dapper and Mandriva 2006 in 2-3 year-old laptops in the 1.3 to 1.6GHz processor range with 384 to 769MB of memory and the speed of Tracker is good. It would be interesting to know if anyone has experimented with the lowest processor speed/memory combination which will still run this search tool at acceptable speeds.
Screenshots of Tracker searching
Recoll: the name says it all
Despite the name this has no connection to the Philip K. Dick story “We can Remember it for you Wholesale” which you might know better as the film adaptation, “Total Recall”. You won’t be able to surf the mountains of Mars but Recoll will allow you to er, ahem... surf for files on your computer.
Depending on the version of GNU/linux you are using, you may be lucky and discover Recoll in the repositories. But, if your search turns up a blank, there is no need to despair. The good people at Recoll have kindly provided a number of precompiled binaries for the following versions: Fedora Core (5 and 6), Mandriva 2006, SUSE 10.1, Ubuntu (Dapper, Edgy, Fiesty), Debian unstable and 3.1, ports in FreeBSD and some binary bundles for FreeBSD 5.5 and Solaris 8 (sparc). There is no list of extravagant dependencies, only a requirement for Qt 3.3 or Qt 3.4, which, if you are installing from source, can be appended to configure as -enable-qt4 in order to build with qt4. If you distro is still left out in the cold (and you have an aversion to source code), you could, as a last throw of the dice, fire up Alien on the command line and download a Debian or RPM package and convert it to work with your build. As ever, mileage may vary. Good luck. The good news for Micronovell/Mono haters is that Recoll is not dependent on Mono and uses the GPLed Xapian search engine.
As you would expect from any self-respecting search engine, it has good support for the usual range of documents and file types: HTML, OpenOffice.org, emails (Thunderbird and Evolution). PDFs, Word, Excel only require that the appropriate “external helpers” be installed and the Recoll website will give you a list of these. They can of course be installed via your package manager. Recoll also supports some advanced features: multiple, selectable databases, stemming (not run at point of query but at the indexing stage), realtime indexing, index runnable via Cron.
Getting Recoll up and running
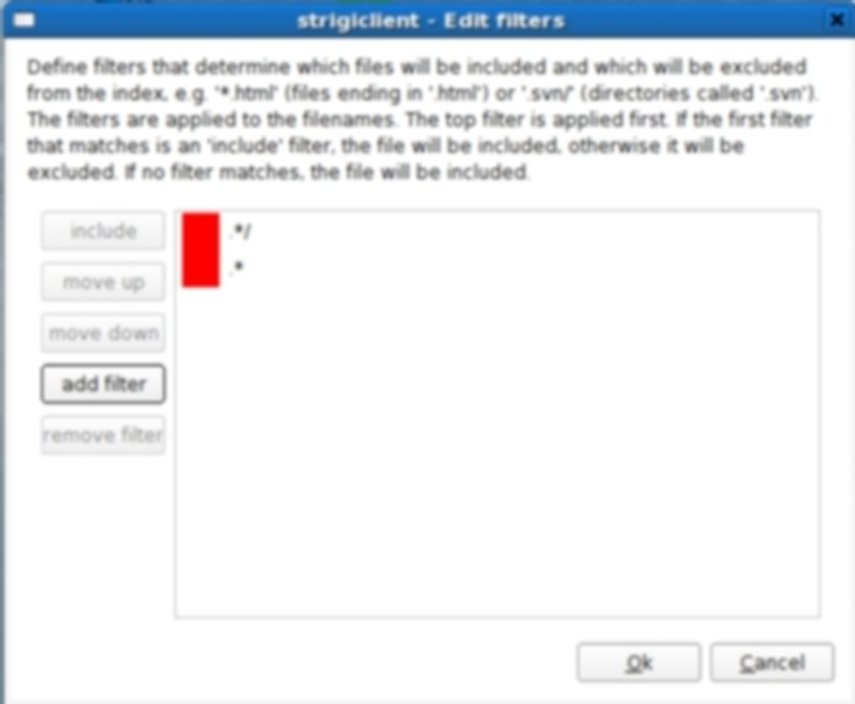
After you have installed Recoll you will obviously want to fire it up straight away. When you do, Recoll will prompt you for a default configuration and for the average desktop user just accepting the defaults should be adequate. If they are not, then the bad news is the Recoll does not have a configuration tool available from within the GUI. For that you will have to edit the configuration files manually—although the user manual indicates the possibility of a GUI configuration tool in the future. In the meantime, see section 4.4 of the User Manual for precise details if you wish to add, amend or delete directories from the indexing process. Your home directory is indexed by default and that is usually good to go for most users in a desktop setup. If you are running a server you might want to think about excluding any directories containing confidential data and the good news is that Recoll is security savvy. It will automatically set user permissions to 0700 to ensure that only the user has access.
Fine-tuning Recoll
Accepting the prompted defaults will create a default index of the home directory. If for some reason an index is not created fire up a terminal and type recollindex. If Recoll is taking a long time to complete indexing and you experience any significant slowdown or indications of memory/processor resource hogging you can interrupt indexing by issusing Ctrl + Z. This not recommended but if you must interrupt, Recoll can be resumed once you have deleted the database in .recoll/xapiandb to avoid leaving the index in a bad. corrupted or inconsistent state. Better still, run Recoll with the recollindex -z option. This will reset the database before indexing and avoid the pitfalls of editing configuration files with piggy-fingering errors. Another way to avoid hassle is to set up the Recoll index as a Cron job at a time of your choosing and convenience when you know system resources will be free from heavy load. If for any reason you miss a scheduled job, Anacron will compensate for missed jobs when your machine is back up. Another command line option is to run realtime indexing by issuing the command recollindex -m which starts a daemon running in the background that will monitor any changes you have made to files and updating the index. For more detailed information, see section 2.5 of the User Manual.
An alternative to these strategies for reducing system load when running indexing is to utilise Recoll’s clever feature: multiple databases. This feature will allow you to set up different configuration directories that can index various parts of your file system. Once you have set it all up, you can run an index on a specific area with the recoll or recollindex command and appending the -c option. Setting up the configuration for multiple databases can be done by manually by editing the relevant configuration file(s) or through the user interface, via the External indexes tab, which can be located under Preferences. Either way, Section 3.8 of the User Manual will provide all the information you will need to enable this handy feature.
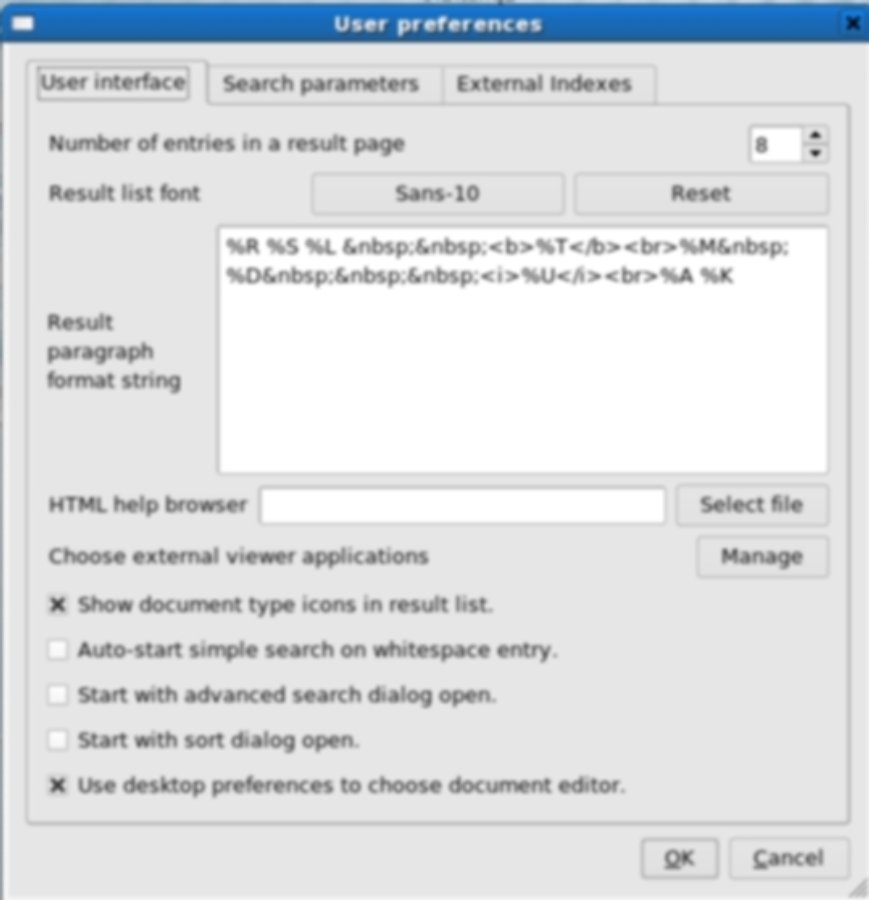
Recoll’s search features
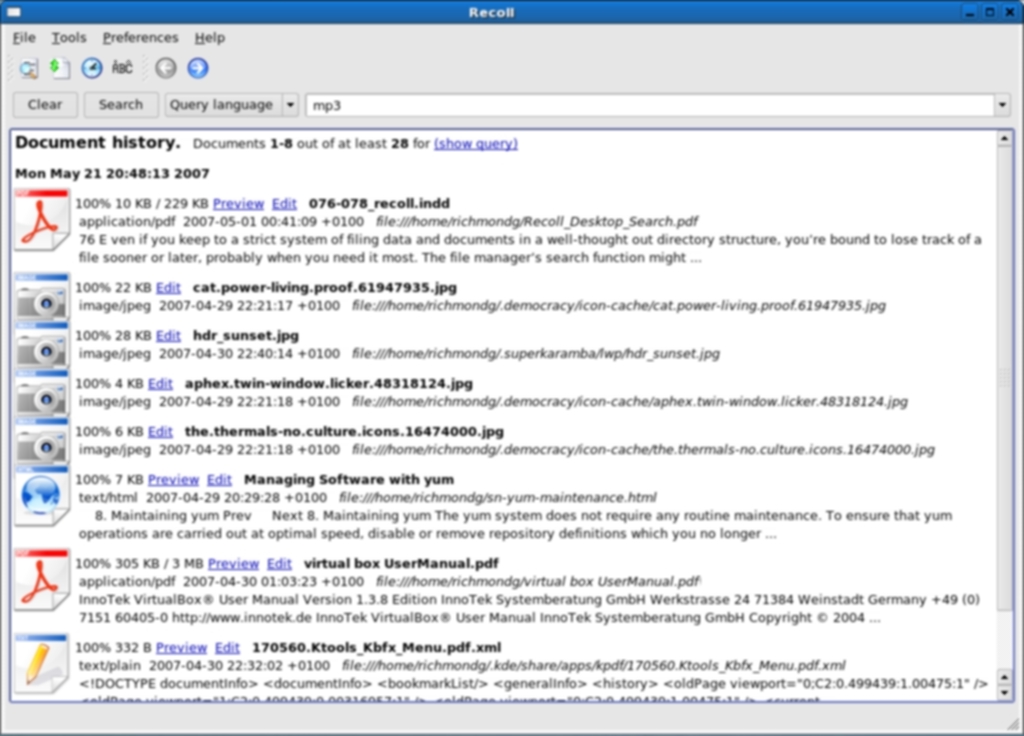
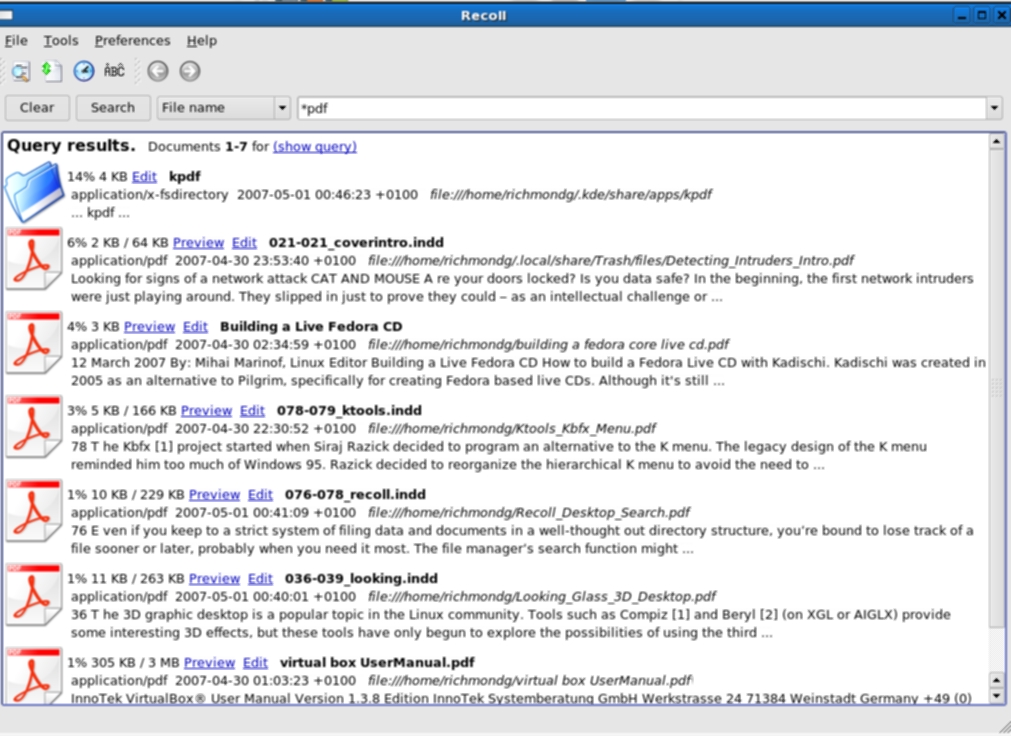
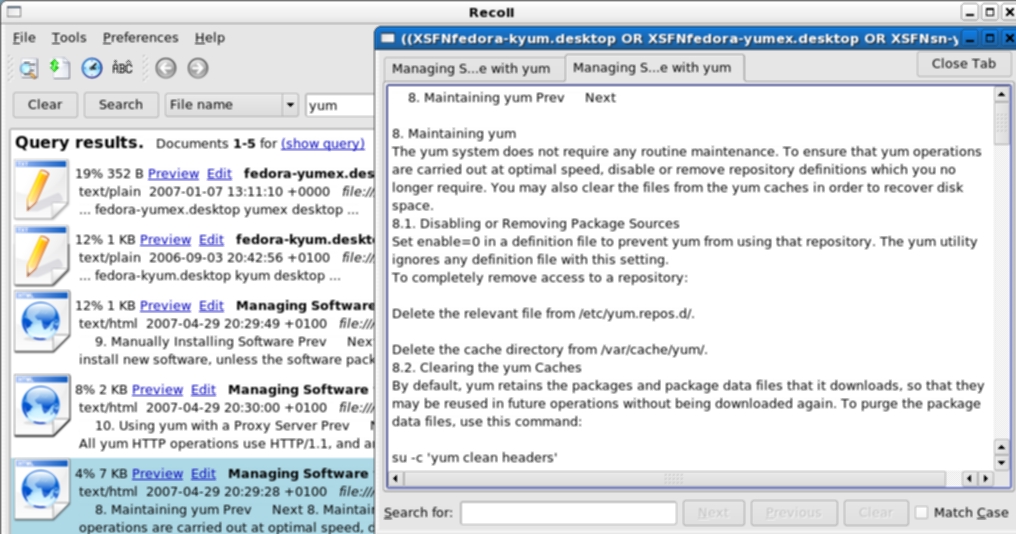
Once you have set up Recoll to your specifications you will want to run a search and Recoll has a plethora of search features. You can do simple searches, file name searches, wildcard searches, boolean searches to construct more complex searches, advanced searches to narrow the field to specific file types or even directories. Whatever search parameters you construct and use, Recoll will present you with a familiar results screen: the main features are Preview and Edit. The former does just what it says on the tin and the latter will open the search query item in a contextual external viewer (which can be set either by editing the User Preferences dialogue or editing the mimeview config file). In some ways, Recoll is perhaps more powerful than it needs to be—the search configurations are legion. This may suit the power user who requires very special features, but sometimes too much power under the accelerator pedal can cause crashes. The best way to familiarise yourself with all the search options is to simply experiment with Recoll in conjunction with a close reading of the User Manual.
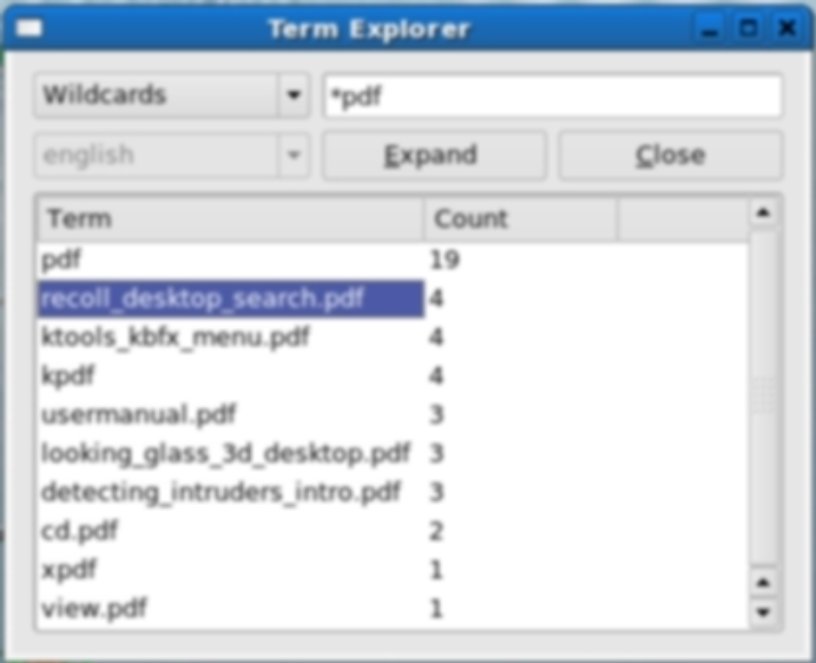
However, before we leave search features there is one other item worth mentioning: Term Explorer. It has nothing to do with Internet Explorer (ugh!) and it’s not a guide for stressed parents planning their child’s term-time activities. It is a feature that enables the user to find things when the exact search terms are not known or of dubious spelling. It supports a number of operations: stem expansion, wildcards, regular expressions and spelling/phonetics—enough to give all the search options you could wish for. Just click on the Term Explorer icon or select it from the Tools drop-down menu and you’re ready to start... exploring.
Screenshots of Recoll in action
Strigi: strictly for the owls?
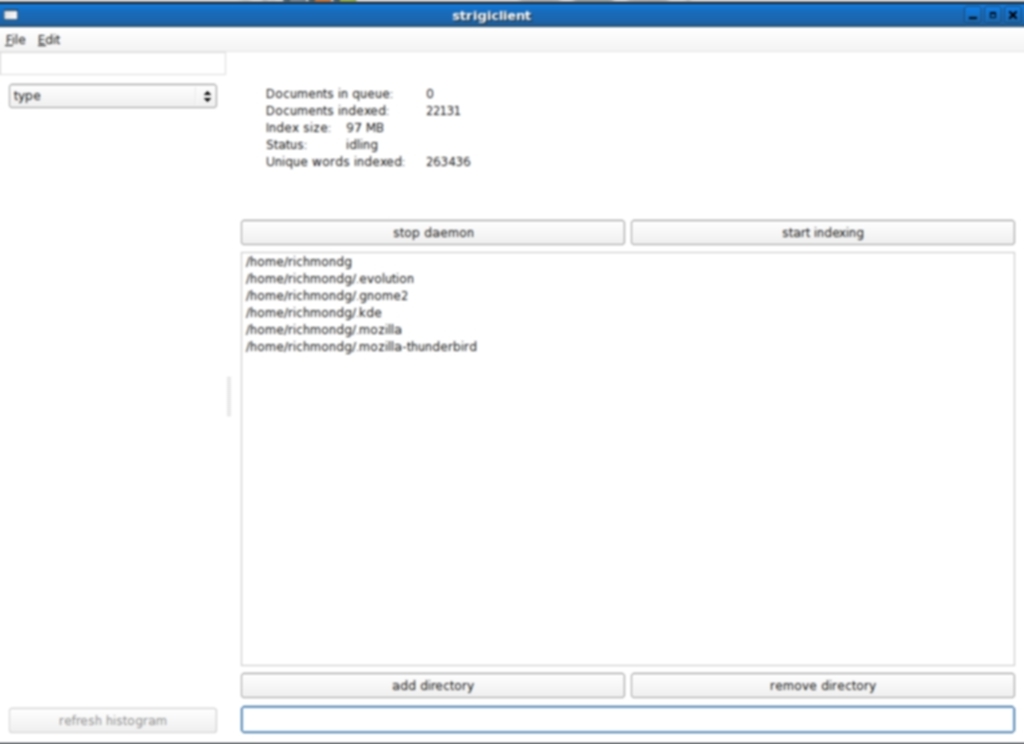
I was going to add Strigi as something of an afterthought as it is slated to be a replacement for Tenor in KDE4 but no sooner had I put pen to paper than I discovered it in the Fedora Core 6 repositories. After an easy troublefree install it was up and running.
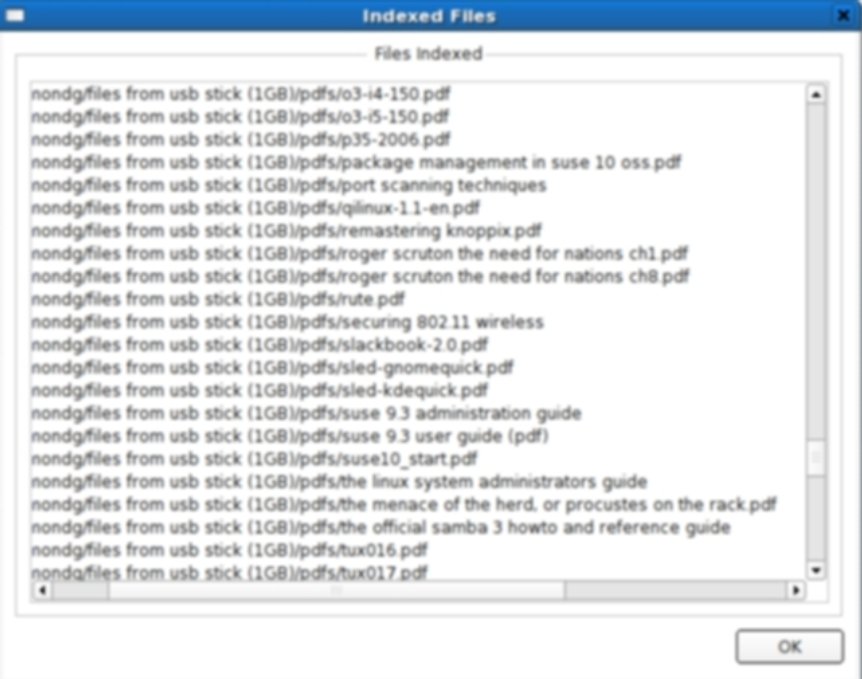
You can see the thinking behind search engine titles like Beagle, Tracker and Recoll—but Strigi? A quick visit to Wikipedia appeared to solve the mystery. It is short for strigiformes of which Owls are an order. That explains why on a few PDFs on Strigi that I searched there was a picture of an Owl. My classical education was somewhat deficient in my earlier years but even I can remember that the Owl was the symbol for Athens and it was stamped on their coinage. It was associated with wisdom, although I still quite can’t see the exact connection with a search engine. Still, it’s the engine that counts. What’s in a name as Mr. Shakespeare said?
On its homepage the claim is made that it is the fastest and smallest desktop searching program, a search engine that can index a hard drive without “hammering your system” and which supports many filetypes: Debian and RPM packages, PDFs, MP3s, plain text, archive files and OASIS spreadsheets, presentations and test files whilst having a small memory footprint.
The backends of choice are clucene (which was covered earlier) and hyperestraier. It is hoped to add Sqlite3 and Xapian in the future. (Hyperestraier is released under the LGPL.) One of the most interesting features of Strigi is that it provides replacements for find and grep by way of deepfind and deepgrep respectively, which allow for searching inside files in the same way as the Strigi daemon.
Strigi integration
Konqueror is the crown jewels of KDE and it is packed to the rafters with features (the term “feature bloat” might almost have been invented to describe it). One of the best is kio-slaves which enables functionality from Konqueror’s location bar. Strigi has this functionality too. Once you have the client running and the daemon started you can pass strigi:/ to the location/address bar. As an alternative you can integrate Strigi into KBFX. KBFX is an alternative to the classical K-Menu. I have it installed on Mepis and Fedora Core 6 (running Strigi). If you are installing the latest binary of KBFX (KBFX Silk 0.4.9.3.1) then you are in luck. It has built-in support for Strigi. If not, you can install from source and enable strigi functionality by simply appending --strigi or -s option to build.sh (./build.sh --strigi). Alas, my versions of both apps. were simple binary installs but I am wondering if I can use the Debian post-install command dpkg -reconfigure to get round that? In the meantime, if you want to see a demo of Strigi/KBFX in action you can view a flash demo here Strigi also has a GNOME Deskbar handler and I look at in the next section on Deskbar.
Jstreams?
Strigi’s most distinctive feature, indeed, its unique feature, is that, unlike all the other desktop search engines, it does not index files. It uses Jstreams. Such was/is my ignorance that until I wrote this article I had not even heard of Jstreams, let alone know what they were. Here is the best definition I was able to find: “a C++ ‘transportation’ of Java InputStream childs”. Hmmm... I’m not much wiser but that’s what the man said it was. Or, as the Google summer of code expresses it: “Strigi combines stream-based content analysis with an abstract index interface”. Jstream’s main claim to fame seems to be that it permits deeply nested files to be read consistent with low memory and processor overhead. If hardcore detail is your thing then you might care to go here and here for details and some pleasant presentation. Jstreams claims to be flexible (supporting new file types), fast and easy to use. Also, Jstreams integrates well into KDE3 (and will be in KDE4) and uses the Jstreams KIOslave.
Strigi Screenshots
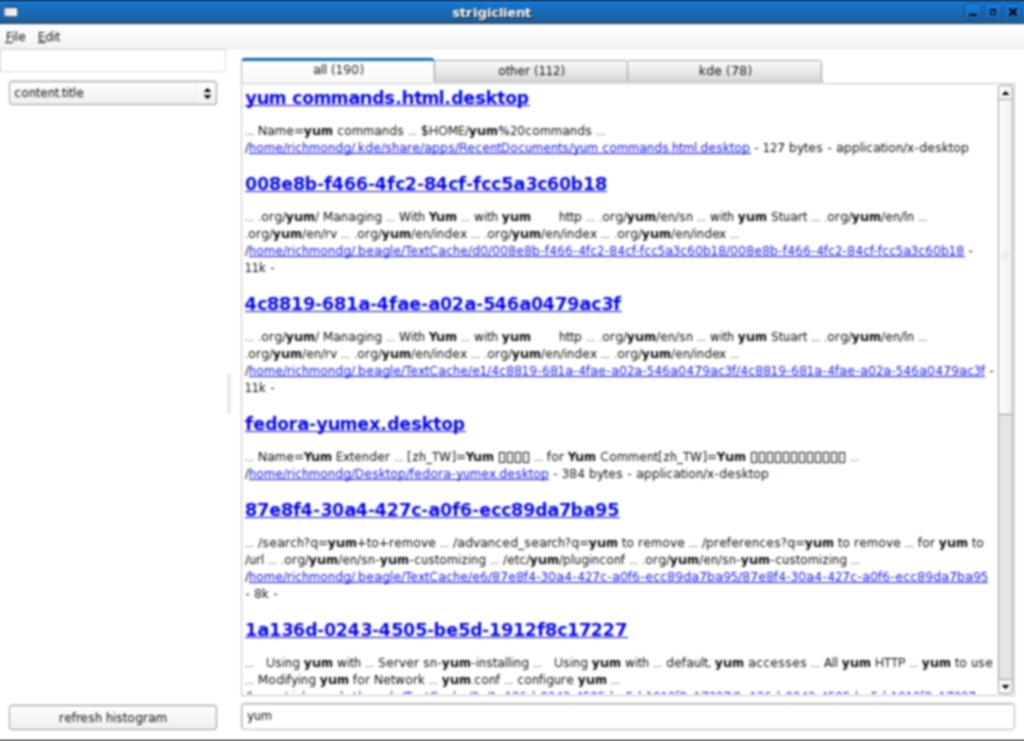
You Choose: Beagle, Tracker, Recoll or Strigi?
Your choice of desktop search tools will depend on a number of factors: what your hardware can run well, availability of binaries for your distro, the desktop(s) you are running, how detailed your search requirements, the range of file types you wish to index and the external applications that you want to use to pursue your search results. Everyone will have their needs and preferences and sometimes it can become a subjective decision not based entirely on objective benchmarking.
If you wish to make your choice a very scientific one based on specific criteria you can do no better than to point your browser to a brilliant and detailed comparison of indexers. There is a wealth of comparative detail there and the two testers have compiled a fantastic amount of information and links. Don’t miss it.
My own preference is for Tracker, but I cannot quite give you chapter and verse as to why. It just feels right for me. It’s very stable, looks good and integrates well into other applications. Beagle is sometimes buggy and seems to be a bit of a resource hog as well as carries the stigma of Mono. Recoll is better in some respects than Beagle, has a smaller footprint and produces good results. Strigi? Well, I think that the jury is still out. It is a relative newcomer and its enormous power requires considerable configuration to exploit it to the full—but if you are a power user then you will be in hog heaven.
Of course, you do not have to restrict yourself to these graphical search tools. GNU/Linux comes bundled with command line tools to do certain search jobs for you: locate, find and grep. If you experience feelings of nausea if you even go near the command line but you you would like to hone your search skills and ease yourself into the arcane mysteries of regular expressions then you can always opt for SearchMonkey Not only will it provide you with an easy way in to those command line tools, it will also provide you with the opportunity to master regular expressions via user-friendly wizards. Well worth a punt.
Deskbar: from searching on the desktop to searching from the desktop
Most users will be familiar with the Deskbar Applet in GNOME. I must admit that I did not use it much, if at all. However, when I was researching this article (yes, that line again... sorry) I suddenly began to see the possibilities when combined with existing and emerging search engines.
Unlike the search tools above, Deskbar can not only locate files, applications and folders on your desktop but it can also search the web. What is really interesting is the way that it can integrate with Beagle, Doodle, Tracker, and Strigi. But, not only that, Deskbar is written in Python and many plugins have subsequently been written for it, and it is these that are worth looking at.
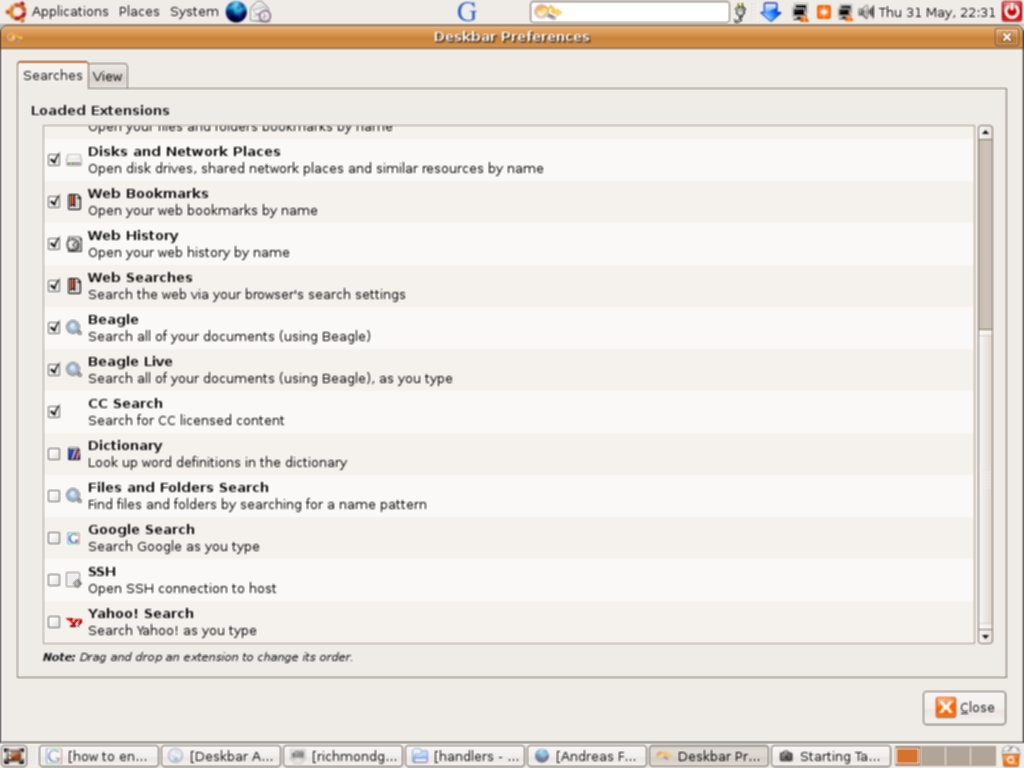
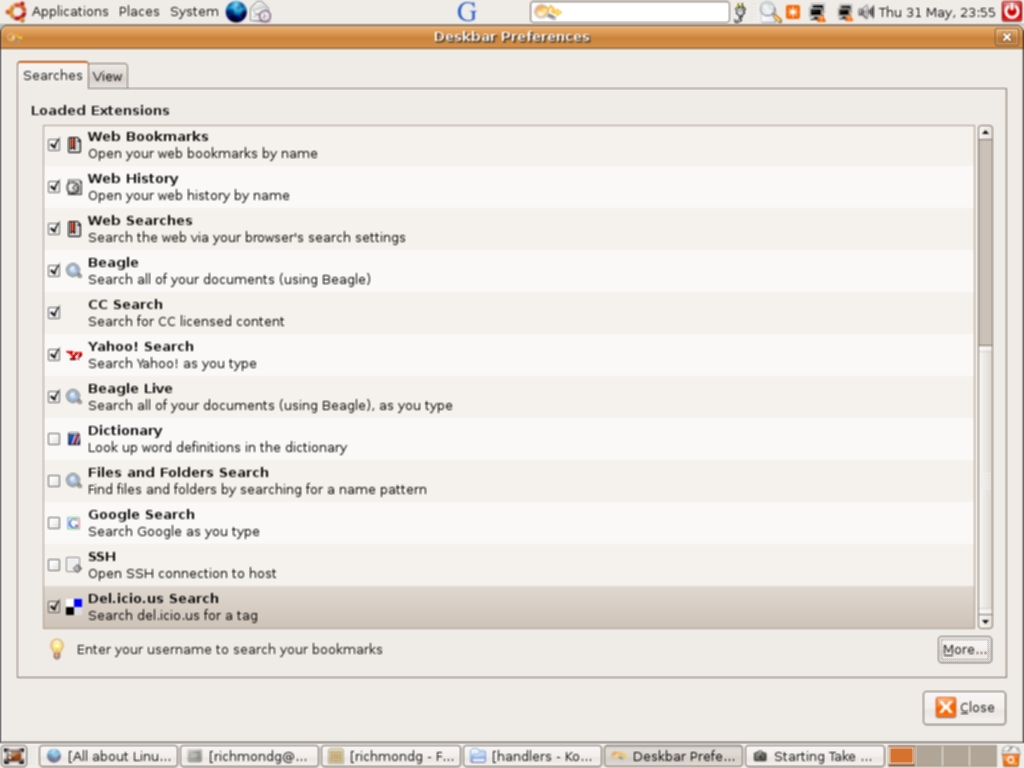
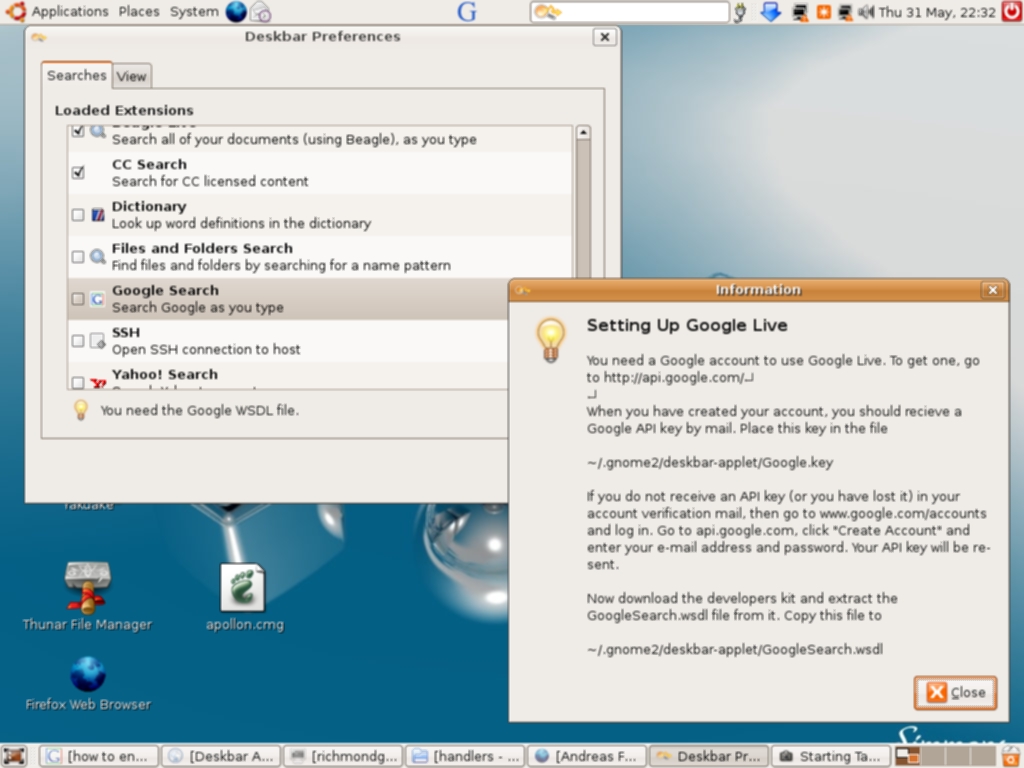
Deskbar is probably installed on your GNOME desktop. If not, have the usual recourse to your software repositories (packages are available for Ubuntu, Debian, Fedora Core, Mandriva, Gentoo e-build and Arch) and if that fails then you can find RPMs here. Source lovers can grab versions here. The latest version of Deskbar (2.19) supports drag and drop, so when you have written or downloaded a Python script for it you can simply drag it onto Deskbar. I tried this out on Fedora Core 6 and the results were patchy. Several scripts installed without complaining as can be seen from the screenshots below but some just wouldn’t play nicely. The error message indicated that the default security policies of SeLinux treated them as security hazards. I was tempted to disable SeLinux in the configuration script but thought better of it. Sometimes you just have to resist the gadarene rush to install the latest goodies regardless of the security risks (as I failed to remember later).
Normally, the Deskbar applet will be visible on the GNOME panel. If not, right click on it and choose “add to panel”. A dialogue will open and you can add it the panel. As you add or delete scripts you may need to close Deskbar down and then restart it. Incidentally, if you wish to try Deskbar without actually installing, say, for test purposes, then open a terminal and type /usr/lib/deskbar-applet/deskbar-applet -w and you will see how it works.
Third-party Python plugins
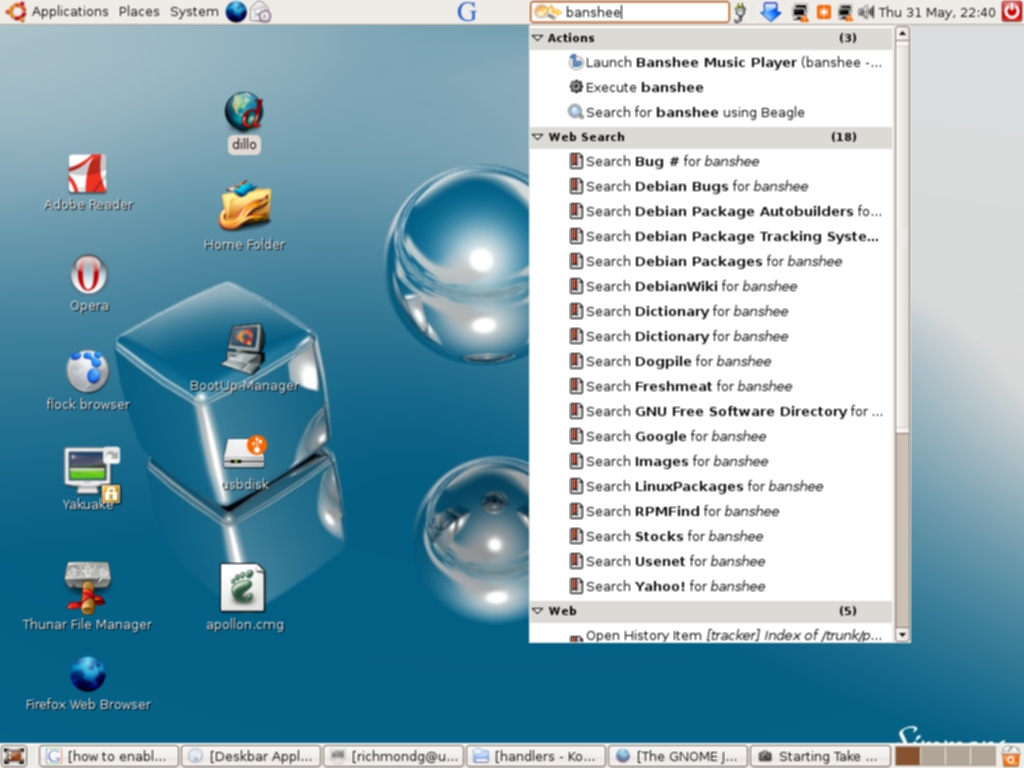
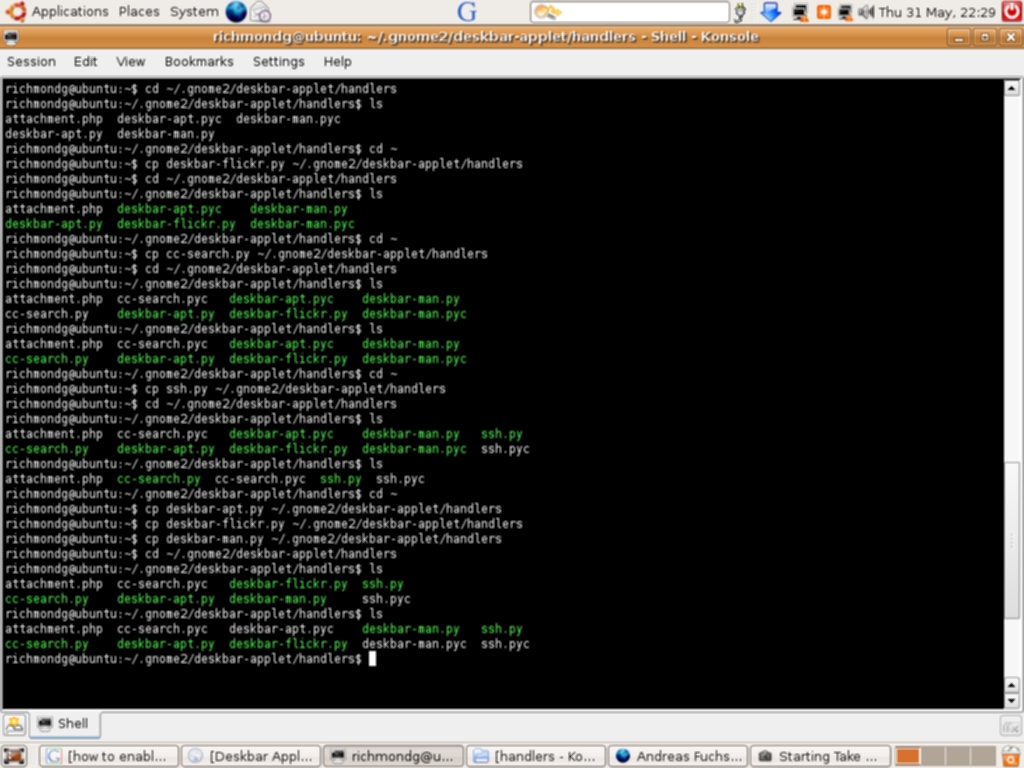
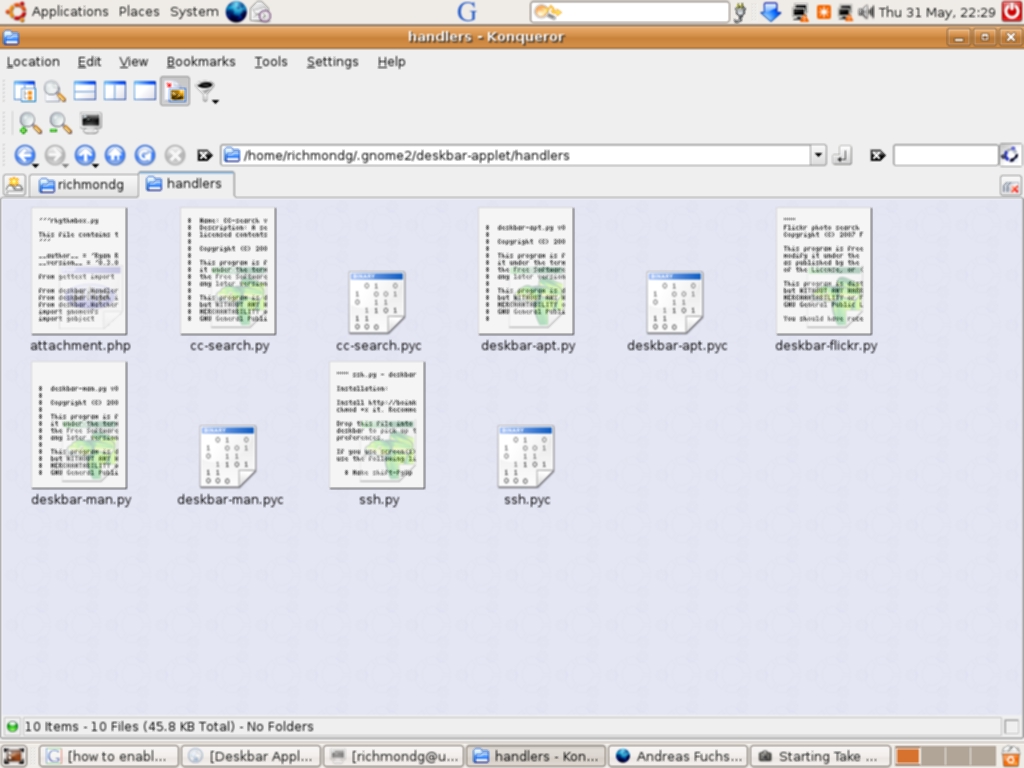
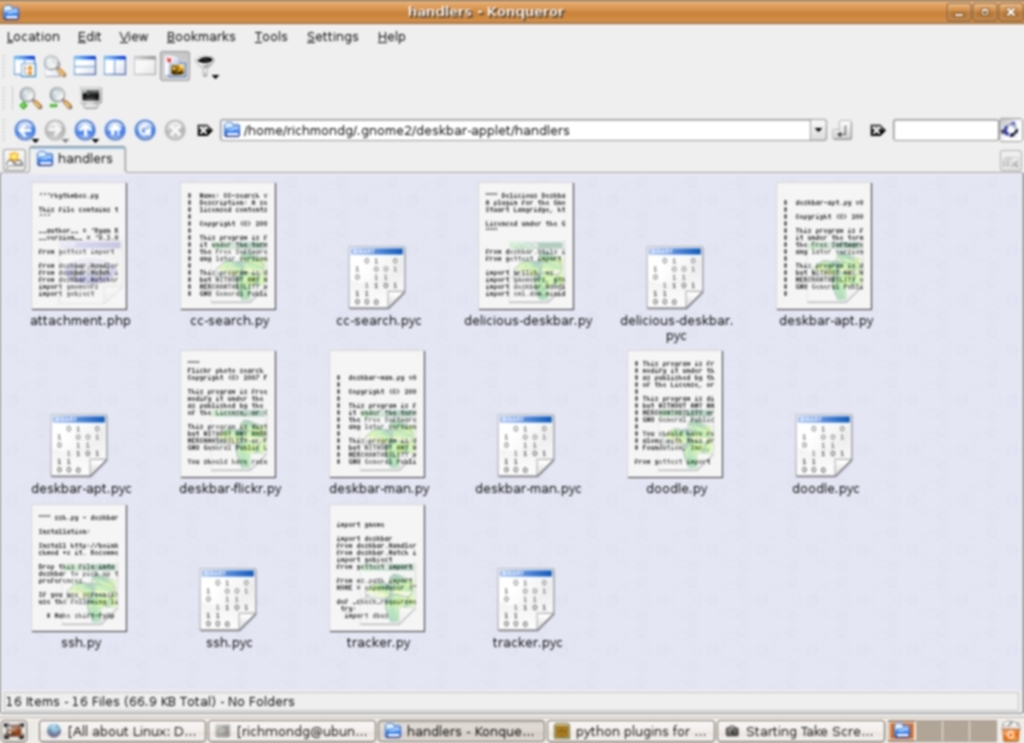
Deskbar is dynamic: it matches as you type (including history). You can even execute a command and see its output by using the keyboard shortcut Alt + T and this will capture the output of the command to a window. Preferences permit you select which search engines you wish to enable and Python scripts are available to install them. This is one of the best features of Deskbar—it is highly extensible. Installation of third-party scripts is easy: download the required extension and copy it to ~/.gnome2/deskbar-applet/handlers/. You can view an excellent guide here—there are Python scripts for GMail, Tracker, Doodle, Manpage lookup (using Yelp), Creative Commons Search, Apt-quick install (security implications), HostLookup, Firefox history, a plugin for Flickr, del.icio.us search plugin, a plugin for ssh and many others. Support is planned for Gaim contacts and Thunderbird addressbook.
Deskbar and New Stuff Manager
Although you can easily install third-party Python scripts for Deskbar, you are probably thinking, like me, that it would be nice if an automatic installer/updater was available that took out all the manual drudgery of searching, downloading and installing by hand. Well, there is but my own experience of this was a lesson in the sometimes maddening experience that can be GNU/Linux. New Stuff Manager is the tool for the job and you can download source versions and Debian binaries at the official homepage. As I wanted to try it out on Fedora Core 6 and only Debian binaries were on offer, I decided to convert with Alien (and I had to install that first too) and try my luck but it was out. Source install fared no better and although I got progressively further with dependencies I eventually hit a brick wall that even a copy and paste to Google couldn’t solve. So, instead of including my own screenshots I can only direct you to some mouthwatering ones courtesy of this blog. You will see an excellent GUI for managing plugins, updates and new extensions for Deskbar. I am determined to install it on Ubuntu once I have upgraded to Fiesty Fawn. It’s too good to miss.
Screenshots of Deskbar in Action
Admittedly, I have strayed off the script (no pun intended) as my original remit was to look at the runners and riders in the desktop search tools stakes and included a tool like Deskbar, which adds excellent functionality to any GNU/Linux box, but wanders out into the wider world of the internet. All the same, I think the inclusion well worthwhile.
Captain’s log: supplemental
This brief tour through the options for searching on the desktop in GNU/Linux reveals both its strengths and weaknesses (and mine). I have always been prone to the siren lure of feature bloat in applications and sometimes it gets the better of my oft-intoned mantra: security and stability. For me feature bloat is the coloured beads and glass left on the beach when Captain Cook plants the flag whilst the unsuspecting natives aren’t looking. I fall for it every time! Viz. New Stuff Manager I had visions of strutting down GNU/Linux street like a leary Mancunian Oasis fan but, instead, I ended up eating double portions of humble pie.
By the time I had finished, I had not only failed to install New Stuff Manager but had upgraded Mono in an effort to solve dependencies and in the process disabled the Beagle daemon—and it was still not installed. Poetic justice and serves me right for running a Micronovell product. At times like this you have to resist the temptation to drag GNU/Linux up an alleyway and give it a bloody good kicking—but it is a Janus-faced beast and if you are down in the dumps one week, the very next you are in hog heaven because you have bragging rights for that problematical wireless card you just installed via the command line using Ndiswrapper—and you always learn something in the process which makes things easier the next time round. So, I won’t be going back to Windows anytime soon. I’m not a dangerous thrills seeker—I’d sooner go play hopscotch in a minefield wearing magnetic boots.