Processing digital images is a very common task today. Image processing tools are so common that users often process images by trial and error, without really knowing what they are doing. One of the operations people fail most commonly is resizing an image.
In this article I will explain how to resize images. This is a way for me to celebrate 10 years since I started studying digital image processing!
Fundamentals
There are plenty of digital image formats out there. Each of them provide common or unique features. The most common formats, such as TIFF (Tagged Image File Format), JPEG (Joint Photographic Experts Group), PNG (Portable Network Graphics), are defined raster formats, as they represent the image as a matrix. Each matrix entry is called a pixel (picture element) and represents a color (also called light frequency). These images are commonly known as intensity images.
There are other types of raster images, such as:
- range images, where colors represent the distance between the object and the sensor (usually white pixels represent surfaces that are nearer to the observer and black ones represent surfaces that are the furthest away);
- thermal images, where colors represent temperatures;
- acoustic images, where colors represent the acoustic reflectance.
You also have vector images, where the represented scene is not a matrix of pixels, but is instead described by formulas instead. Examples of such formats are SVG (Scalable Vector Graphics) and EPS (Encapsulated PostScript). They are usually used to store technical drawings, plots and camera-ready documents.
The resolution indicates how close each pixel is to the others
The advantage of a vector image over the raster is that it can be scaled (in or out) without loss of quality. However, vector images can’t efficiently store complex images such as photographs.
In this article I’ll focus on raster images, and I’ll explain how to resize them with the GIMP [1]. Keep in mind that you can usually open a vector image with the GIMP, which will rasterize the input image before showing it. You can also read more on image formats in [2].
Images, pixels, resolution
Open the GIMP and create a new image typing Ctrl + n (that means “hold the ‘Ctrl’ key and type ‘n’”) or by choosing New from the File menu. You’ll be given the window in figure 1.

You are asked to enter the image size; this information is expressed in pixels by default. A summary tells you that the image resolution is 72 dpi (or “dots per inch”—I’ll talk about this more in a moment). You can also edit the advanced features to change the resolution, and other information I won’t talk about here.
Once you have created the image, you can see how big it is exactly in inches or centimeters, because you know the image’s resolution which is expressed in dots per inch (dpi) or in dots per centimeter (dpcm). This piece of information tells you how many pixels will make up each inch or centimeter.
Consider, for example, a 512 x 512 pixel image. The so-called print size is calculated using the following formula: size = pixels / resolution. So, since 512 / 72 = 7.11, the considered image is 7.11 x 7.11 square inches (or in²) at 72 dpi (on an output device like a monitor), and 1.71 x 1.71in² at 300 dpi (on an output device like a common printer). Of course, GIMP and similar programs will take into account the image resolution, and will show the image accordingly, regardless of the output device’s resolution.
GIMP and similar programs will take into account the image resolution, and will show the image accordingly, regardless of the output device’s resolution
You can also enter image size in other unit measures, as humans are more experienced with centimeters or inches than with pixels.
You now know how to create an image of the right size from scratch. However, you will often work on third party images: digital pictures, scanned documents, screen shots, and so on. Opening such an image is straightforward: either type Ctrl + o or select File→Open.
Lossless resize
If you’ve just opened an image to work on, at the top of the image’s window, in the title bar, you can see the image’s size in pixels. To find out more, you have to select View→Info Window (or Shift + Ctrl + i). The info window provides you the dimensions in pixels and the resolution, along with the print size.
If you have an image that is 2775 x 3525 pixels, stored at 72 dpi, the info window would tell you that it is about 38 x 48in². How can you make it smaller? Select Image→Scale Image to get the window shown in figure 2.
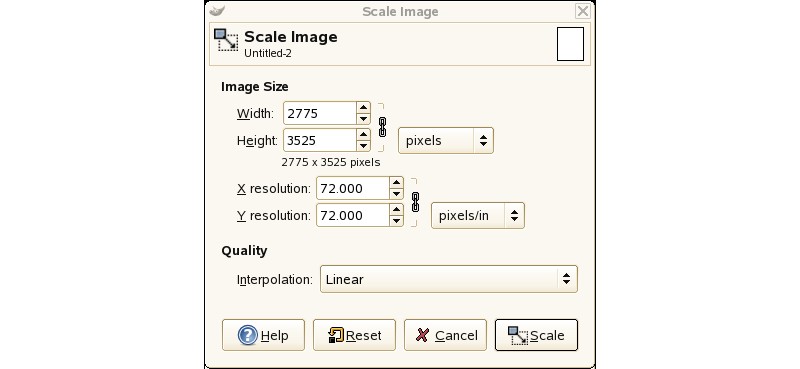
Change the X resolution value to 300 pixels/in (pixels/in is another way to say dpi). As soon as you enter the value, the corresponding Y resolution value will change to 300. This happens because the chain next to the resolution values is “locked” (in which case, the same dpi will be kept for the image’s height and width). If you “unlock” the chain, you will be able to change each of the resolutions separately. To apply the resize just click on Scale.
Look now at the info window: you can see that the print size is 9.25 x 11.75in². You resized the image by putting the same amount of pixels in a smaller area. This means that you’re not losing information, and the image file remains substantially untouched in its byte count (how much space it will take on disk).
If you want to change the image’s file size you need to change the number of pixels
If you decrease the resolution, the pixels will be rendered bigger and the resulting image will also be larger. Because of the rendering, the final image’s quality will be slightly worse.
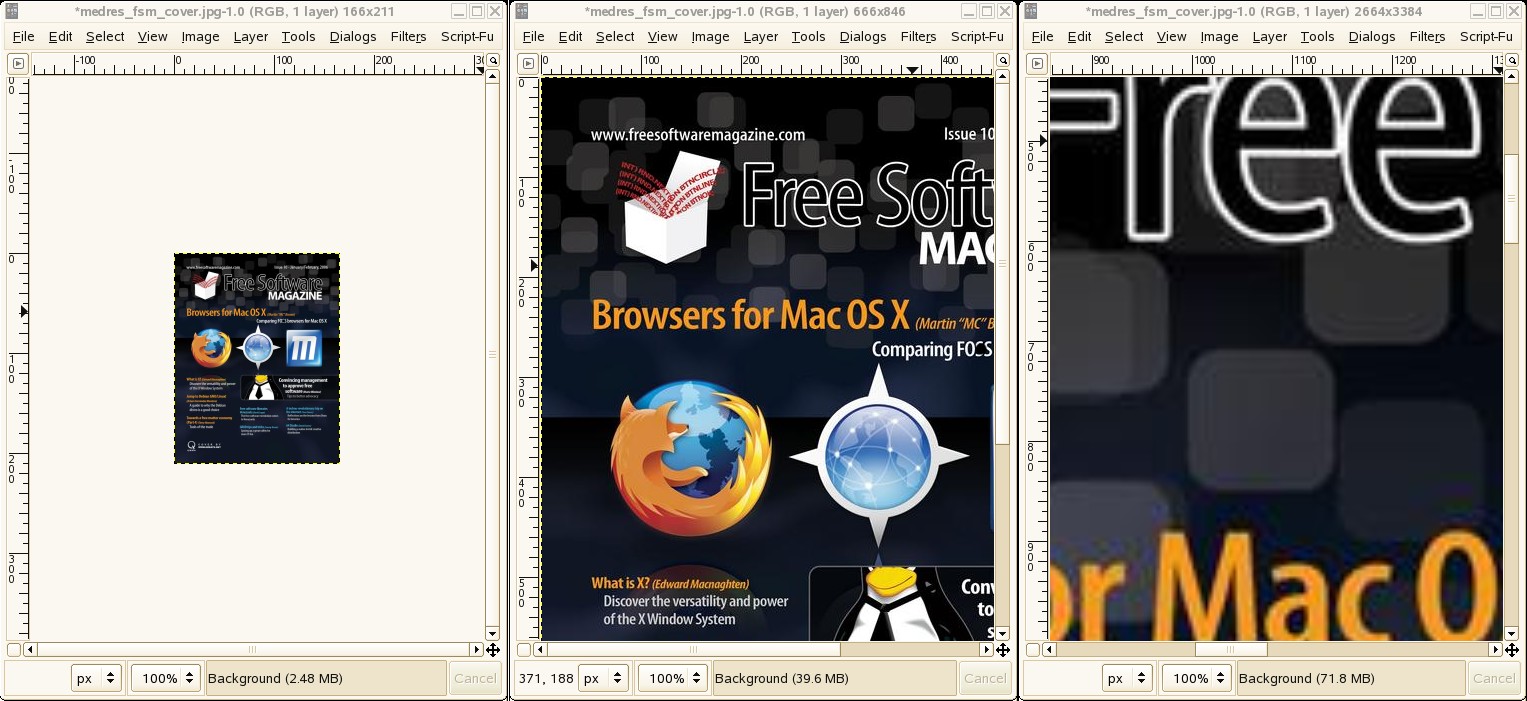
In figure 3, I show a real example: FSM’s cover. Though both the images are 2775 x 3525 pixel, the left one is 300 dpi and fits a U.S. letter page (i.e., 8.5 x 11.0in²), once trimmed 0.375in per side. The right one is larger (72 dpi), so a U.S. letter page shows only a small portion of the whole image.
Lossy resize
If you want to change the image’s file size, you need to change the number of pixels. This kind of change determines an information change: a loss of detail if you decrease the number of pixels; or an arbitrary addition of pixels, or interpolation, if you increase them. You have to decide if such changes are a good trade-off between file size and image intelligibility.
An operation I perform very frequently for FSM (see textbox 1) is resizing FSM’s covers and ad images. I make them low resolution following a simple procedure: the new image will have the same print size as the original, but a lower resolution. So the new pixel dimension is determined with formula 1.

I fixed medium resolution to be 200 dpi, and low resolution to be 72 dpi. Of course, what “high”, “medium” and “low” mean depends on you. For instance, images for a web site could be considered high resolution at 72 dpi, medium resolution at 60 dpi, low resolution at 48 dpi, since a web site is mainly viewed on a computer screen.
Textbox 1: How FSM provides small downloadable PDFs
Once in a while, one of our readers ask me how we manage to stuff the whole magazine (including the cover and the ads!) in a 5MB PDF file.
You might have noticed that the PDF available to our subscribers isn’t good enough to be professionally printed, since the image quality is too low for a printing house. Well, it’s as simple as that!
Our typesetting system is based on a real programming language. So I was able to write a wrapper command to embed the right image in the final PDF. To typeset the downloadable magazine, the wrapper is programmed to include low resolution cover, ads and images. The images are preprocessed the way I described in the section “Lossy resize”.
It’s now time to lossy resize images. Considering FSM cover: as I said, I want it to have the same print size (i.e., 9.25 x 11.75in²) but at 72 dpi resolution. So, using formula 1, I get X = 2775x72/300 → X = 666; Y = 3525x72/300 → Y = 846. So, 666, 846 and 72 are the figures I have to input in figure 2’s window, to replace the pixel size and the resolution. The resulting image will be print-sized as the original.
You’re not forced to apply formula 1 every time you resize an image. You are free to enter the figures you like, and experiment to find the results that suit you best.
What you might have realized by looking at my example, is that the resulting image has less pixels than the original. This means that it has less information, and thus it’s not as defined. A similar consideration applies when you increase the number of pixels, and, hence, add information (the program has to add “extra” pixels). This leads to the creation of artifacts. In figure 4 I show an example of both the cases.
Conclusions
In this article I explained how to use the GIMP to resize images. Now you can see that there's a lot more to resizing images than you probably thought!
You are strongly advised to check the GIMP’s manual [3], particularly when experimenting. Happy resizing!