My son's hand-me-down motherboard recently gave up the ghost, and I decided that was a good excuse for an upgrade. Shopping around, I found that multi-core CPUs were finally in my price range, so I decided to build him a quad-core system. This build worked out extremely well, with almost no configuration problems, not even for accelerated 3D graphics or ALSA sound -- all using the latest Debian GNU/Linux (which means it'll also work with Ubuntu or other derivatives). This one has that "classic" feel -- everything just clicked into place. So I wanted to document it here. This also serves as a technology update to my earlier article on selecting hardware for a free-software-friendly system.
I started by looking for an appropriate CPU and motherboard combination. I've been a fan of AMD CPUs for some time, so I looked for that. AMD boards tend to have ATI graphics chipsets built into them (since AMD owns ATI), and ATI has been the best-supported OpenGL chipset with free software drivers, so that's another factor.
I found several with similar characteristics and prices, but settled on the ASUS M4A785TD-M EVO, which has the AM3 socket that the Athlon 64 multi-core processors need. The CPU is a 2.6GHz AMD Athlon II X4. This particular chip is a relatively low-power chip at 95W, so it runs reasonably cool and quiet.
The motherboard has an ATI Radeon HD 4200 graphics system built into it. This graphics board was just recently added to the supported list for the free "radeon" DRI driver that provides accelerated OpenGL 3D graphics support, which I think was a real coup.
Debian doesn't quite consider this driver 100% free, because it uses a binary firmware "blob." This is an opaque block of data which the driver has to load into the firmware program memory on the card to make the card work properly. Back in the old days, this would've been a permanent part of the card itself, which I wouldn't have worried about. So it's kind of a gray area. I do understand that developers are working on a free software blob. But in any case, I don't consider this nearly as onerous as a non-free driver.
The sound system, by the way, is a VIA VT1708S chipset, and the LAN ethernet is a Realtek 8112L. The sound gave me no trouble at all. The ethernet was a little problematic in that I needed the very latest binary Linux kernel image (2.6.32) to get a working driver (but that's not really a big deal).
I was upgrading through a couple of generations of hardware developments, so I wasn't able to reuse much of the original system. I also needed 240-pin DDR3 RAM and a new power supply.
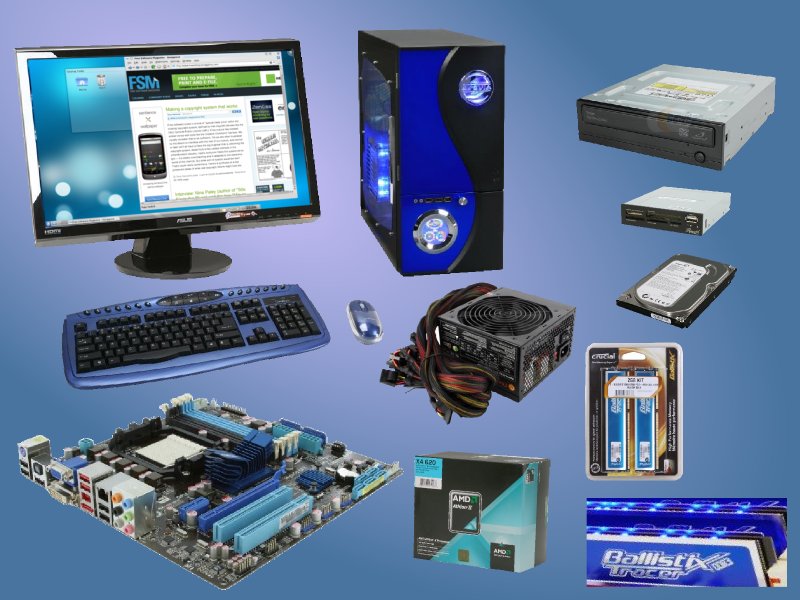
Although I didn't actually need them for my son's system, I've gone ahead and specified additional parts to make this a complete build: hard drive, DVD-writer, case, monitor, keyboard, and mouse. A full listing of components with current prices and sources (taken from the Newegg online catalog) is listed in Table 1.
Most of these components are certainly matters of taste, you can get cheaper or more expensive versions of everything. The only really critical components for the software to work are the motherboard and CPU. Otherwise, you just need to ensure hardware compatibility.
Quad Core System for GNU/Linux
A relatively inexpensive, high-performance computer which works very well with Debian GNU/Linux's current "testing" release, code-named "Squeeze" (and should work with just about any of the most recent GNU/Linux distributions).
| Key | Function | Description (and Quantity) | Cost | Notes |
|---|---|---|---|---|
| 1 | Motherboard | ASUS M4A785TD-M EVO AM3 AMD 785G HDMI Micro ATX | 82.99 | |
| 2 | CPU | AMD Athlon II X4 620 Propus 2.6GHz 4 x 512KB L2 Cache 95W Quad-Core | 99.99 | |
| 3 | RAM | Crucial Ballistix Tracer 2GB 240-Pin DDR3-1600 SDRAM w/ LEDs (2×1GB) | 83.99 | [ a ] |
| 4 | Video Card | ATI Radeon 4200 (on motherboard) | 0.00 | |
| 5 | Power Supply | Thermaltake TR2 W0379RU 500W ATX 12V v2.2 | 59.99 | [ b ] |
| 6 | Hard Drive | Seagate Barracuda ST3250318AS 250GB 7200 RPM 8MB Cache SATA 3.0Gb/s 3.5" | 44.99 | |
| 7 | Optical Drive | Samsung SH-S222A DVD Burner | 24.99 | |
| 8 | Flash Reader | Rosewill RCR-IC002 74-in-1 | 15.99 | |
| 9 | Cooling | Fan cooler (included with CPU) | 0.00 | [ c ] |
| 10 | Case | Apevia X-TELSTAR-JR G-Type X-TSJGT-BL | 79.99 | [ d ] |
| 11 | Monitor | ASUS VH242H Black 23.6" 5ms HDMI Full 1080P Widescreen LCD w/ Built in Speakers | 199.99 | [ e ] |
| 12 | Keyboard | Apevia KI-COMBO-BL Blue & Black 104+22 Key PS/2, with mouse | 24.99 | |
| 13 | Mouse | Apevia, included with Keyboard Set | 0.00 | |
| TOTAL (US$): | 717.90 |
Components
(If this sounds a little high, please note this includes the monitor. A lot of desktop price quotes don't, and the monitor is the most expensive single component. Of course, I didn't need to buy a new monitor or keyboard, because we just used the old ones).
Notes:
[a] There are lots of choices for memory. This one looks cool with the blue LEDs that match the rest of the system.
[b] You need a newer power supply for this motherboard. My old AT supply did not work, even though it was theoretically rated high enough (the new boards make much more use of the 12V power, and they have extra connectors).
[c] The CPU warranty says it's void if you don't use this fan that was sold with it.
[d] There are plenty of higher-performance cases, but this one is attractive and adequate.
[e] As I noted in my previous article, large heavy items like the monitor and case may actually be cheaper to buy locally, because of the shipping costs. This monitor includes small built-in speakers, which I like because it reduces clutter, but if you're an audiophile, you'll want to buy better ones.
Assembly
If you've built computers before, you can skip this part, but I'm providing it here for those who aren't very familiar with the process (or need an update -- computer hardware is a moving target).
Motherboard
Be sure to observe anti-static protocols. This means you should ground your hands (on the case, for example) before touching any electronics, especially the CPU and RAM modules and especially before attaching them to the case and power supply (once connected, they will be grounded, which reduces the risk). When setting a board or a chip on a table top, use an anti-static foam pad or just a sheet of aluminum foil over a towel, which is almost as good. Avoid obvious static build-up such as shuffling your feet on the carpet.
I recommend installing components on the motherboard before installing it into the case, as this is just a lot easier to do. It does add slightly to the static risk and the risk of bending the motherboard. Mitigate this by keeping it flat on the anti-static surface (using a slightly soft surface like a foam pad or towel provides better support for the printed circuit board, because the raised connections can sink into it, allowing the board itself to rest on the surface). Motherboards can take a fair amount of bending, but at some point, they can break internally (circuit traces can snap inside the board, even if there is not a visible crack).
The CPU cooler (the large heatsink and fan assembly packaged with the CPU) has heatsink compound (a thermally conductive paste) on it already, where it is meant to mate with the CPU. Avoid touching this (you don't want to smudge it so that it goes on unevenly, and I believe it may be mildly toxic as well). Note that there is a plastic cover protecting this part for shipping and handling. You'll remove this before installation, of course. The cooler will attach to the motherboard, over the CPU.
The CPU can only be inserted in one orientation on the motherboard. Still, the pins on the CPU are tiny and easily bent if you try to force it in the wrong way. Look for the keying features: there are a few missing pins in the otherwise regular pattern, and one corner is marked to match the socket. The socket is a "zero insertion force" (ZIF) type, which means there's a little plastic lever that you open to drop the CPU in. With the lever up, it should literally drop right in, without any force whatsoever. Then you push the lever down until it snaps into place. This locks the chip (you can verify this by pulling up on it gently, it won't come out. At least not easily).
Once the CPU itself is in, you are ready to install the CPU cooler. This uses a clip arrangement which matches the plastic connectors on the motherboard. One side will need to be clipped in, then the other stretched to clip on the other side, pressing the cooler down onto the chip. This can be a little scary. On the one hand, you obviously don't want any uneven pressure on the surface of the CPU chip, nor do you want to bend the motherboard, but on the other hand, that clip has to connect, and it may take more force than you expect to do it. So just make sure everything is straight, and push it in as needed.
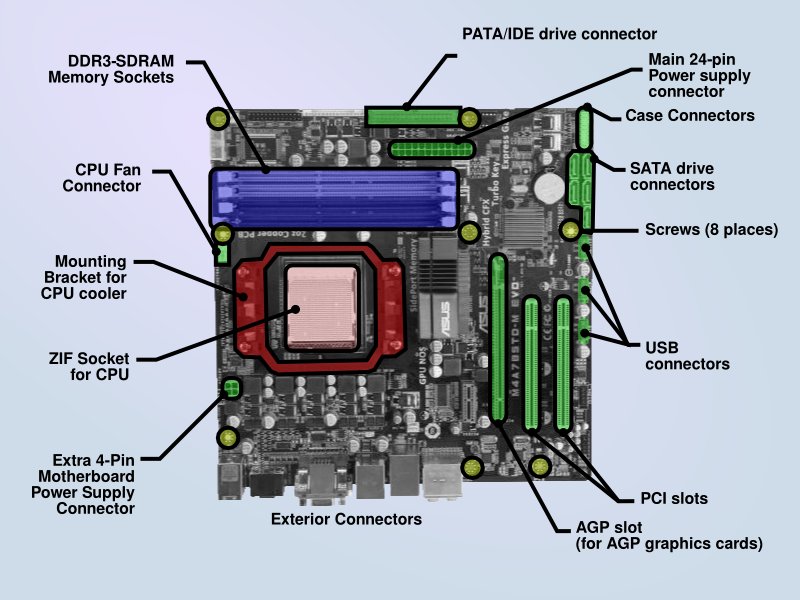
Once the cooler is attached physically, you will need to plug the fan wire into the socket provided for it (see Figure 2). Once again, the connector is keyed so that it will only plug in in the correct orientation.
The memory modules install into the appropriate slots on the motherboard (see figure 2 for a quick guide to the sockets on this particular motherboard). It took me awhile to convince myself of this, but it does not matter which slots you put the two modules into. These have a lever on each end which needs to be pulled back to admit the RAM module. Then press the module in with even pressure on both sides. You'll note that the module has a off-center key notch which matches a ridge in the socket. This ensures that you can only install DDR3 RAM (there is a DDR2 RAM module standard which is identical except for the location of this key, so if it doesn't fit, check that you really have DDR3 RAM). The levers will start to role back into place, engaging additional notches on the ends of the module. If you push the levers the rest of the way, they will help to push the module into place, with minimal pressure on the board. The same notes about insertion force apply here as for the CPU cooler -- it can be a little scary, depending on the exact fit.
Putting the Motherboard into the Case
The CPU and cooler will be the heaviest part of the motherboard, and it is quite well attached to the board by the strong CPU cooler clips. I therefore use the CPU cooler as a handle when manipulating the motherboard inside the case. This, combined with handling the board by its edges is the safest way to move it. You should avoid grabbing any other components on the board (including the other heatsinks), as it is possible to damage them this way, either physically, or by static discharge from your fingers.
There are eight screw-down connections for the motherboard. You should make sure to attach them all. A motherboard spacer or "standoff" should be installed at each of these positions on the mounting plate in the case, and then the motherboard should be screwed into these. See figure 2 for the locations of the screws on the board.
The motherboard includes a metal coverplate for the connector cluster that faces the back of the computer. The case will have a matching hole that this coverplate fills (They do this so that motherboard designers are free to alter the connector layout without requiring new case designs). It takes some fiddling to get this bezel to fit over all the connectors -- in particular, you will have to compress several of the spring "fingers" on the bezel to get them to slide into position over the connectors on the motherboard. A small screwdriver or nailfile can help with this. You'll have to keep this bezel positioned with your finger as you insert the board. Once in place, the bezel will snap into the computer case (I think this is because you're really supposed to snap the bezel into the case and then insert the motherboard, but that doesn't work so well with a motherboard with this many connectors, so I position it on the motherboard first).
Press the motherboard into position and line up the screw holes with the mounting standoffs. Start putting in the screws. I recommend starting all the screws before you tighten any of them, and then tightening them in rotation until they're all tight. This spreads out the positioning error and avoids binding the board.
Power supply
The power supply mounts in the top of the case at the back. There are several screw holes, and I imagine this is self-explanatory. I recommend laying the case over onto its side (use the pad to protect the exterior from scratches) to do this, so there's no danger of dropping the power supply onto the motherboard.
This power supply provides a 20-pin "AT" motherboard connector bundled with a 4-pin connector. These combine to fill the 24-pin connector on this Micro-ATX motherboard. Another 4-pin connector (apparently identical) plugs into a second connector on the motherboard as indicated in Figure 2. These connectors all have complex keying shapes so that you can't plug them in upside down.
The other connectors are for the peripherals (and quite a few will remain unused).
Peripherals and Case Connections
Several case connection points are provided (for things like the power and reset switches, the hard drive light, and so on). You'll need to check these against the wires from the case (I didn't actually use the case specified above, since I could reuse the old case).
The DVD burner will be installed into one of the 5.25" drive bays on top of the case, while the hard drive and flash reader are designed to install into the 3.5" drive bays towards the bottom. Each has appropriate power supply sockets -- just look for the power supply cables that fit them. All of the drive bays in the specified case are meant to use "toolless" connectors (there's a sliding piece of plastic that locks the drives into place). Many older cases will have screw connectors for this.
The hard drive and DVD burner specified above are both SATA devices, so they will plug into the smaller SATA sockets identified on the motherboard in Figure 2. If you instead reuse older drives (as I did), they will probably use the Parallel ATA (PATA or IDE) socket also identified in Figure 2.
The flash reader is really just a USB device, and it will plug into one of the available USB headers on the motherboard. The other headers should be attached to the cables for the external USB sockets provided by the case.
Smoke test
Once you get all of the components assembled, but before you close up the case, you should attach a power cable and briefly power up the system to check that everything is working. The very first thing you should look for is that the CPU cooler fan is spinning. If it is not, shut the system down immediately and troubleshoot. Modern CPUs cannot run without a cooler, they will burn themselves up in only a few minutes. Remember this CPU dissipates 95W of power -- think how hot a 100W incandescent light bulb gets. The same physics applies!
Once you are sure everything is coming up, attach the keyboard and monitor and then power up the system. You should see the "power on self test" (POST) screen. Hold the "Del" key on the keyboard to get to the firmware BIOS menu. In here you can check various things, but what you should do first is go to the "Power" tab and select "HW Monitor Configuration" to watch the temperature numbers. Nothing should get above about 60 degrees Celsius (40-50 C is normal for the CPU). Let it sit on this menu for a few minutes (take a break). If you come back and the temperature is still stable, you can feel pretty confident that the cooler is doing its job and your CPU will be safe.
Now you can shut it down and close up the case.
Installation
Installation on this system is a breeze. The following walks you through a few details.
What you need
First of all, you really need the latest GNU/Linux for this system. In particular, you want the AMD64 build of Linux 2.6.32 (or later). For me, the simplest way to do this was to get the AMD64 architecture Debian GNU/Linux "Squeeze" distribution CD-ROM. With broadband internet access and a CD-R burner, you can simply download "disk 1" from Debian's archive (I'm a KDE user, so I used the special "KDE disk 1" version), and install a basic system from that (obviously this assumes you have another computer to do the download. Alternatively, you can just order a CD or DVD set from one of the commercial suppliers. Afterwards, you can update your /etc/apt/sources.list and get the rest of what you need by direct download.
All of the default versions in Debian "Squeeze" worked just fine for me, without any serious hitches. A few things did confuse me, which I want to mention:
-
There is no special "SMP" version of the kernel for AMD64, it's part of the standard build
-
Use the "radeon" driver with X.org (if you specify it -- it will auto-detect correctly if you don't)
-
Be sure to install the "linux-firmware-nonfree" package from Debian. This includes the already-mentioned binary blob for the video system
Installation disk
Start up the system with the CD-ROM (or DVD-ROM) in the drive. You'll probably need to go into the BIOS menu, visit the "Boot" tab, and set the CD-ROM as the first boot device. Then the system will boot from the CD. Debian CDs are bootable, of course. This will launch the installation system from the disk.
After this, you will mostly just answer simple questions about the installation as needed. Most have default responses that will work fine, depending on your preferences.
Graphics system
The X.org X-server will auto-detect this hardware, so you won't have to do anything, but I'd like to point out that the preferred DRI driver will be the 'radeon' driver. There is also a 'radeonhd', but you shouldn't need to use it (the functionality of radeonhd has apparently been absorbed into the main 'radeon' driver by now).
Sound system
This should likewise auto-detect without any effort on your part. Note, however, that sound systems are often defaulted to have the volume all the way down or be muted. You'll very likely need to use your favorite sound-mixer application to reset the sound system to work. Of course, you should also check to make sure you remembered to plug in the cable from the speaker port to the port on the monitor for the built-in speakers.
Networking
A lot of people today use DHCP networking. Personally I prefer the predictability of static, manually-configured IP addresses on my home LAN, so of course, I spend a few minutes configuring the network with appropriate IP addresses and nameservers.
Configuring APT
Check the Debian website for a list of distribution mirrors for Debian "Squeeze". This will give you the correct information to put in your /etc/apt/sources.list file to pick up the packages you need. I used the main Debian archive, plus the "Debian Multimedia" unofficial archive for my system.
No doubt you'll have your own list of packages you want to install, so I'll leave that to you.
Nice... very, very nice
The quad core processor especially makes a difference for GNU/Linux users because most of the time we are running a lot of separate processes. These can be shared over the available processors, achieving a degree of parallelism. The most remarkable thing, though, is that the 3D graphics and sound software (often major headaches to configure) appear to work exactly as they should on this hardware.
Everything clicks into place and works. The worst problem so far has been a few lock-ups of the X windows system which might be due to video driver issues (or it might just be a flaky hard drive -- the one we're using is pretty old. We're eventually going to replace that).
So far, my impression is that this build is a keeper, and that's why I wanted to share it with you.
Now I just have to find the money to build three more like it!