This is a collection of tips&tricks written by Andrew Min and Gary Richmond. In this article:
- How to create a GNU/Linux live USB stick with SLAX (Andrew)—see below
- How to use Quake-style terminals on GNU/Linux (Andrew)
- How to take screenshots with Scrot (Gary)
- How to back up your Master Boot Record (MBR) (Gary)
How to create a GNU/Linux live USB stick with SLAX (Andrew)
One of the biggest things holding back GNU/Linux adoption is the fact that most people haven’t tried GNU/Linux. That’s where SLAX comes into play.
Introduction
What is SLAX, you ask? SLAX is a KDE-based GNU/Linux distribution that’s meant to run as a live GNU/Linux operating system. In other words, it will automatically wipe all traces of itself from the computer it is running on once you turn the computer off. And best of all, it includes tons of useful software including KDE, NTFS-3G, tons of wireless tools, CUPS, games, graphics tools, multimedia apps, development tools, the KOffice suite, and much more. This makes it perfect for showing off the power of GNU/Linux to your friend without messing up their settings.
SLAX is perfect for showing off the power of GNU/Linux to your friend without messing up their settings
Putting it on a USB drive
Although SLAX can not be used as a regular operating system, it is possible to put it on an external device such as a USB drive and carry around a live GNU/Linux system. There are three advantages to using a USB drive over a more traditional CD: it’s faster, it lets you add file and programs on the fly, and it (usually) has more storage. There are several ways to do this, but the easiest way is to use the make_disk script. First, format the drive using a program like QtParted or GParted (use FAT32 on Windows and ext2 on GNU/Linux). Then, download the standard SLAX ISO and extract it with a program like ISO Master. If you are using a GNU/Linux system, cd to the directory that the ISO was extracted to, and run ./make_disk.sh /dev/sda1, replacing /dev/sda1 with your hard drive (you can find the hard drive by running fdisk -l as root). If you’re using Windows, run make_disk.bat E:, replacing E: with the drive name. Now, reboot the computer and change the boot order of your machine (see this for a howto or refer to your computer’s manual) to make USB or removable drive the top.
Note: dfego notes that this won't work with SLAX 6. Use this method instead.
Adding programs
Although the default version of SLAX comes with a ton of tools, it’s always nice to be able to add and remove programs. That’s why SLAX has support for modules, available at the SLAX Modules page. There, you can download programs like OpenOffice.org, The Battle For Wesnoth computer game, the Firefox web browser, and even desktop environments like Xfce or Gnome. After downloading the program, put it in the modules folder on the USB stick. When you next boot into SLAX, look for the program under your K Menu. If you need to make your own program, use a tool like rpm2mo or deb2mo to convert an existing package to the SLAX format.
Conclusion
SLAX is a great operating system. And we haven’t even scratched the surface of what it can do. You can create your own SLAX, build your own modules, and even install SLAX to a hard drive. And best of all, you now have a GNU/Linux system to show off to your friends.
How to use Quake-style terminals on GNU/Linux (Andrew)
We know all about how powerful the GNU/Linux terminal is. However, it’s a pain to have to fire up a terminal emulator like Konsole or gnome-terminal, wait for a few seconds for it load, and then have to keep Alt-Tabbing to it. Wouldn’t it be easier to just have a terminal that automatically hides and shows itself at click of a button? Today, I’m going to look at three different terminal emulators that do just that.
What the heck is a Quake-style terminal?
Quake is a wildly popular first person shooter created by id Software. In the game, there is a terminal that is accessible by hitting the ~ key. It is used to edit settings and variables, show logs, and enter commands and cheats (for more, read the Quake-style Console article at Wikipedia). Quake isn’t the only program that has this functionality: Doom, Half-Life, Dark Engine, Lithtech, and several other games and game engines use similar consoles.

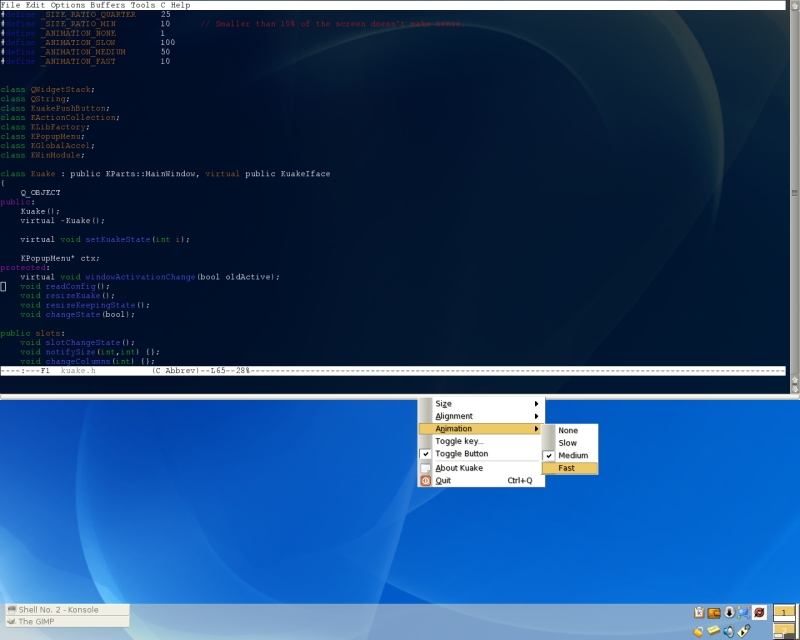
Kuake: Quake-style terminal for KDE
A long time ago in an IDE far far away... OK, so it wasn’t that long ago (unless January 2003 is really “long ago”) and it wasn’t that far away. Anyway, not so long ago in an IDE not so far far away, Kuake was born. Martin Galpin got the bright idea of creating a Quake-style front-end to Konsole. The idea was that you’d hit a hotkey (at the time, Ctrl-K) and Konsole would slide down from the top of the screen. You could resize it, realign it, and much more. When it came, it achieved great success (Unfortunately, development seemed to freeze after the release of an unstable 0.3 release in March 2004.)
Even though Kuake hasn’t been updated recently, you can still install it. The site offers a tar.gz source archive, a Debian package is available at deb ftp://ftp.berlios.de/pub/kazit/debs, Ubuntu has a package called kuake in the Universe repository, and many other distributions offer packages. The hotkey is Alt-~ (available after you launch Kuake).
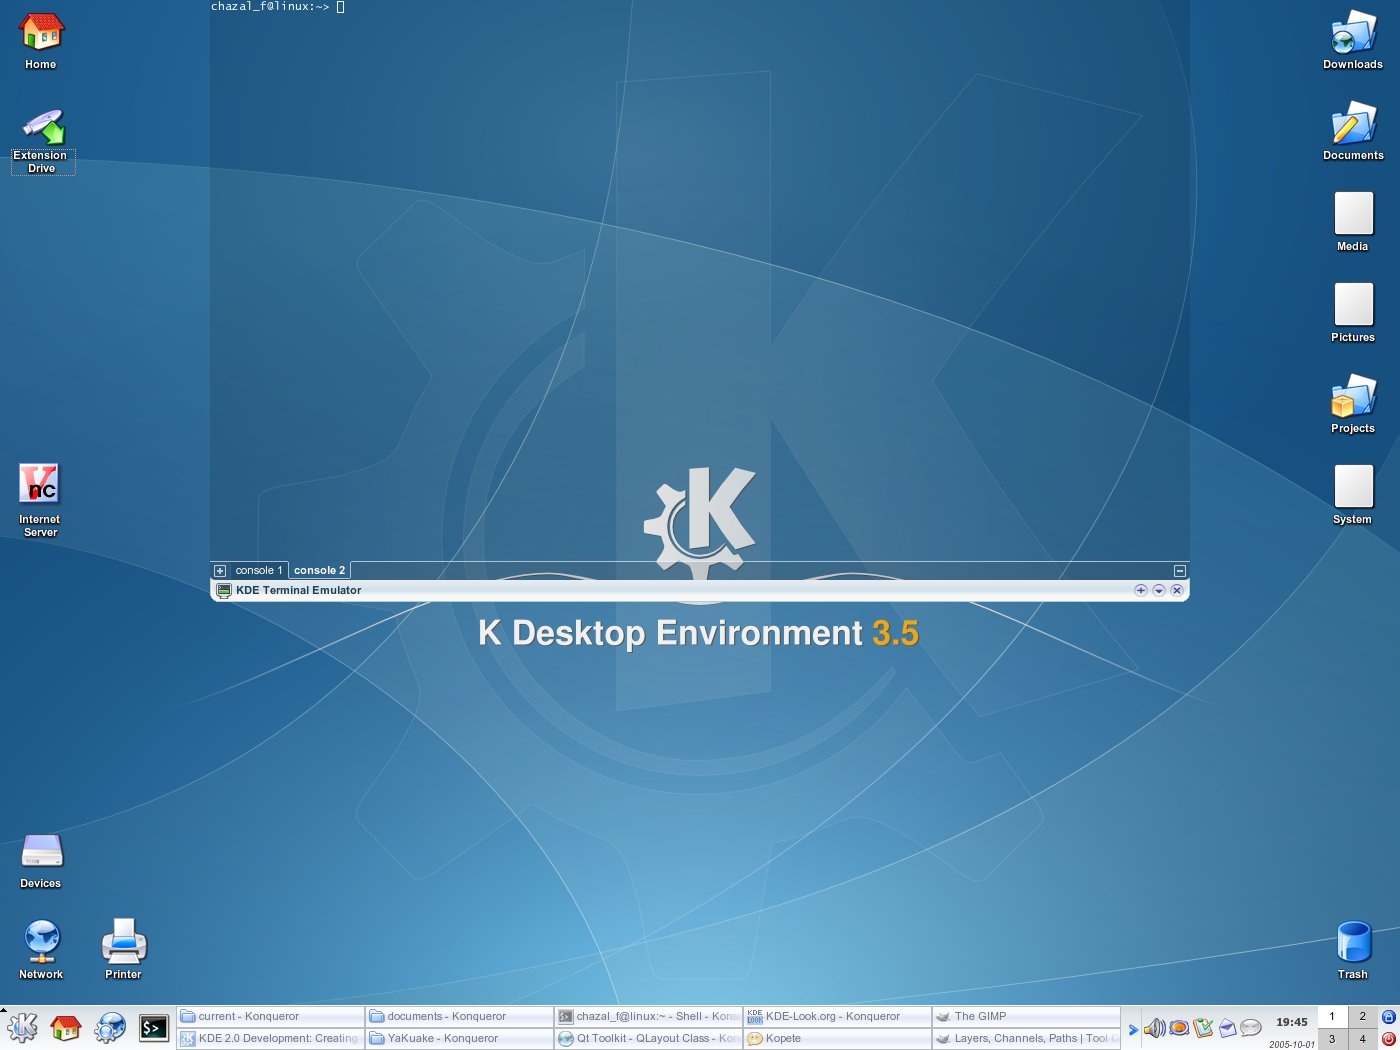
YaKuake: Yet Another Kuake KDE terminal emulator
Meanwhile, in another part of the galaxy, a French programmer named Francois Chazal was working on a forked version of Kuake known as YaKuake (Yet Another Kuake KDE terminal emulator). YaKuake added several features including inline tab renaming, better Xinerama support, and skins. Like its predecessor, its popularity skyrocketed, reaching over 25,000 downloads and earning a 5 star rating from the famous software repository Softpedia.
YaKuake offers a tar.bz2 source archive. Many distributions offer it as a package in their repositories. The hotkey for launching YaKuake (after it is running) is by default F12, but you can change it to whatever you want (I like Kuake’s default Alt-~ myself).
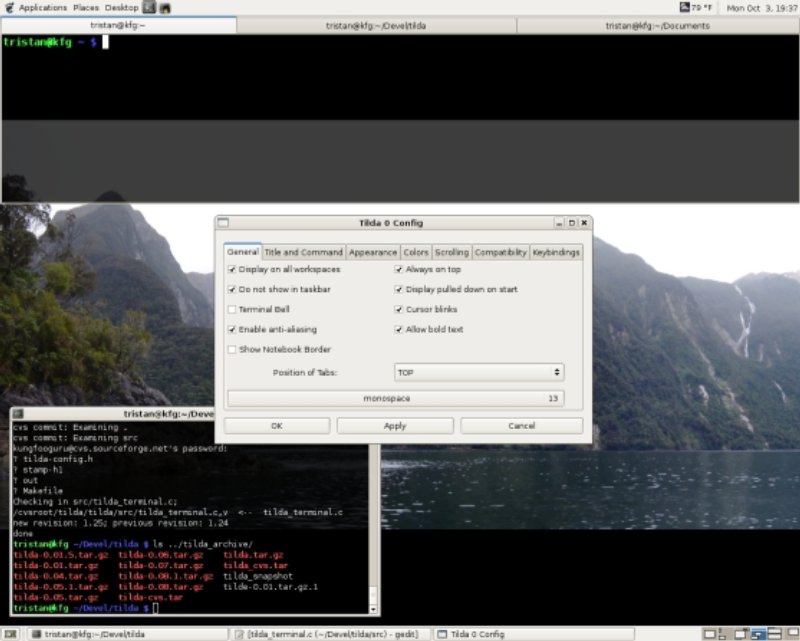
Tilda: Quake terminal for Gnome
KDE users weren’t the only ones having fun with Quake-style terminals. In December 2004, Tristan Sloughter (aka kungfooguru) released Tilda (named so because tilde, the ~ symbol and often the hotkey for Quake-style terminals, was already taken), a GTK+ Quake-style terminal emulator. Like Kuake and YaKuake, it took off, reaching 12,000+ downloads in 3 years.
Tilda provides a tar.gz source archive, but many distributions provide packages. Once you install it, run tilda -C to configure it. Then run Tilda with the command tilda. Options are available via tilda -h. Tabs are available too. Access keys are Ctrl-Shift-T (New Tab), Ctrl-Shift-PageUp (Next Tab), Ctrl-Shift-PageDown (Prev Tab) and Alt-#(go to 1 to 10th tab)
How to take screenshots with Scrot (Gary)
Screenshots. Where would the internet be without them? They are ubiquitous and when you are researching that latest piece of cool software or the latest ISO of your favourite GNU/Linux distro they are an opportunity to preview the eye candy. There are many ways to make those screenshots and most KDE and Gnome users will be familiar with the GUI tools bundled with them: Ksnapshot for KDE and Take Screenshot for Gnome. They are good at what they do. However, sometimes you just need to take screenshots quick and dirty without the overheads (especially if you are using a lightweight windows manager on a relatively low-spec machine). If that's your case, you can use “Scrot”.
Welcome to Scrot
Scrot (SCReenshOT) will probably not come pre-installed with your distro; so, as ever, it is a case of a quick visit to the software repositories. If that turns up a blank you should be able to download a source tarball or a pre-compiled binary at the official site. If not you can always get it at Klik which should install it for you across a wide range of distros. Just follow the instructions on the website to enable the Konqueror and Firefox browsers to use it.
This is not the place to launch into a detailed comparison of available screenshot tools, graphical or command line. Suffice it to say, by the end of this article, I hope I will have demonstrated the power and utility of Scrot which, despite being a command-line tool, offers the user an excellent screenshot tool with power options to suit most requirements. If you want to see the commands Scrot supports just type man scrot in a terminal.
Ways of running Scrot
Scrot is a command-line tool (written in C and using the imlib2 library); so obviously you will be running it in a console within your X windows session.
I find that in order to clear the way for the screenshot quickly and to avoid switching between the mouse and the keyboard, it is useful to have Yakuake installed. It is a Quake-style terminal emulator (see more at the previous article. You can either use your package manager to install it (if available) or get Yakuake here. Once installed and run, the terminal screen can be pulled down and retracted very quickly by toggling the F12 key. This is very useful speed tweak after you have issued a Scrot command.
However, there is an even better way to launch a Scrot command: just press Alt+F2 and type in scrot, hit run and you're done.
If you want to take it one step further and avoid the hassle of even opening the run dialogue, then right-click on an empty space on the taskbar and select Add Applet to Panel and from the GUI scroll down to Run Command, click on it and add it to the panel. This will add the ability to type commands directly into the Gnome panel. So, you can type a Scrot command directly into the panel without ever needing to open a console in an X-windows session or call up Alt+F2 again. The added bonus of taking a few seconds out to set this up is that it will persist across reboots and always be there to launch any programme without resort to the Start menu or Alt+F2.
Inevitably you will want to take more than simple screenshots, especially where it involves demonstrating menus, submenus and tabs. As with graphical tools like Ksnapshot you will need to incorporate a delay whilst you set up the screenshot. If it involves a lot of navigation through a thicket of menus/tabs then it it a good idea to do a dry run and roughly time how long it takes to set up that screenshot and then add on an extra five seconds to allow for sloppy mouse actions. Once you have done this you are ready to craft a Scrot command.
Don't delay—or rather, do
Having done everything in two preceding paragraphs, go ahead and set up a command. Here is one which will take a screenshot in the JPEG format after a delay (to allow you time to set it all up) of, say, 5 seconds:
scrot -d 5 desktop.jpeg
We have liftoff!
NASA aren't the only ones who can launch with a countdown. If you like all the bells and whistles, you can run a neat little countdown facility by adding a simple parameter to that command. Just type:
scrot -d 15 -c desktop.png
and you can experience the dubious pleasure of watching Scrot flaunting it's numeracy skills.
The length of the delay you set will depend on the simplicity or complexity of the screenshot you are setting up and you will of course give it a contextually appropriate name. Scrot is not too strict as regards syntax. The last command could also have been typed as:
scrot desktop.png -d 15 -c
and it works equally well. If you wish to specify a window or part of a screen (use your mouse to draw out a selected area) then just append -s thus:
scrot desktop.png -s
and then use your cursor to draw out the area for your screenshot. A number of useful points here: by default, Scrot automatically saves screenshots to the current directory you are in (usually the home directory) so if you wish to save to a different one, cd to it first before executing a command. Like ImageMagick, another useful command-line tool for taking screenshots, Scrot supports many formats including, of course, the ubiquitous PNG and JPEG formats.
Scrot's other tricks
Scrot can do all of the above but it has a few more tricks up it's sleeve: if you want to create thumbnails for a web gallery or to save space by way of compression, you can always do so manipulating the screenshot later using a program like Gimp. Scrot can incorporate that in one line by simply adding the -t option followed by the percentage by which you want to compress it. If you want to include the WM border too, append -b. You can set the quality (size and compression) with -q followed by a number between one and one hundred (seventy five is the default).
OK, say cheese everyone...
We all like to find clever and cool ways to do things, and if you have acquired any reasonable command-line skills then you won't need to be a genius to think of ways to combine that knowledge with Scrot's power. Once a screenshot has been taken, you might want to do some editing—to change format, compress, crop, resize etc. Normally, you will right click on the saved image and select the graphical tool of choice to do the job, or just open the graphics package separately and navigate to the relevant directory; however a little command-line magic can do that for you too. When you want to run multiple commands you can join them together by using the double ampersand. This means that if the previous command is true it will execute the following one. In this case you can append the name of the graphical package of choice for editing the screenshot Scrot has just taken.
So, let's put all those options together in one big line and run it:
scrot -d 5 -q 95 -t 30 screenshot.jpeg -b -s && gwenview screenshot.jpeg
Done! Yes, it's a bit of a mouthful but once you've memorised it Scrot is a very powerful and useful piece of software and doubtless readers can think of many commands that can be used in conjunction with Scrot to extend its utility. The only features it seems to lack are the ability to convert image formats and take multiple screenshots. For that you will have to use ImageMagick— which, fortunately, comes pre-installed with most GNU/Linux distros.
Snap it the ImageMagick way
Although this article has been about Scrot I can't resist finishing off with a very brief howto with ImageMagick for taking multiple screenshot in one command-line pass. This is one feature that would make Scrot complete and it's called snap. Append this parameter to the basic import command and you can take multiple screenshots of the number you specify:
import -delay 20 -snaps 4 snapit.jpeg
Prepare the screens you want to capture, mimimize them all, type that command and then use Alt+Tab to toggle through them one at time, clicking on each one. (You can type into the Run command box in the Panel as per Scrot.) Go to the directory in which you saved them and you will see the screenshots. They will all have the same name (in this instance "snapit") and they will be numbered from 0 through to 3—four in total. Neat. Obviously, you can specify the number of snaps and of course, like Scrot, you can specify the format, amongst other things.
A disclaimer
For all of you who have the welfare of open-source software close to your hearts I wish to assure you that no GUI graphics packages were harmed in the making of this article.
How to back up your Master Boot Record (MBR) (Gary)
Backup, like security, is a well-worn mantra in the world of GNU/Linux—and even the most battle-hardened, street-wise user has, for whatever reason, thought about regular backups after disaster has already struck. It is an all too familiar story. System Administrators, by the very nature of their work, will have that imperative carved on their headstones. For them it will be a way of life. Desktop users, being responsible only for themselves, can afford to be a little more louche about such things. If it all goes a bit “arms in the air” there is no one to reproach but themselves.
You should backup many things: the files in your home directory, configurations files in /etc, (and there are many excellent graphical tools to do the job) but one of the simplest and best things you can do is to backup your boot master boot record (MBR). It’s one thing to experience lost or corrupted files, it’s quite another not to be able to bootup your computer at all. What follows may just get you out of a fix.
Windows manners
It is highly unlikely that you came to GNU/Linux as a computing virgin. You almost certainly, like me, came via Windows and therefore either installed over it or decided to attempt to dual boot. Like Bill and Steve, Windows is a bit short on computing etiquette and if you installed GNU/Linux first on a blank hard drive and then followed up with an installation of some version of Windows you will have made a painful discovery. Windows will, without so much as a by-your-leave, stamp all over your GNU/Linux boot sector with great big hobnail boots. The first lesson is to install Windows first.
However, you don’t need to be dual booting with Windows to court disaster. Dual booting with several versions of GNU/Linux can lead to boot problems too. At best, only one version will boot—or worse, none and you may find yourself googling furiously to understand terse and cryptic GRUB (GRand Universal Bootloader) error messages. Sometimes, boot sectors (including partition tables) can just get corrupted for no discernable reason at all. Whatever the reason, you need to prepare for all eventualities as GRUB does not make a copy of the MBR during installation.
Backing up
The MBR, as I will refer to it hereafter, is a 512 byte segment on the very first sector of your hard drive composed of three parts: 1) the boot code which is 446 bytes long, 2) the partiton table which is 64 btyes long, and 3) the boot code signature which is 2 bytes long. These numbers are VERY important. Any careless or impulsive fingering at the keyboard of these numbers could well render your machine unbootable or the partition table unreadable. The sight of a grown man crying is not pretty. You have been warned!
The core of the backup command is dd—which will be familiar to every system administrator, especially to those who intend to clone an entire hard disk. To see all the options type man dd. As we want to back up only the first 512 bytes we need to append some agruments to it. Here is the full command you need (and remember to run it as the root user, su (and sudo for Ubuntu users):
dd if=/dev/hda of=/home/richmondg/mbr_backup bs=512 count=1
Obviously, you will need to substitute the partition where your boot sector resides and also use your own username. Now let’s see just what we did there. dd just stands for disk dump, if means input file, of means output file, bs simply means bytes and count=1 tells the command to do this just once. It makes sense to save this out to some removable device, usually a USB stick, in which case amend the file path to suit so that /home/richmondg/mbr_backup reads, say, /dev/sda/mbr_backup or just copy the original backup to the external device.
Or, only copy the first 446 bytes. Why?
This could be a useful tip. If you change 512 to 446 in the above command you will only save the boot sector, but not the partition table. Why would you want to do that? The reason is that if you use 512 bytes and subsequently amend your partitons for any reason and then restore the MBR it will be out of sync. So, ensure that if you have made any partiton changes since your original MBR backup that you update that backup.
Restoring the MBR
Not surprisingly, in order to restore the MBR it is only necessary to reverse that original command which saved it. If you managed to hose the MBR you will not be able to boot up, so you can use a live CD to access your hard drive and read the backup off any removable media such as a USB stick. Here is the command:
dd if=/dev/sda/mbr_backup of=/dev/hda bs=512 count=1
Again, amend sda to read where you saved the MBR and run the command as root. If you wish to kill the MBR altogether, including the partition table, then you can overwrite it with a series of zeros:
dd if=/dev/zero of=/dev/hda bs=512 count=1
If you want to kill the MBR but leave the partition table intact then simply change 512 to 446.
There are, of course, alternatives which involve using your install CD in rescue mode to reinstall GRUB which will have the same effect (with the added advantage of not overwriting the partition table) but that is another topic in its own right. In the meantime, using the dd command with arguments will help familiarise you with other linux commands and the file structure. Mastery of the command line is a learning curve but one that can repay huge dividends when things go wrong.