I am setting up five MediaWiki instances in three domains on one server with three different security configurations. Each has its own MySQL database backend and its own separate home on the filesystem. All share the same MediaWiki code (from the standard Debian GNU/Linux 6.0 "Squeeze" package installation). All share the same extensions, including the Debian packaged extensions, and some others installed from source. And of course, I'm migrating content from my home LAN server to the web server. In this column, I'll explain how I'm doing this in 10 "easy" (okay, actually quite hard) steps.
Making Movies with Free Software
This article is part of an on-going series on the challenges I've faced in producing two free-licensed movies, Marya Morevna, through the Morevna Project and Lunatics, which we are working on as Anansi Spaceworks.
For some time now, we've been working on a wiki on our home LAN (as I covered in a previous column), but in order to involve more people in the Lunatics video project, we've got to put that information online, and we have to enable collaboration. On the other hand, unlike Wikipedia, we are running a project under creative direction, so we don't want a completely wide-open door. In fact, we need several different layers of collaboration, and even a little bit of secrecy (so as not to reveal spoilers about upcoming episodes). It's a fairly tricky balance -- even when all the software is designed for what you want.
MediaWiki, however, is not a perfect fit to this kind of selective-security design. You can set the access controls for an entire wiki, but not for individual pages or categories. There is, however, a set of tools for combining multiple wikis -- this is used by Wikimedia to separate its various services (such as Wikipedia, Wictionary, Wikimedia Commons, etc) and also to deal with multiple languages (each different language version of Wikipedia is really a different wiki).
And it does provide basic access control at the wiki level -- you can set up various permissions. In particular, you can create almost any combination of these options:
| Type of Access | See | Edit | Add Page | Upload file | Add User |
|---|---|---|---|---|---|
| Anonymous Users | Y/N | Y/N/C | Y/N/C | Y/N/C | Y/N/C |
| New Users | Y/N | Y/N/C | Y/N/C | Y/N/C | Y/N/C |
| Confirmed Users | Y/N | Y/N/C | Y/N/C | Y/N/C | Y/N/C |
| Administrative Users | Y/N | Y/N/C | Y/N/C | Y/N/C | Y/N/C |
Table 1: Grid of most common access controls for MediaWiki
The "Y" of course means you can do it, "N" means you can't, and "C" means you can, but you have to pass a CAPTCHA test to confirm you're a human being before you do!
For Lunatics, I've determined that I'll need three different wikis: one privately-edited wiki for general use, one completely private wiki for the production team to use for collaboration, and one public wiki for community contributions from people who don't want to join the production team, but would still like to share models or art with us.
While I'm at it, I'm going to set up two additional wikis for two other on-going projects: my "Lib-Ray" HD video format project and my "Open Hardware" resources site. These will use the same configuration as the "public wiki" for the Lunatics projects, since they are intended to allow for community contributions.
Parallel MediaWiki installations
First, let me explain how the multiple wikis are set up. This is a little bit of a rehash, because I covered a nearly identical configuration in my previous column about using MediaWiki on a home LAN. But there are a few refinements here, since this site is "for company".
There's a lot of different ways to do this, but oddly enough, I never found one quite like the way I finally did it. I couldn't see any reason why I needed all of the wikis to cohabitate in a single database, and doing so with table prefixes would've made the MySQL tables a terrific mess (not that I look at them much, but what if I have to?). So, instead, I just created a separate database for each wiki.
This costs essentially nothing in terms of disk space or CPU overhead. I think the only reason for putting everything in one database is if you don't manage the database server yourself, but I use Virtual Private Server (VPS) hosting, so I have root on my server, and I don't have to go through any intermediaries (My problem is just keeping things simple enough so that I can maintain it myself).
I don't like having separate copies of the MediaWiki source code, not because of the space it takes up, but because of the possibility of them losing synchronization (e.g. upgrading one, but not the others). I also want them to use the Debian GNU/Linux package version of MediaWiki, because I don't need the headaches of a from-source installation.
I need several extensions, and the Debian package provides some of those. But I also need a few that aren't packaged, and so I did install those from source. This is quite easy since they are just PHP scripts integrated into MediaWiki. Essentially, you just have to copy them to the right place.
So, to recap: When I finish, I will have multiple mediawiki sites under /var/local/mediawiki. Each will be a symlinked copy of the package installation in /var/lib/mediawiki. Each will, however, have its own config and images directories. For each, the extensions directory will actually be a symbolic link to the directory /var/local/mediawiki/extensions, which itself is a symlinked duplicate of the /var/lib/mediawiki/extensions, but with extra extensions as real scripts.
This arrangement has several advantages:
- Full use of existing Debian packages
- Allows source-installed upstream extensions
- Each wiki is quite independent of the others
- Minor upgrades to mediawiki upgrade all wikis at once
It does of course have a few disadvantages:
- It requires full root access for MySQL and server
- Sensitive to code reorganization (brittle)
- Many wikis can add additonal administration troubles
- No "single" sign-on -- each wiki has its own password list
Step 1 - Install Debian Packages
First, I installed the packages I need:
# apt-get update

# apt-get install vim

# apt-get apache2

# apt-get install php5-gd mediawiki mediawiki-extensions mediawiki-math
Of course, each of these will produce a lot of output that I've omitted, and you'll typically need to confirm installation, but I'm assuming you already know how to install Debian packages with apt-get.
Step 2 - Create ghost installations for each wiki:
Now, I want to make the directories where each instance will live:
# cd /var/local

# mkdir mediawiki

# cd mediawiki

# mkdir lunatics production contrib hardware libray extensions log
The first five directories here are for each of the five wikis. The extensions directory will have the shared extensions, including the ones I've installed from source. The log directory is where I tell MediaWiki to keep its logs. There are exactly a zillion ways to configure this on your system, but I find /var/local/mediawiki convenient to remember.
Next, I need to populate the wiki directories:
# cd lunatics

# mkdir images config

# chown www-data:www-data images config

# rm extensions

# ln -s /var/local/mediawiki/extensions extensions

# ln -s /var/lib/mediawiki/* .

# rm LocalSettings.php

# cd config

# ln -s /var/lib/mediawiki/config/index.php .

# cd ../..
And of course, I repeat this for each of the other four wiki sites. Each directory has its own copy of the "config" directory (which of course, defines the particulars for that wiki) and its own "image" directory (this is where uploaded files like images get stored). And of course, these have to be writable by the web server. The name extensions is bound to the single directory, /var/local/mediawiki/extensions, that supports them all (not to be confused with /var/lib/mediawiki/extensions which is the default file from the Debian installation).
Edit Apache Aliases (First Pass)
Prior to installation, we need simple aliases to allow access to the wikis. This is not the final configuration, but if you jump ahead and try to set up "Short URLs" early, you'll most likely botch the installer. Better to leave it and change afterward (I say this after a few painful experiments, of course).
Another caveat to be aware of: the default Debian installation for MediaWiki places the aliases in the generic Apache configuration file directory (i.e. /etc/apache2/conf.d). This will make the wikis appear on ALL domains served by the same Apache server (so, for example, http://lunatics.tv/wiki, http://hardware.narya.net/wiki, and http://lib-ray.org/wiki would all point to the same wiki instance (or conflict). Clearly I don't want that. So I need to place the aliases in the domain's respective VirtualHost blocks in the Apache site configuration files under /etc/apache2/sites-available.
# cd /etc/apache2/sites-available

# vim no_zope
Why my Apache 2 config file is called "no_zope" is a topic for another day. The entire site is configured in this file, though.
For now, I'm just adding the following lines to the VirtualHost block for the lunatics.tv domain:
        Alias   /wiki        /var/local/mediawiki/lunatics

        Alias   /contrib     /var/local/mediawiki/contrib

        Alias   /production  /var/local/mediawiki/production
So now the whole block looks like this:
# lunatics.tv

<VirtualHost *:80>

        ServerName lunatics.tv

        ServerAlias www.lunatics.tv

        DocumentRoot /var/www/lunatics.tv/htdocs

        Errorlog /var/www/lunatics.tv/logs/error_log

        TransferLog /var/www/lunatics.tv/logs/access_log

        Alias   /wiki        /var/local/mediawiki/lunatics

        Alias   /contrib     /var/local/mediawiki/contrib

        Alias   /production  /var/local/mediawiki/production

</VirtualHost>
I make similar changes for the hardware.narya.net and lib-ray.org VirtualHost blocks.
It's probably obvious, and may already be done, but I do need to make sure that my "available" site is "enabled", by symlinking it into the appropriate configuration directory, like this:
# cd /etc/apache2/sites-enabled

# ln -s ../sites-available/no_zope .
After making these changes, it's necessary to restart Apache, like so:
# /etc/init.d/apache2 restart
Step 3 - MySQL Management
I nearly skipped this step, which is why I do it now. I need to make sure I have a root user and password for my MySQL server.
# mysqladmin -u root password [password-omitted]

# mysqladmin -u root -p status

Enter password:

Uptime: 519159  Threads: 1  Questions: 124  Slow queries: 0  Opens: 99  Flush tables: 1  Open tables: 23  Queries per second avg: 0.0

#
If it seems weird that a freshly-installed MySQL has tables in it, remember that MySQL uses its own tables to manage user accounts and other administrative information.
Step 4 - Configure MediaWiki sites
Now you need to visit each wiki site. If it's not clear from the above, let me explicitly state that the wikis are now at these URLs:
| URL | Directory | Description |
|---|---|---|
http://lunatics.tv/wiki |
/var/local/mediawiki/lunatics |
Main "Lunatics" wiki |
http://lunatics.tv/production |
/var/local/mediawiki/production |
Production wikis |
http://lunatics.tv/contrib |
/var/local/mediawiki/contrib |
Community Contribution wiki |
http://hardware.narya.net/wiki |
/var/local/mediawiki/hardware |
Open Hardware resources wiki |
http://lib-ray.org/wiki |
/var/local/mediawiki/libray |
Lib-Ray wikis |
Table 5: Home locations of the five wikis I'm installing
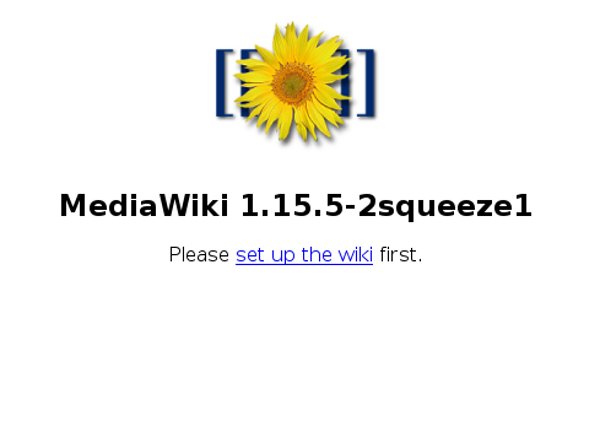
Visiting each of these URLs leads to an installation page (Like the one in Figure 1).
Click on the link to continue, and you will find yourself on a configuration form. This is a very long form, so I'll go over it a piece at a time. First of all, you need to decide on the default license for your wiki's contents. In my case, I want "Creative Commons Attribution-ShareAlike 3.0, unported" (CC By-SA 3.0). You should do this first because using the online selection widget causes all the other form fields to be lost.
So, I select "A Creative Commons license" and then click on the "choose" button. This navigates to a page from creativecommons.org which provides a license selector. To get By-SA, I have to choose "Yes" and "Yes"/"ShareAlike". Then I click okay, and I come back to the MediaWiki installation with the CC license filled in correctly. There's probably a faster way around this (look at the URL in the location bar of the browser), but this is simple enough. Next I fill in obvious things like the name of the wiki, and so on. See Figure 2 for this part filled out.

Further down this form, I set the database name, the database username, and I provide the database superuser name and password so that the installer can create the necessary user. There are also options for e-mail confirmation. I leave these at the default settings -- on my web server, all of this stuff is configured already and it makes sense to use it.
The box labeled "MySQL Specific options" is pretty esoteric stuff, but there's no need to mess with it. I just accept the defaults, which are fine for a typical small installation like mine (the main issue is that I use the same settings as I did on my prototype server from which I'm planning to import content -- but of course, I used the defaults there, too).
After the form is all filled in, I submit it by clicking the button labeled "Install MediaWiki". After this, there is a brief delay, and then I get an "Installation Successful" page (See Figure 3).
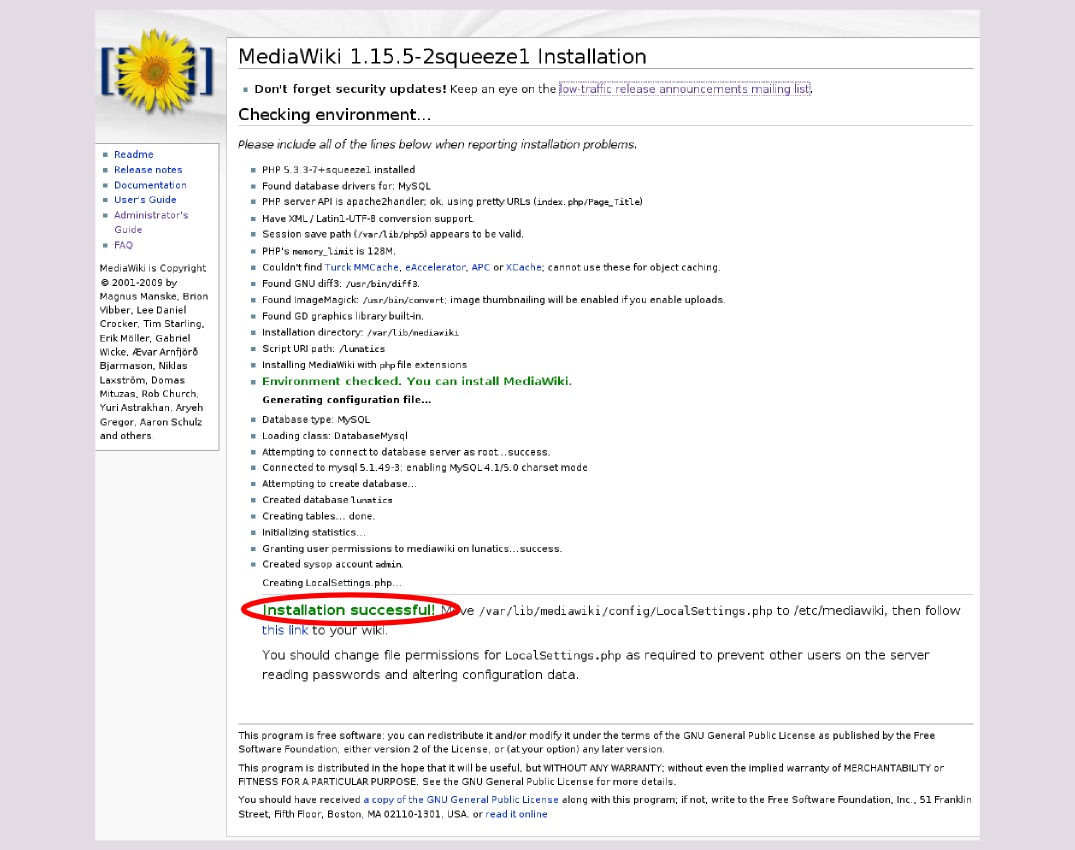
The instructions at the bottom of this page are slightly misleading -- I do not move the LocalSettings.php into the /etc hierarchy as it suggests (there are symlinks set up so that this makes sense in the default Debian installation which provides a single wiki, but my multiple wiki setup uses a separate version of LocalSettings.php for each wiki), as we'll see in the next step.
Step 5 - Move LocalSettings.php and test
Next, I move the LocalSettings.php file out of the config directory to the main directory for each MediaWiki instance:
# cd /var/local/mediawiki/lunatics/config

# mv LocalSettings.php ..

# cd ..
(Of course, I repeat this for each of the five wikis).
Now, I need to start customizing the wikis. First of all, I find the default sunflower logo really boring, and I think wikis look a lot more professional with an appropriate logo. So I created these in Inkscape. You need a 135x135 square PNG image for this. I designed slight variations on the different Lunatics wikis as a visual cue to which site you're on, but kept the most important elements to unify them. I made quite different logos for the Open Hardware and Lib-Ray sites.
These logos need to be copied onto the respective sites under the /var/www hierarchy. For example, my main Lunatics wiki logo is /var/www/lunatics.tv/htdocs/lunatics_wiki_logo.png on the filesystem, which appears as http://lunatics.tv/lunatics_wiki_logo.png on the web (try it and see).
Then we add a line to the LocalSettings.php to link this image:
$wgLogo = "$wgServer/lunatics_wiki_logo.png";
For all of these wikis, which will be used rather heavily for uploading content files of all types, I also need to set some parameters to make them more upload-friendly:
$wgEnableUploads  = true;

$wgFileExtensions = array_merge($wgFileExtensions, array( 'svg', 'blend', 'lyx', 'ogg', 'flac', 'wav', 'pdf', 'txt', 'mp3' ));

$wgUploadSizeWarning = 5 * 1024 * 1024;

$wgVerifyMimeType = false;
These lines enable uploading (this parameter is probably already in the file -- you just need to set it to true), extend the number of filetypes that can be uploaded, greatly raise the upload size limitations, and eliminate a mime-type check which occasionally hangs on the less familiar data types (this is a small security risk, since someone could upload malicious files, but as long as we're aware of this possibility, it's not a very serious problem).
Another small change is to update the "install path". This only affects a few things, but if it's set wrong, some scripts will look in /var/lib/mediawiki directory, instead of the appropriate ghost directory under /var/local/mediawiki. So, for example, for the "lunatics" wiki we need:
define('MW_INSTALL_PATH','/var/local/mediawiki/lunatics');
Step 6 - Install and configure extensions
The extensions that are included in Debian are provided by the package "mediawiki-extensions", and they have to be enabled before they can be used. To do this, you need to create symlinks in the directory "/etc/mediawiki-extensions/extensions-enabled/" to the PHP scripts in "/etc/mediawiki-extensions/extensions-available/", like this:
# cd /etc/mediawiki-extensions/extensions-enabled/

# ln -s ../extensions-available/Cite.php .

# ln -s ../extensions-available/CategoryTree.php .

# ln -s ../extensions-available/ConfirmEdit.php
This enables the extensions Cite (which provides footnote citations), CategoryTree (which allows hierarchies of wiki categories to be displayed), and ConfirmEdit (which provides the CAPTCHA service I'm using).
Now, I also have a few extensions that I got from the upstream MediaWiki site. I actually had to pull LabeledSectionTransclusion from the Subversion version control system. I documented this in my previous MediaWiki column, so I won't go into details. For this installation, all I had to do was to archive the directories, copy them onto the server, and expand them under the /var/local/mediawiki/extensions directory that I created for this purpose. The extensions I installed this way were: OggHandler (for sound files), Interwiki (we'll come back to this one -- it provides shortcuts for communicating between my wikis), SpecialUploadLocal (lets me do mass imports from the filesystem on the server if needed), Timeline (generates graphical timelines from wiki markup -- not too sure about the value of this one), LabeledSectionTransclusion (which allows sections of articles to be "transcluded" into other articles -- indispensable for script development, I found on my home server), and Calendar (which provides a calendar using wiki markup).
It is also necessary, though, to add some code to each wiki's LocalSettings.php configuration file. The common lines are these (these have to be added for each of the five wikis):
# MANUAL EXTENSIONS

require_once ( 'extensions/SpecialUploadLocal/SpecialUploadLocal.php');

require_once ( 'extensions/LabeledSectionTransclusion/lst.php' );

require_once ( 'extensions/LabeledSectionTransclusion/lsth.php' );

require_once ( 'extensions/Interwiki/SpecialInterwiki.php' );

require_once ( 'extensions/OggHandler/OggHandler.php' );

require_once ( 'extensions/Timeline/Timeline.php' );

require_once ( 'extensions/Calendar/Calendar.php' );
Of course, if I wanted to avoid using one of the extensions in a particular wiki, I could do that by omitting it from this list.
Step 7 - Configure access controls
For the three wikis I need for Lunatics, I will need different security configurations. There is detailed documentation for these configurations on the MediaWiki site. Here, I will just show the particular configurations I need.
The first is for general information and collaboration on properties, sets, and characters, and one specifically for episode production. This is the default "wiki". It includes things like the characters, sets, and 3D models we'll be using for production, as well as the "story bible" that keeps all the details about these things consistent. For that wiki, we want to have universal read access, but editing should be reserved for the production team. E-mail confirmation of users is not very important, because the only way to join is to send me an email:
| Type of Access | See | Edit | Add Page | Upload file | Add User |
|---|---|---|---|---|---|
| Anonymous Users | Y | N | N | N | N |
| New Users | Y | Y | Y | Y | N |
| Confirmed Users | Y | Y | Y | Y | N |
| Administrative Users | Y | Y | Y | Y | Y |
Table 2: Permissions for basic "Lunatics" wiki
This set of permissions requires these lines in the LocalSettings.php file:
# Disable anonymous editing

$wgGroupPermissions['*']['edit'] = false;


# Prevent new user registrations except by sysops

$wgGroupPermissions['*']['createaccount'] = false;
The second is the "production" wiki -- a semi-secret wiki accessible only to the production team. Joining the team won't be hard, but it will involve contacting me so I can assign a username and password.
This solves a number of problems: it ensures that I know everyone working on the project, that everyone has had my standard introductory explanation of how things work, and also that when they contribute original content, it will be correctly attributed more or less automatically (though of course, they'll have to explain if they are uploading someone else's work).
So that wiki will be similar, except that outsiders won't be able to read it:
| Type of Access | See | Edit | Add Page | Upload file | Add User |
|---|---|---|---|---|---|
| Anonymous Users | N | N | N | N | N |
| New Users | Y | Y | Y | Y | N |
| Confirmed Users | Y | Y | Y | Y | N |
| Administrative Users | Y | Y | Y | Y | Y |
Table 3: Permissions for "Production" wiki
These permissions look like this in the LocalSettings.php file (taken straight from the MediaWiki site -- this is their "basic private wiki" configuration):
# Disable reading by anonymous users

$wgGroupPermissions['*']['read'] = false;


# But allow them to access the login page or else there will be no way to log in!

# NOTE: You also need to provide access here to the .css and .js files that the

# allowed pages attempt to load; otherwise, users will get errors on the page

# when they attempt to load it (IE will complain about the errors;

# FF will show them in its error console)

# [You also might want to add access to "Main Page", "Wikipedia:Help", etc.)

$wgWhitelistRead = array ("Special:Userlogin", "MediaWiki:Common.css",

"MediaWiki:Common.js", "MediaWiki:Monobook.css", "MediaWiki:Monobook.js", "-");


# Disable anonymous editing

$wgGroupPermissions['*']['edit'] = false;


# Prevent new user registrations except by sysops

$wgGroupPermissions['*']['createaccount'] = false;


# CAPTCHA - Don't need? (Access is restricted anyway)

# require_once( "$IP/extensions/ConfirmEdit/ConfirmEdit.php" );

# $wgCaptchaClass = 'SimpleCaptcha';
As the comments note, you can expose particular pages individually if you want to (in principle, I could probably have merged the two wikis using this, but I think keeping them separate is more manageable).
Finally, it occurs to me that we might call for new content from the community. This will all be migrated into the main Lunatics wiki after being vetted by the production team. But where does it go initially? For that we need a special "community contributions" wiki. We'll have to watch this one, because it's the one that'll be easiest to spam.
So on this site, we'll be making use of CAPTCHA (to try) to make sure that new users are humans and not spam bots. This is not 100% effective, and some humans spam, too, but it'll help. In this case, of course, the email confirmation is a useful step. Its permissions will look like this:
| Type of Access | See | Edit | Add Page | Upload file | Add User |
|---|---|---|---|---|---|
| Anonymous Users | Y | C | N | N | C |
| New Users | Y | C | C | C | N |
| Confirmed Users | Y | Y | Y | Y | N |
| Administrative Users | Y | Y | Y | Y | Y |
Table 4: Permissions for the "Community Contributions" wiki, as well as for the "Lib-Ray" and "Hardware" wikis on different domains hosted on the same server
I will use the same configuration for the other two wikis, though of course, they'll be set up on their respective domains (lib-ray.org and hardware.narya.net). These all have this configuration, which additionally uses features of the ConfirmEdit extension, from the ConfirmEdit documentation:
# Restrict page creation to email-confirmed users:

$wgGroupPermissions['*'            ]['createpage'] = false;

$wgGroupPermissions['user'         ]['createpage'] = false;

$wgGroupPermissions['emailconfirmed']['createpage'] = true;


# CAPTCHA

require_once( "$IP/extensions/ConfirmEdit/ConfirmEdit.php" );


# Simplest CAPTCHA - math problems

$wgCaptchaClass = 'SimpleCaptcha';


# Triggers (some of these are defaults, but included to show options)

$wgCaptchaTriggers['edit']          = true;

$wgCaptchaTriggers['create']        = true;

$wgCaptchaTriggers['addurl']        = true;

$wgCaptchaTriggers['createaccount'] = true;

$wgCaptchaTriggers['badlogin']      = true;


# Exceptions...

# Recognize e-mail confirmation in ConfirmEdit

$ceAllowConfirmedEmail = true;


$wgGroupPermissions['*'            ]['skipcaptcha'] = false;

$wgGroupPermissions['user'         ]['skipcaptcha'] = false;

$wgGroupPermissions['sysop'        ]['skipcaptcha'] = true;

$wgGroupPermissions['emailconfirmed']['skipcaptcha'] = true;
Step 8 - Set up short, mnemonic URLs
At this point, MediaWiki is pretty much working like I want it to, but when I look at the location bar when I visit the wiki, I can see it's still pretty complicated. This isn't so terrible, but it violates the assumptions of users who learn MediaWiki from Wikipedia, and they'll find the URLs confusing if they want to link to them.
It's better to have simpler URLs, and it's not that hard to set up. MediaWiki officially does not recommend mapping the URL directly to the unadorned domain name (i.e. so that my main page would be: http://lunatics.tv/Main_Page). This is because the virtual pages would clash with the static web pages -- not just for my normal web pages, but also for things like "favicon.ico" and "robots.txt" that are automatically retrieved by some browsers and search engines. It's simpler to avoid this. That's why I chose to use "http://lunatics.tv/wiki" instead of, say, "http://wiki.lunatics.tv" for my wiki location.
There's more than one method of doing this, and there is a full page of documentation on Short URLs on the MediaWiki site. I chose a simple method that fits my site. It require two sets of changes, one in my Apache site file (no_zope, as mentioned above) and one in each respective LocalSettings.php file. Remember to do both. As far as I can tell, it isn't damaging to leave one out, but it sure can be confusing.
First, the changes to /etc/apache2/sites-available/no_zope. The VirtualHost block for Lunatics is changed to read like this:
# lunatics.tv

<VirtualHost *:80>

        ServerName lunatics.tv

        ServerAlias www.lunatics.tv

        DocumentRoot /var/www/lunatics.tv/htdocs

        Errorlog /var/www/lunatics.tv/logs/error_log

        TransferLog /var/www/lunatics.tv/logs/access_log

        Alias   /wiki/skins             /var/local/mediawiki/lunatics/skins

        Alias   /wiki/images            /var/local/mediawiki/lunatics/images

        Alias   /wiki/index.php         /var/local/mediawiki/lunatics/index.php

        Alias   /wiki                   /var/local/mediawiki/lunatics/index.php

        Alias   /contrib/skins          /var/local/mediawiki/contrib/skins

        Alias   /contrib/images         /var/local/mediawiki/contrib/images

        Alias   /contrib/index.php      /var/local/mediawiki/contrib/index.php

        Alias   /contrib                /var/local/mediawiki/contrib/index.php

        Alias   /production/skins       /var/local/mediawiki/production/skins

        Alias   /production/images      /var/local/mediawiki/production/images

        Alias   /production/index.php   /var/local/mediawiki/production/index.php

        Alias   /production             /var/local/mediawiki/production/index.php

</VirtualHost>
The main difference here is that we are including the index.php script in the aliased URL. However, it is necessary to support the original form of URL, by mapping URLs ending with index.php to the correct spot, and we need to punch a hole through for the skins directory, which is a real directory in the MediaWiki installation.
The configuration for the hardware and lib-ray sites follow the same pattern.
After making this change, I need to make some minor changes in the behavior of the wiki, by adding these lines to LocalSettings.php (I have to remember to do this for each of the five wikis):
# Short URL / alias mods

$wgScript      = "$wgScriptPath/index.php";

$wgArticlePath = "/wiki/$1";
And of course, since we've made changes to the Apache configuration, we have to restart it for those to take effect:
# /etc/init.d/apache2 restart
Step 9 - Set up interwiki linking
Since I'm using several wikis that ought to know about each other, it's useful to set up "interwiki" linking with the "Interwiki" extension. This allows me to use links between my separate wikis, using a short code which looks like a "namespace" in the wiki. The extension also provides a wiki-page installation interface so that administrators can maintain the namespace aliases. By default, the list includes external wikis like the Wikipedia wiki itself -- which I find quite useful, since I sometimes want to reference real-world documentation.
This gives the wikis an integrated feel -- just like when you are using the Wikimedia online services: it's easy to switch from Wikipedia to the Wikimedia Commons, for example. So we need to include the Interwiki extension (if we haven't already), and we need to set the permissions to allow administrators (but no one else) to modify it. I add this to the LocalSettings.php of each wiki:
require_once ( 'extensions/Interwiki/SpecialInterwiki.php' );


$wgGroupPermissions['*']['interwiki'] = false;

$wgGroupPermissions['sysop']['interwiki'] = true;
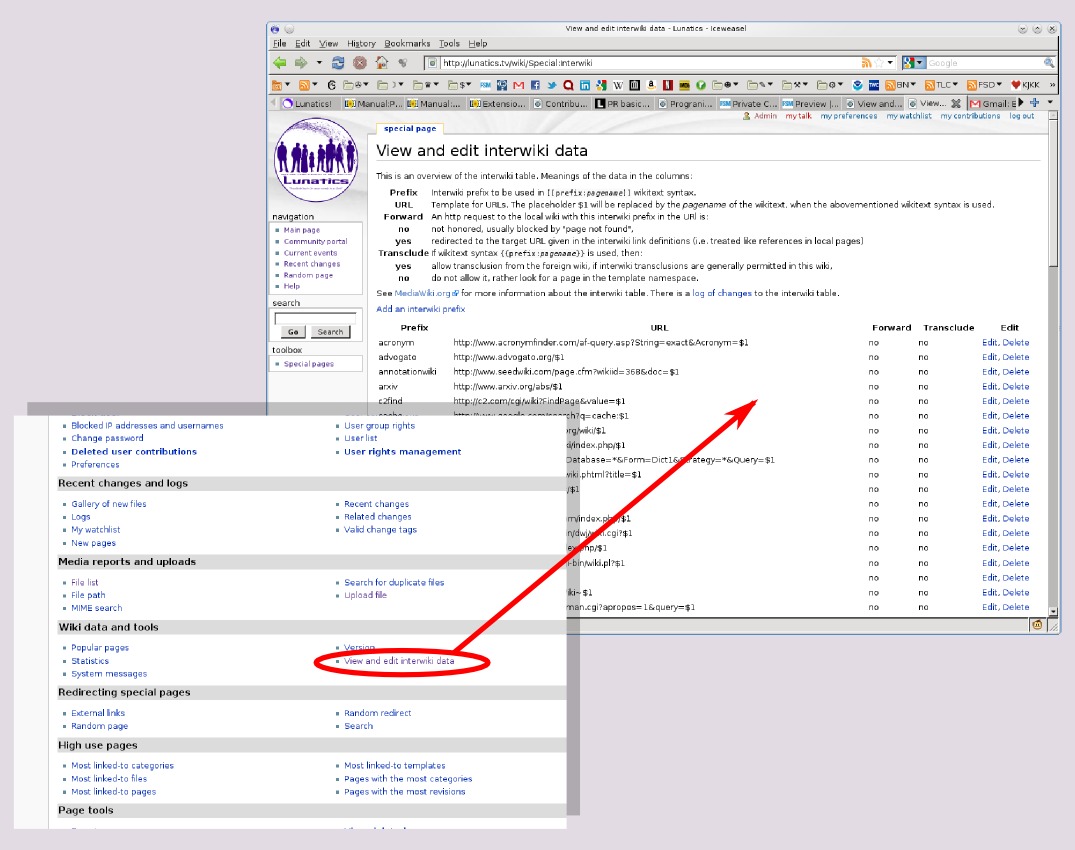
Now that the Interwiki extension is configured, I can log in as administrator on my wiki and access the page (See Figure 4).
From there, I will be able to set up my namespace-to-wiki mappings:
| Namespace | Actual Wiki URLs |
|---|---|
| lun | http://lunatics.tv/wiki |
| contrib | http://lunatics.tv/contribut |
| prod | http://lunatics.tv/production |
| hw | http://hardware.narya.net/wiki |
| libray | http://lib-ray.org/wikis |
Custom Interwiki mappings for my wikis
Of course, you don't need to provide a namespace for the wiki you're on, but otherwise, these mappings will be the same for all five of our wikis, providing simple shortcuts between them. There are also several other useful interwiki mappings that come defaulted with the package, such as wikipedia for Wikipedia.
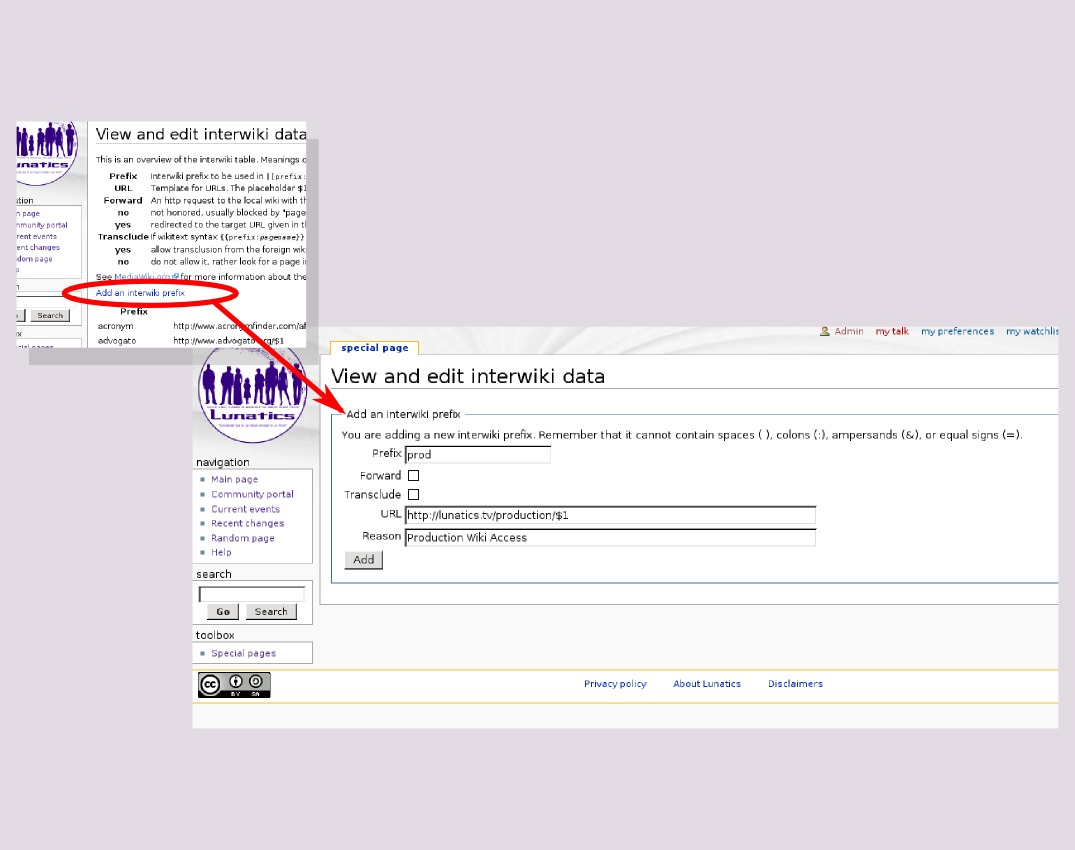
To add these, login as the site administrator, navigate to "Special pages", then, under "Wiki data and tools", click on "View and edit interwiki data". From here, you can see all the currently defined wikis. Then click "Add an interwiki prefix" to add a new one (See Figure 5). Repeat for all the wikis.
Step 10 - Migrate data from home server to web server
At this point, I now have a complete and (I think) correctly-configured MediaWiki installation on my server. The only thing remaining is to move the data from my home LAN server onto this new public server.
First, of course, I need to dump the contents of the source wiki on my computer, using the dumpBackup.php script. Remember: this part is on my home server, not the public server where I've been doing the rest of this work:
# cd /var/local/mediawiki/lunatics

# php maintenance/dumpBackup.php --conf=/var/local/mediawiki/lunatics/LocalSettings.php --current > ../lunatics-migrate-20110506.xml
This will then putter along for awhile (depending on how large the wiki is), printing out status reports. Then you'll have the pages from your wiki backed up. These are the elements of the wiki that are stored in the MySQL database as text.
I could've made a "full" backup instead (with "--full"), but it would include some private notes I don't want released in public, and users can look at past revisions of pages on a MediaWiki wiki. So instead, I use "--current" to back up only the latest revisions -- this will be the starting point for the public wiki.
There are also "images" (including other kinds of files that are opaque the wiki, such as music files or 3D models, in addition to images and SVG vector graphic files). These are not stored in the database, but are instead placed in a collection of directories under the images directory in the mediawiki installation. Interestingly, no metadata is required -- as long as the file names are retained, they will get stored in the right place on the target wiki. So all I have to do is to collect these for uploading:
# cd /var/local/mediawiki

# mkdir images

# mkdir images/lunatics

# cd /var/local/mediawiki/lunatics/images

# cp [0-9a-f]/*/* ../../images/lunatics/

# cd ../../images

# tar zcf ../lunatics_images-20110506.tgz lunatics
Now I need to move these archives onto my server:
# cd /var/local/mediawiki

# scp lunatics_images-20110506.tgz lunatics-migrate-20110506.xml root@narya.net:/var/local/mediawiki/
Then, I log onto my server, and finish the migration there.
Now I need to run the importDump.php maintenance script to import the wiki:
# cd /var/local/mediawiki/lunatics

# php maintenance/importDump.php --conf=/var/local/mediawiki/lunatics/LocalSettings.php ../lunatics-migrate-20110506.xml
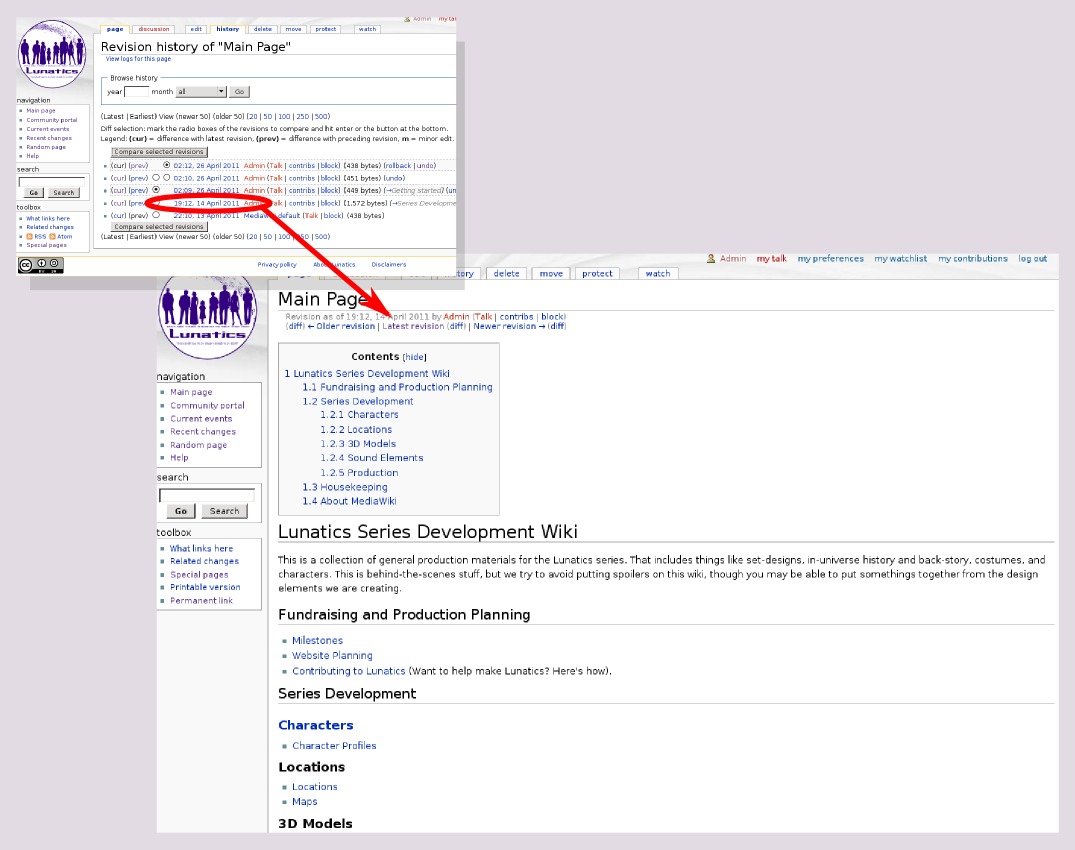
Okay, now you'd think I'd be done at this point, but this is what I see when I return to the main page (Figure 6). What the heck happened? Making sure I'm logged in as the administrative user, I click on the "history" tab, and you can see what the problem is (Figure 7). MediaWiki keeps its revisions based on wiki pages and dates -- but of course, the new MediaWiki that I am setting up was installed after the last edit on the Main_Page of my home wiki. It's possible that I could've avoided this by saving a revision of the home wiki right before exporting, but it's not hard to fix now, and this way I can share this little "gotcha" with you.

I find the correct revision by clicking on the dates and viewing past revisions (it's not hard to find -- there's a gap in the dates, and that revision has a descriptive comment). I click on that date, then click on the "edit" tab. I add a descriptive comment ("INITIAL MIGRATION TO LUNATICS.TV") for later reference, and I submit this page as the newest revision.
Note that, on a fresh installation, there won't be any other pages confused in this way, because none of the other pages will have been created on the server to shadow the uploaded ones.
Okay, now we just have to add the image files that we uploaded above. I start by unpacking the images:
# cd /var/local/mediawiki

# mkdir images

# cd images

# tar zxf ../lunatics_images-20110506.tgz
Then I need to run a separate MediaWiki maintenance script, importImages.php to import the images into the wiki:
# php maintenance/importImages.php --conf=/var/local/mediawiki/lunatics/LocalSettings.php --overwrite ../images/lunatics
In my case, I only really needed to migrate my open and production wikis, the others will start out empty on the server, and I'll edit them there.
That's it!
After this (yes, I know it was pretty complicated), it's possible to explore the site and verify that it's all there. Since this is my actual live site, you can check it out for yourself by visting here: Lunatics Wiki. This was quite a hassle, but once installed, MediaWiki is very robust, and it is very easy for users to use, which is why I decided on it in the end.
Having set this up, I've cleared a major hurdle, as it will now be possible to collaborate with other people over the internet, and I can therefore start opening the project up a little bit. It's only the first step in a long process, but it's an important one!
Licensing Notice
This work may be distributed under the terms of the Creative Commons Attribution-ShareAlike License, version 3.0, with attribution to "Terry Hancock, first published in Free Software Magazine". Illustrations and modifications to illustrations are under the same license and attribution, except as noted in their captions (all images in this article are CC By-SA 3.0 compatible).