As I was working on a sound track project for a science-fiction film I've been working on, I remembered reading an article in Free Software Magazine, by Gianluca Pignalberi, in which he described filtering using Gimp and a command-line program then called "ARSE" (version 0.1). The program is now called "The Analysis & Resynthesis Sound Spectrograph" ("ARSS", now version 0.2.3). Combined with an image editor of your choice (I also chose Gimp), it also turns out to be a very interesting way to make original sound effects -- by painting the sound spectrum.
Making Movies with Free Software
This article is part of an on-going series on the challenges I've faced in producing two free-licensed movies, Marya Morevna, through the Morevna Project and Lunatics, which we are working on as Anansi Spaceworks.
Originally, I went back to Pignalberi's article because I wanted to find a way to imitate some unusual voice filtering effects that I had heard. This turns out to be a bit of a dead end, because the method that ARSS uses causes distracting distortions of its own when applied to voices (a bit like a vocoder, which of course, has its own uses, but not for what I wanted).
I was very excited by the possibility of creating sound effects from scratch
However, I was very excited by the possibility of creating sound effects from scratch. In my project, I need a lot of sounds that I can't easily find real-world recordings for, and while I sometimes have a good idea of what it should sound like, I can't always find a way to create that sound. Audacity is very good, and it does have a few features for generating sound effects from scratch -- but they're very limited in what they can do (although possibly complementary).
Getting ARSS
The arss utility itself is free software, and is available from its website. When you visit, you'll probably notice the text saying that ARSS is "superseded" by a GUI application called "Photosounder." Well, I'm sure it's a nice program, but it's non-free "demo-ware" and is only available as a Windows binary. Given that it doesn't really provide much extra functionality beyond what I can do with Gimp and ARSS, I'll stick with the free software stuff.
I was not able to find a Debian package for ARSS, but this wasn't too much of a problem. The program is available for download in both source code and a fairly generic Linux binary. It has few dependencies, and the binary is a statically linked single file, so it's particularly easy to install:
# tar zxf arss-0.2.3-linux-binary.tar.gz

# chmod a+x arss

# cp arss /usr/local/bin/
The chmod line is probably unnecessary, but I thought I should show how to set the executable flags, just in case. There is only the one executable file. Naturally, to move the file into /usr/local/bin you will need root privilege. Alternatively, you can but the binary anywhere else on your command path that is convenient, or just call it by its full path name.
Using ARSS
The program is very simple to use, though it is limited in what data it can handle. The only images supported are 24-bit RGB BMP format (note that this is a little nonsensical, since the images are always monochrome -- color has no meaning to the program). The only supported sound format is WAV. So if you use other formats, you'll have to use other tools to convert.
To convert a WAV sound file into a BMP image for editing, use the "analysis" mode of ARSS:
$ arss --analysis foo.wav foo.bmp

The Analysis & Resynthesis Sound Spectrograph 0.2.3

Input file : foo.wav

Output file : foo.bmp

Min. frequency (Hz) [12.000]:

Bands per octave [48.000]:

Max. frequency (Hz) (up to 21580.827) [19789.705]:

Bands : 514

Pixels per second [300.000]:

Image size : 820x514

 514/514 (FFT size:  19683)   4669.75 Hz - 4806.58 Hz

Processing time : 22.873 s
The program will query for various sampling settings, as you can see above, and it will provide defaults matching the last time you invoked the program. The settings above were used for all of the sound effect examples in this article, although you might want to spend some time tweaking them to get different sounds.
The end result is the requested BMP file, which in this case, looks like this:
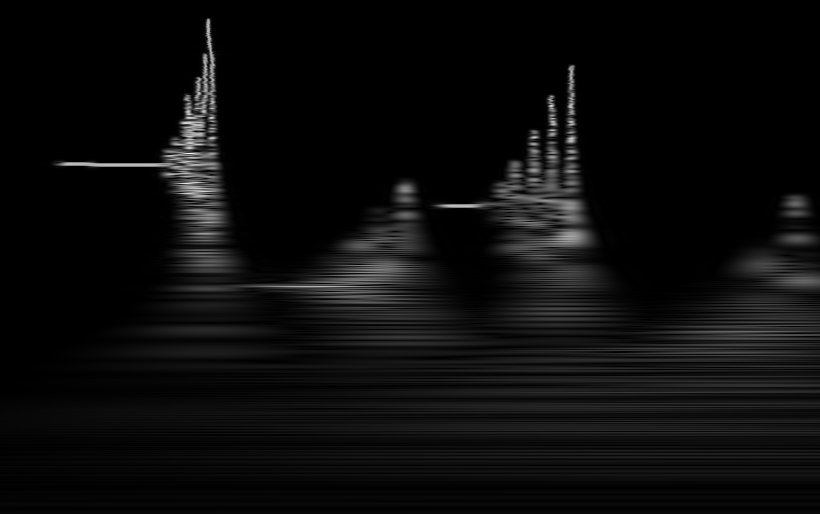
An audio spectrograph is a two-dimensional representation of a sound, showing the changing frequency spectrum of the sound over time.
The vertical axis represents the frequency, with the 0 row of pixels (at the top) representing the highest pitch, while the lowest (highest-numbered row) represents the lowest pitch. My low frequency setting of 12 Hz is actually somewhat below the range of human hearing (and most sound systems) and is probably not necessary. In this case, I've chosen a scale such that 48 rows are equal to one octave (each higher octave represents a doubling of frequency). The reason for choosing a number divisible by 12 is to respect the Western 12-tone musical system. This choice means that each "note" is approximately four pixels in height.
An audio spectrograph is a two-dimensional representation of a sound, showing the changing frequency spectrum of the sound over time
The horizontal axis represents the time, with one pixel equalling (in this case), 1/300th of a second (controlled by the "Pixels per second" setting above).
The intensity of each pixel is the amount of sound energy at that frequency during that instant in time.
Of course, you can load this image into Gimp (or any other bitmap editor), and manipulate it. You can stretch the image, flip it upside down, or do whatever you want. What I did for most of the sounds in this article (including the original this image comes from), is to simply fill it with black and start over, painting in the sound spectrum that I wanted.
To turn the resulting image (or any other image) back into a WAV sound sample, ARSS gives you two choices. The simpler method, is the "Sine" method:
$ arss --sine foo.bmp foo-s.wav

The Analysis & Resynthesis Sound Spectrograph 0.2.3

Input file : foo.bmp

Output file : foo-s.wav

Bits per sample (8/16/32) [16] :

Sample rate [44100] :

Min. frequency (Hz) [12.000]:

Bands per octave [48.000]:

Max. frequency : 19789.705 Hz

Pixels per second [300.000]:

Sound duration : 2.733 s

 514/514   19789.58 Hz

Processing time : 0.533 s
Note that the settings are slightly different, and some are determined from the image itself. The processing time is shorter for this step -- the sine method, which simply assigns a sine-wave based signal for each row, is very fast.
This is fundamentally a lossy process, both because of the aliasing inherent in the sampling process and because the frequency and time axes are not truly independent
Now you should be aware that this is fundamentally a lossy process, both because of the aliasing inherent in the sampling process and because the frequency and time axes are not truly independent (a rapid change in the time behavior of the signal introduces one or more frequencies, and changes in frequency similarly affect the time axis behavior). This results in a kind of tradeoff in accuracy between frequency and time. For physics fans, I will simply note in passing that this is exactly the same phenomenon that causes the "Heisenberg Uncertainty Principle" in quantum physics, where we observe that all matter also has a "wave nature", just like sound or light.
As an illustration, consider the image below, which was the actual painted source image for the sound from which the previous image was made:

Depending on the type of sound, the "sine" method may not be the most accurate approach. There is also a "noise" method which is based on generating "white noise" instead of sine waves. This is a "less pure" sound, which is more appropriate for natural, sibilant, or percussive, as opposed to highly harmonic, resonant sounds like those from an instrument, which may benefit from the sine wave approach. The noise approach is also much slower, though:
$ arss --noise foo.bmp foo-n.wav

The Analysis & Resynthesis Sound Spectrograph 0.2.3

Input file : foo.bmp

Output file : foo-n.wav

Bits per sample (8/16/32) [16] :

Sample rate [44100] :

Min. frequency (Hz) [12.000]:

Bands per octave [48.000]:

Max. frequency : 19789.705 Hz

Pixels per second [300.000]:

Sound duration : 2.733 s

 514/514   19505.99 Hz - 20077.55 Hz

Processing time : 702.822 s
(Note that the "processing time" is over 10 minutes).
Which you need will depend on the sounds you want to make, but I recommend always trying the "Sine" approach first, because it's so much faster and it will produce an approximation of the final sound, even if you feel you really need the benefits of the noise approach.
Scripts
Naturally this was so much fun my kids wanted to try it. I simplified it a little bit for them by creating script files. They're tcsh scripts, because I know how to write those, bash fanatics can write their own versions if they like:
wav2bmp
#! /usr/bin/tcsh

arss --analysis --min-freq 20.0 --max-freq 20000.0 --bpo 12.0 --pps 300.0 --brightness 0.7 --sample-rate 44100.0 $1 $1:r.bmp
bmp2wav
#! /usr/bin/tcsh

arss --sine --min-freq 20.0 --bpo 12.0 --pps 300.0 --brightness 0.7 --sample-rate 44100.0 --format-param 16 $1 $1:r-sine.wav
bmp2noise
#! /usr/bin/tcsh

arss --noise --min-freq 20.0 --bpo 12.0 --pps 300.0 --brightness 0.7 --sample-rate 44100.0 --format-param 16 $1 $1:r-noise.wav
Obviously, using these takes out some of the flexibility of the program, but they are a little quicker and easier to remember.
I did a little looking into adapting ARSS as a python script plugin for Gimp, and this doesn't look too hard. I may try to set that up later, which would be even easier to use, and restore some of the flexibility.
Painting sound
Everything else is just using the image tools in Gimp, which I will assume you can figure out. I did most of the work in the examples with the "paintbrush" tool. There is one "gotcha" I should mention:
If you create transparent regions in your image with Gimp, it will decide that it should save them as 32-bit BMP files with an alpha channel. This format is not supported by ARSS, so you may occasionally need to override this with the "Advanced Options" on the BMP format save dialog in Gimp (this sometimes requires using "Save As" and clobbering the original file instead of just using "Save"). I mention this, because I got bitten by it during my experimentation, and it took a while to figure out what had happened.
This is really a whole different way of thinking about sound for me, and I found it a lot of fun, but also very confusing.
Some hints to think about: the aspect ratio of the image is arbitrary, rotations as such do not make any real sense with sound spectra -- they simply approximate shearing effects (and the "shear" tool may produce more understandable results). Very fine horizontal lines correspond to unchanging pure notes. Very fine vertical lines correspond to staccato clicks or pops. Broad horizontal strokes tend to sound a bit like white noise, with a pitch determined by the vertical position and extent.
This is really a whole different way of thinking about sound for me, and I found it a lot of fun, but also very confusing
The human ear is very sensitive to resonances, so you will find that two thin horizontal lines at exactly one octave interval sound quite "ideal" (like major chords) while lines at other intervals often sound somewhat "sour" (like minor chords). As the sounds are made noisier by using broader lines, these distinctions become less apparent. They are also less apparent when the sounds are rising and falling.
Examples
Beyond this, I think the subject is best addressed with examples. So I'll present a sampling of my first experimental sound effects. The video below includes 18 sounds, along with the image used to create them and the image that results from reprocessing the created sound.
I'm still not quite to the point where I can imagine a sound and then create it it by painting it, but my experience suggests that that kind of control might be possible with more practice. It's certainly a different and fun way to work with sound!
Licensing Notice
This work may be distributed under the terms of the Creative Commons Attribution-ShareAlike License, version 3.0, with attribution to "Terry Hancock, first published in Free Software Magazine". Illustrations and modifications to illustrations are under the same license and attribution, except as noted in their captions (all images in this article are CC By-SA 3.0 compatible).