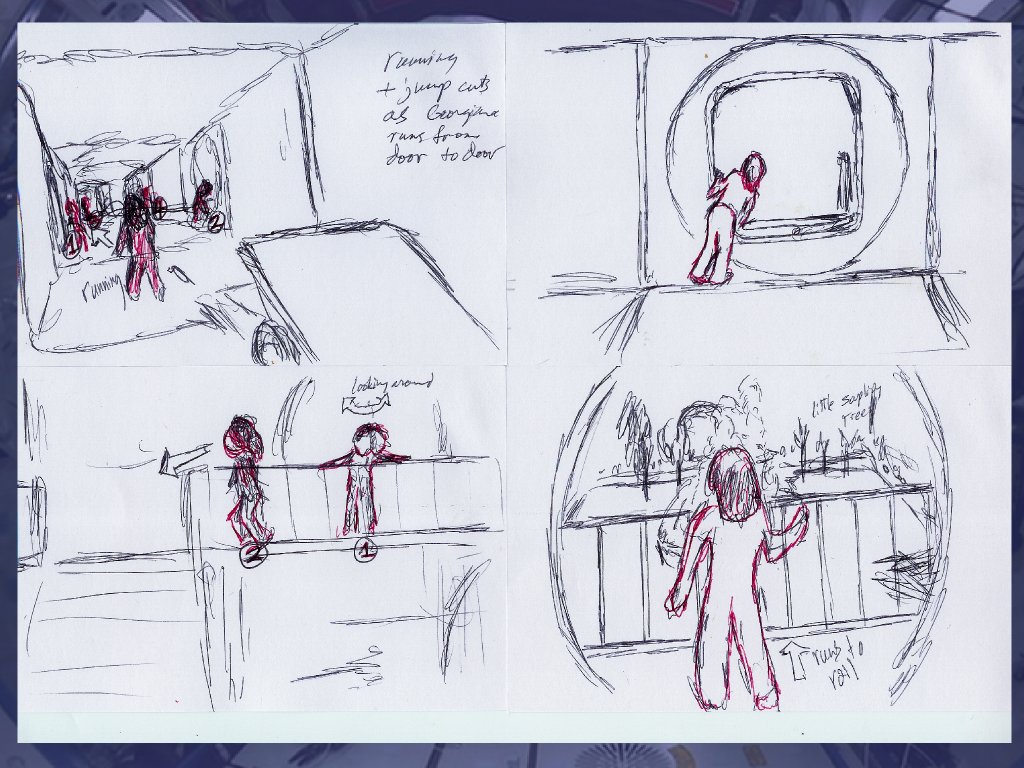
How do you get a flurry of images in your head into a concrete description of a film so that you can produce it? One important step is to create storyboards. For the storyboards on Lunatics, I've used a variety of approaches, from rough sketches on index cards to found photos and collages. This has allowed me to collect my ideas and get them into a concrete form -- both as cards I can manipulate directly and as images on computer that I will later be able to turn into an animatic.
Making Movies with Free Software
This article is part of an on-going series on the challenges I've faced in producing two free-licensed movies, Marya Morevna, through the Morevna Project and Lunatics, which I am working on as part of Anansi Spaceworks.
From Mind to Matter
Animated films (and even live-action films with animated special effects) involve quite a bit of work for every second you see on screen. This creates a production problem in terms of reduced flexibility. You can't experimentally shoot a shot over and over again from different angles until you're satisfied. Instead, you need to know exactly what you intend to produce, and then produce that.
But how do you figure it out? At first, of course, you have the ideas in your head -- you see the film like a little movie running inside your mind. But that's deceptive and difficult to quantify. So we have steps for moving the idea out of your head and onto paper (and/or into computers).
For animation or special effects shots, the shooting script is often inadequate, because it's just text
The first is usually the screenplay. Here we have descriptions of the scenes, lines, and other elements, expressed verbally. Typically, this will engender a second screenplay, called a "shooting script" with very particular descriptions of shots as we see them. Then there is the "storyboard" -- a collection of drawings of each shot. After that, we often create "animatics" and/or "pre-visualizations" (or "pre-vis").
Each step has its own strengths and weaknesses:
The original screenplay usually has only the bones of the story from the director's point of view. It tells "what happens" in the story: who speaks, what they say, what they do, and so on. It usually says very little about what the camera is doing. The advantage is that it concentrates on the writing, allowing the director the freedom to imagine the presentation of the story in his or her own way.
The shooting script starts to fill that void by adding specifics about particular shots and notes about how to achieve them. This is particularly useful in live-action film, where a description of shot setups is very helpful for putting together each scene on the soundstage or location.
For animation or special effects shots, though, the shooting script is often inadequate, because it's just text. And some things we want to do defy textual description. So we need to draw pictures (and thereby save thousands of words, as the old adage suggests).
This is the essence of what a storyboard is -- just a tool for describing shots, though it has become somewhat lionized by big budget Hollywood productions, on which the storyboards are often incredibly detailed
This is the essence of what a storyboard is -- just a tool for describing shots, though it has become somewhat lionized by big budget Hollywood productions, on which the storyboards are often incredibly detailed. The storyboards for The Matrix or Sky Captain And the World of Tomorrow, for two examples, are truly remarkable works of art in themselves.
Having seen those, I have to admit to feeling a little intimidated. I'm not much of a comic artist, and even though I can draw detailed drawings if I want to, the prospect of doing that many would be truly daunting. But, it's important to remember that that's not the point. Storyboards can be stick-figure art. Or even (as the ones in this article are), found still photographs patched together to make the picture you want. The point is simply to communicate (or to clarify to yourself, if you are working alone).
Storyboards for Lunatics
For this pilot episode, "No Children in Space", I've adopted a somewhat unusual approach in that I've gone straight to storyboards, before formally writing a script. This was driven by the idea of doing a very non-verbal script (there's only a few lines of actual dialog in this story). So this film is mostly images, music, and sound effects. There are both aesthetic and pragmatic reasons for doing that: I think it tells this particular story better, and it also minimizes the need for good actors. Which is really useful, because the pilot is also our demo -- we want to use it to attract actors to work on the project by showcasing the kind of work that we can do. Thus it's also part of our boot-strapping strategy for production.
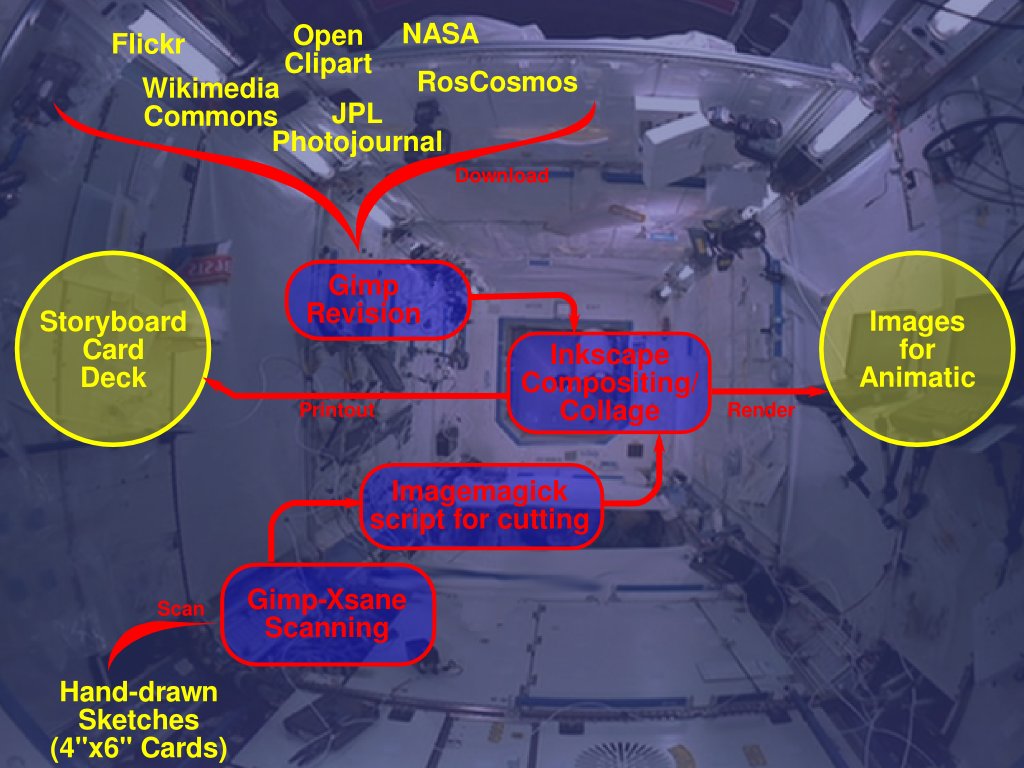
For storyboards on Lunatics, I originally imagined doing the artwork directly on the computer, but this was often a little too involved. I found instead that it was very effective to work with regular ballpoint pens on 4"x6" index cards for most of the shots. These can later be scanned to get them into the computer.
For others, especially where I was working with existing locations and objects, I found it easier to just search Flickr for "near enough" photographic shots, and create 4"x6" layouts in Inkscape, which I then printed onto cardstock and combined with my sketched shots.
The result is a mixed deck of storyboard cards which I can easily manipulate to lay out sequences with considerable flexibility, and a matching collection of images on the computer which I will later be able to combine into an animatic.
Searching for photographs and clipart
For the parts of my story that occur on Earth, I needed to do quite a bit of research to keep things accurate. I had decided for various reasons that my characters would launch from Baikonur Cosmodrome in a Soyuz vehicle that was only a little different from the existing "Soyuz TMA" used to ferry crews to and from the International Space Station.

It would've been easier to just invent a fictional launch system, but I wanted a way to emphasize the connection between my story and the reality of spaceflight today, and also to set a very high standard for realism. Since Lunatics spends much more time on this kind of fine detail than most science fiction, I want to establish this kind of credibility right from the start.
But of course, that means I need to be accurate. So I've downloaded hundreds of reference images of the entire Soyuz system -- the spacecraft itself, the launch pad, the carrier vehicle, the integration facility, various cosmonauts (and their suits), and a variety of shots around the spaceport town of Baikonur. I have been perhaps a little compulsive about this -- but then, I've never been to Baikonur myself, so it's a potential weak point in my narrative.
Obtaining the photos was relatively easy. Most of these are from Flickr, though a few are directly from RosCosmos or NASA websites. For Flickr photos, it's easy to do a search of content under Creative Commons "By" or "By-SA" licenses, using the "Advanced Search" interface. However, it turns up a surprisingly sparse result for "Baikonur" or "Soyuz" (Figure 2).
This is partly due to the fact that whoever published the NASA photos on the Flickr site incorrectly indicated the license as "By-NC." At first, I thought this was some disturbing new government policy, but backtracking the user profile page leads eventually to a link describing the exact terms -- which turns out to be the standard NASA "copyright free" policy. This policy does contain certain commercial restrictions, which is no doubt the source of the error, but what these restrict are uses of the images to "imply endorsement" by NASA or NASA personnel. In other words, they are personality rights restrictions and/or trademark restrictions -- both of which are consistent with "By" or "By-SA" licenses.
The RosCosmos official site has a notice: "The materials published in this web-site are copyright of Roscosmos. Full or partial reproduction shall be followed by an appropriate link to Roscosmos web (Roscosmos PAO)." This should be essentially equivalent to an attribution-only license similar to NASA's policy, if that is the whole policy. However, I'd still be interested in finding a more legally definite statement of this policy.
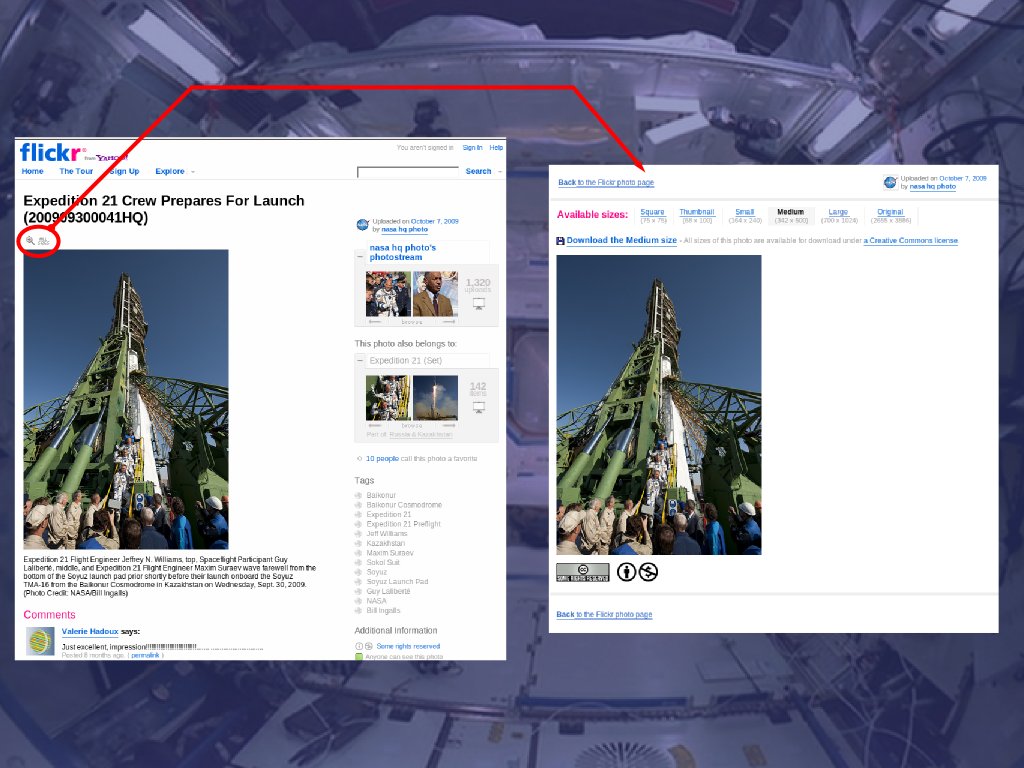
So in fact, this is really just a clerical error -- the NASA statement supersedes any tickboxes on the Flickr site. I suppose someone ought to get them to fix this, but after many years' experience, my general attitude towards NASA is to let sleeping dogs lie. If you want to find NASA photos on Flickr, though, you have to untick the "commercial use" box in the advanced search form (but then you have to watch out for other "By-NC" licensed material). Or, you can just do a separate search of images from the "nasa hq" user. The NASA photos are usually very high quality, though, as you can see in Figure 3, both in terms of composition and in the available resolutions.
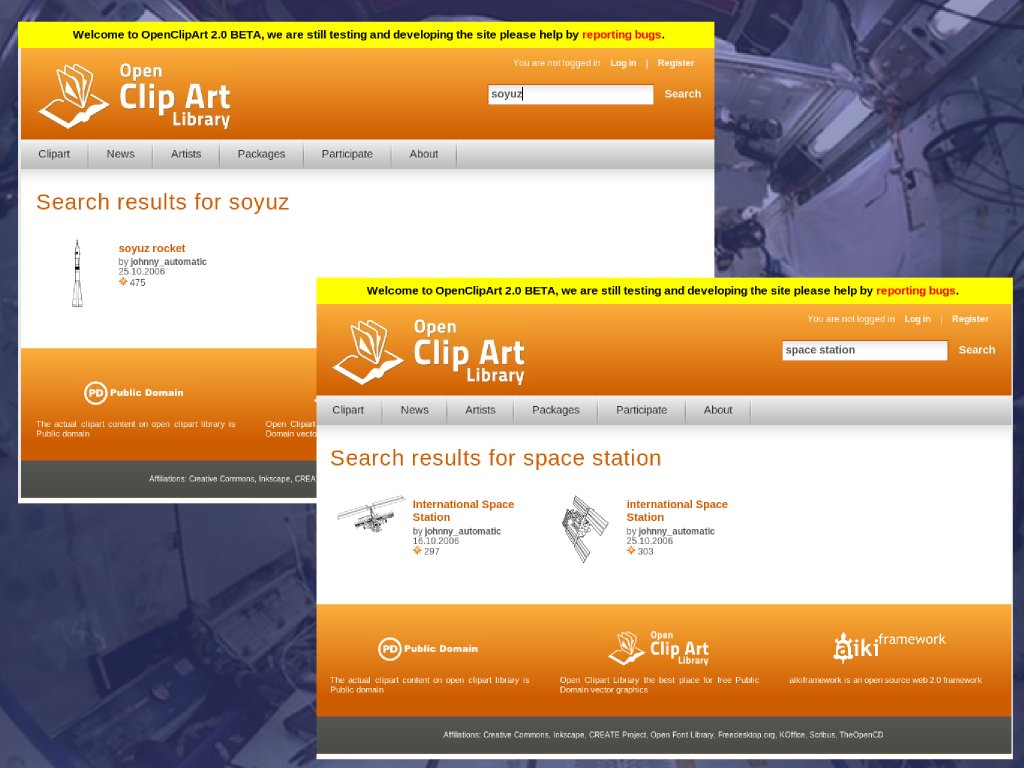
I didn't have nearly as much success as I expected to with the Open Clipart project, but you might want to try it if you are working on different projects. One nice thing about Open Clipart is that all of the material is public domain, so you can't go wrong with images you find there. On the other hand, the topical coverage is spotty at best. (Figure 4).
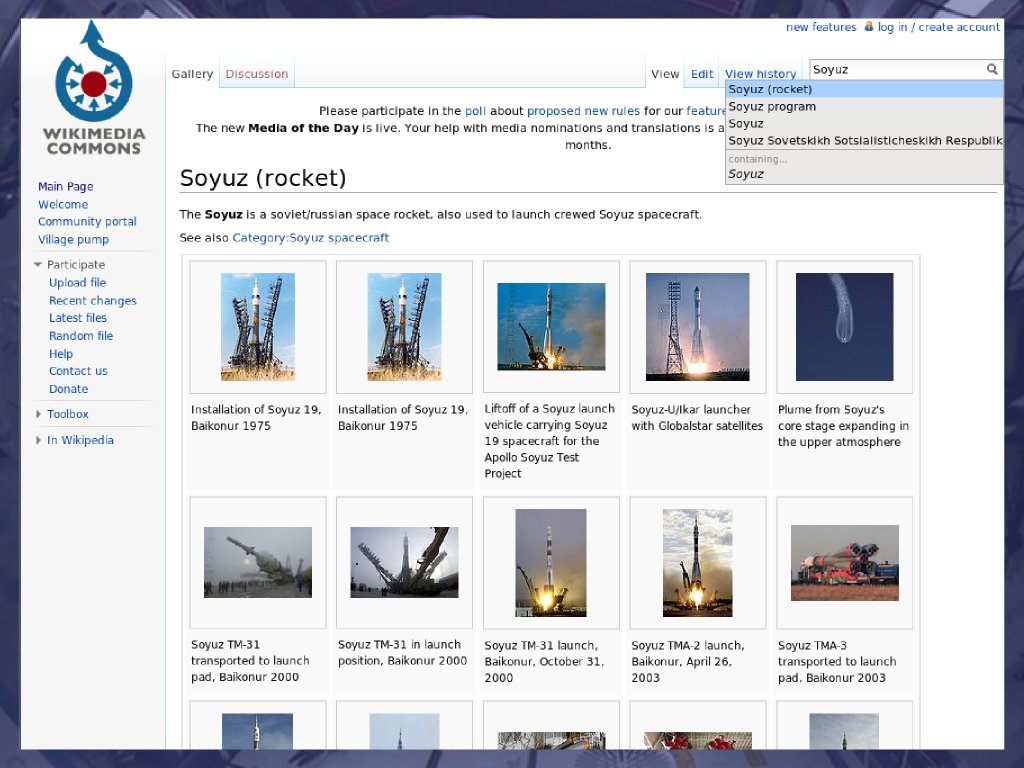
Another valuable resource is the Wikimedia Commons. The great advantage here is that almost all of the content is "By" or "By-SA" licensed, and the information is well-categorized. The only downside is that the volume of images is somewhat smaller, and of course, many of the photos are originally from Flickr, so it can be somewhat redundant. (Figure 5).
One more source of interest is, perhaps surprisingly, YouTube. Since both NASA TV and RosCosmos TV publish their videos on YouTube, it's possible to use snapshot stills from these videos as well.
Extracting and compositing digital sources
In some cases, I had to do a fair amount of manipulation in Gimp to get something closer to the image I wanted. Figure 6 shows the original image and the result I used in my storyboard.
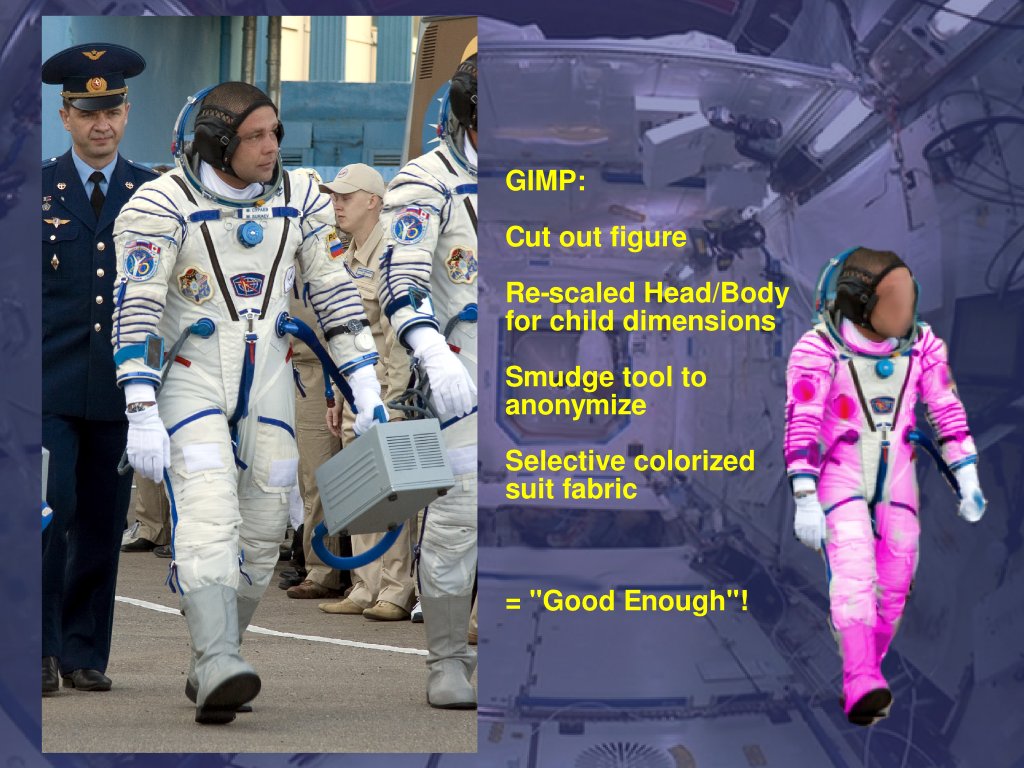
I had to do several things to image to make it usable. Of course, I had to erase the background with Gimp's "eraser" tool (effectively painting "clear" on the transparent PNG image). Then I used the smudge tool to get rid of the cosmonaut's particular features, leaving a "blank face" look (I know it's a little creepy -- don't worry, the real character will have a face!). This was partly to honor the "no personality rights" restriction and partly because my character is a little girl who bears no resemblance to this cosmonaut! Next, I scaled the head and body differently. This is not as hard as it might sound. I just snip the head out using a circle select, scale that to one scale and then scale the body separately. The head needs to increase about 120% over the body to age-regress the figure to about age 7, as needed for the story.
Of course, colorizing parts of the suit pink was a bit gratuitous, but in reality this would have to be a custom-made IVA suit, so why not personalize it?
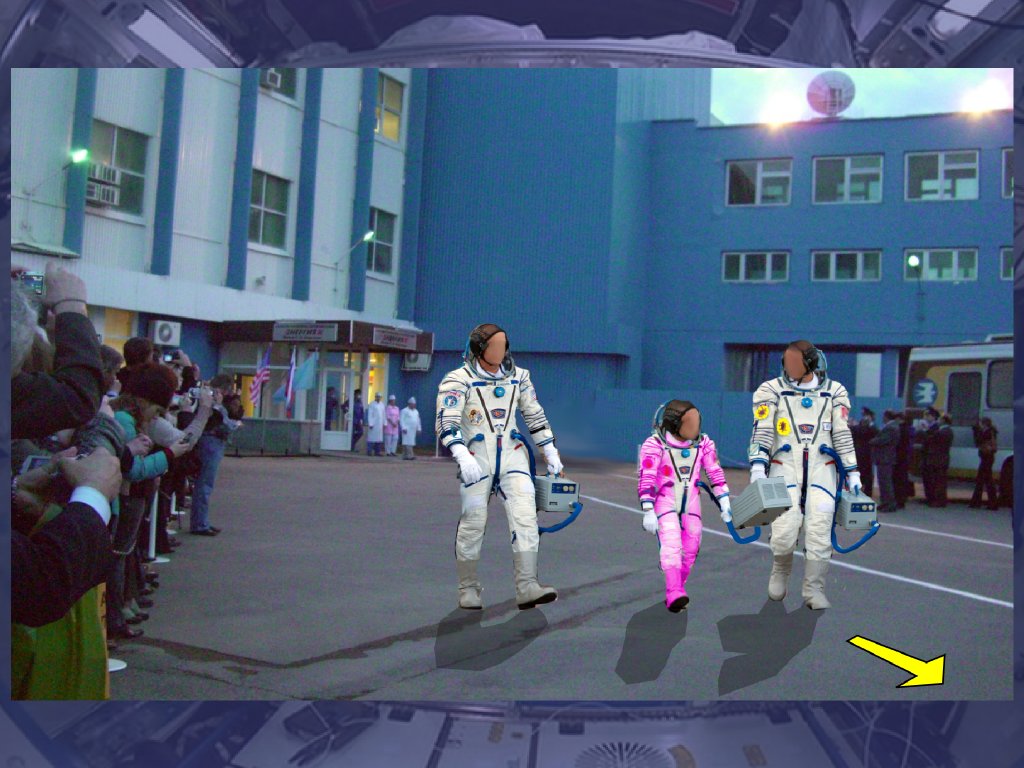
Figure 7 shows how this and other elements were used in an actual storyboard composition. The figures have all been similarly modified, and now represent particular characters. The background is another launch day photograph from a Soyuz launch, which has been modified slightly to eliminate cosmonauts who originally appeared in the frame (a little smudging can still be seen where they were removed). This is called a "background plate." And of course, the shadows and motion arrow are simply "bezier curve" objects added in Inkscape.
Printing digital storyboards
Figure 8 shows how I laid out two 4"x6" cards in Inkscape for printing onto 8.5"x11" cardstock to provide a copy for my "storyboard deck." This was a pretty straightforward process. The compositional work was done directly in Inkscape, as the outline version shows.
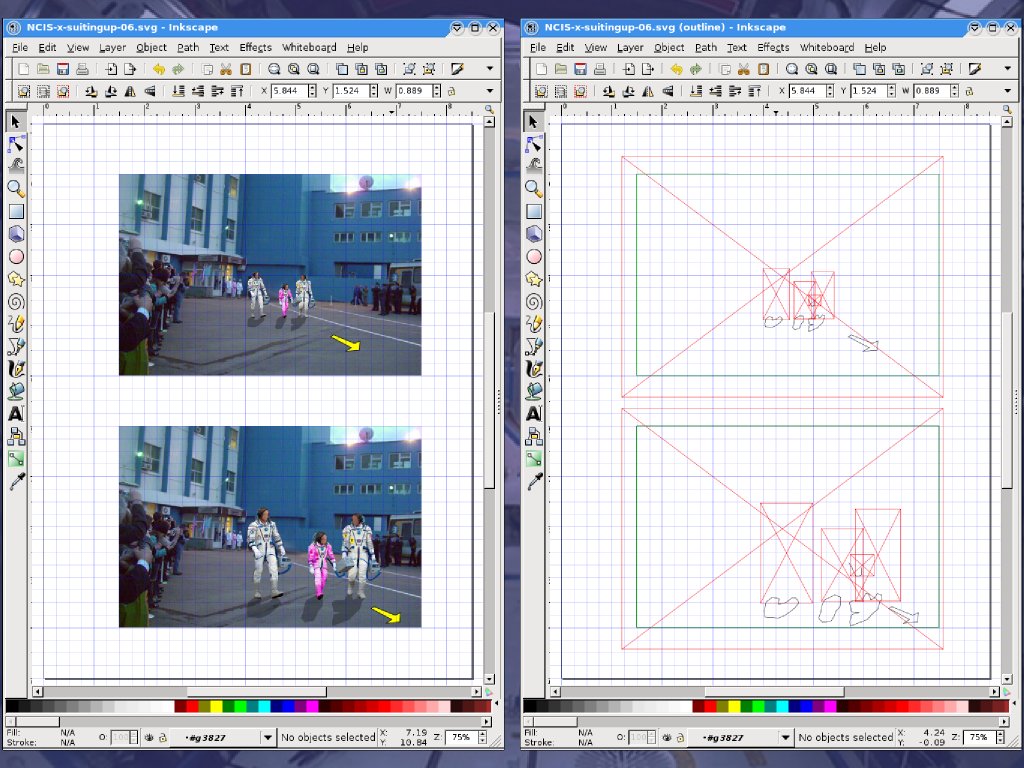
The drawing uses two layers with a template consisting of two rectangles on the background layer, and compositions of varying complexity for the top layer. As needed, I copied the background rectangle and used it to clip various elements to fit the 4"x6" cards.
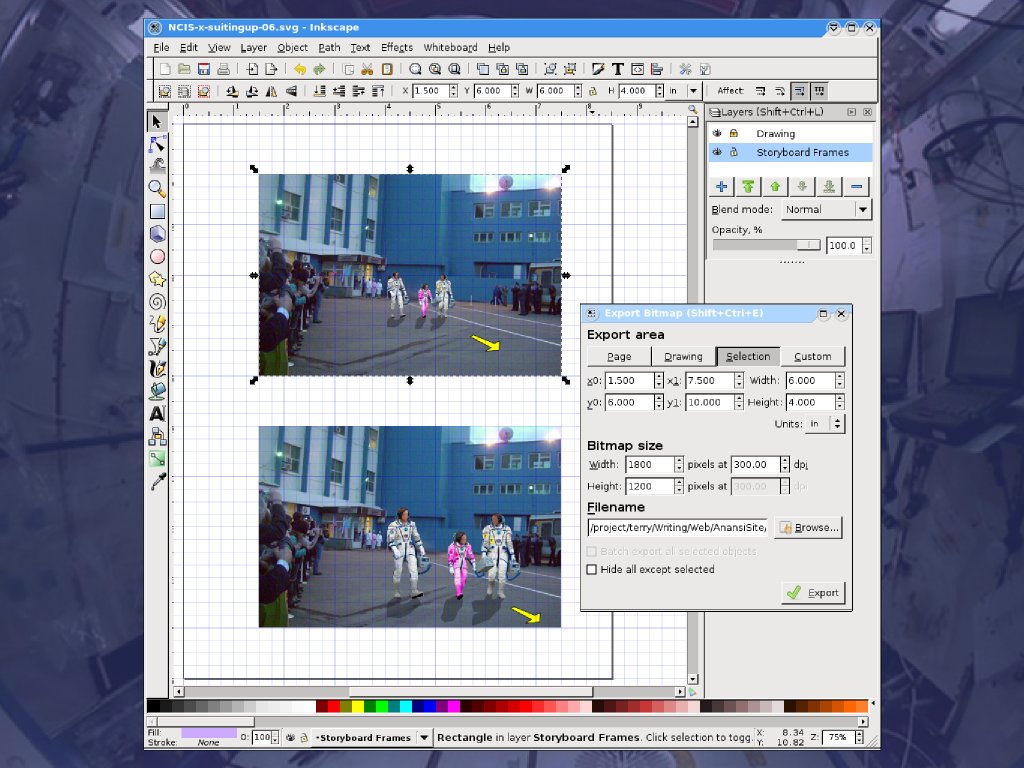
To correctly export the images for the animatic, I selected the rectangles on the background area, and then did a bitmap export from Inkscape as shown in Figure 9. Using the background rectangle to control the selection avoided any problems that might have arisen from incorrect boundaries.
Scanning sketched storyboards
Of course, for those cards that started out as sketches on cards, there is no problem putting them directly into the storyboard deck, but for the animatic, I need to get them into the computer.
I did this on a flatbed scanner, with the cards laid out in sets of four to fill the scanner bed. Then I used Gimp with the XSane extension to scan the cards into the computer. With a short script based on Imagemagick, I was then able to split the scan up into separate images for each card:
#!/usr/bin/tcsh

foreach n ( 027 028 029 030 031 032 )

  convert storyboard$n.png -rotate 90 -crop 3468x2400+0+0 +repage -crop 1734x1200 sb$n.png

end
These cropped images can then either be incorporated as-is, or composited with other elements in Gimp or Inkscape to make digital storyboards which I can then convert into animatics with video editing software.
The storyboard deck
I find it quite useful to have actual printed cards with the storyboard panels on them. This gives me considerable fluidity with trying out new sequences, and I can simply flip through the cards while listening to my temporary soundtrack (I'll describe how I made that track in another column) to see how well the timing is working out.
I have to admit that I did have some second thoughts about the choice of using photos for some panels, rather than drawing sketches. Although it's obviously easier and more accurate, it does cause a considerable unconscious bias towards easily-obtainable angles for photography. And some of those may not be the most dramatic choices for the film. This may result in a slightly visually cliched presentation of the sequence. It's a bit like choosing to use stock footage in a live-action film -- you get the benefit of not having to recreate complex imagery, but you're stuck with someone else's "directorial decisions".
So far, my storyboarding workflow is a success.
Licensing Notice
This work may be distributed under the terms of the Creative Commons Attribution-ShareAlike License, version 3.0, with attribution to "Terry Hancock, first published in Free Software Magazine". Illustrations and modifications to illustrations are under the same license and attribution, except as noted in their captions (all images in this article are CC By-SA 3.0 compatible).