Everyone likes pretty pictures. The newsagent’s stand is now crowded with glossy magazines, roadside advertisements glare out at you as you drive along the freeway, you see a wondrous mosaic as you look at all the packaging on supermarket shelves. Television long ago replaced the radio as standard home entertainment and the fact that you cannot judge a book by its cover doesn’t prevent the vast majority of the human population from doing so. The same applies to computers now. The GUI (Graphical User Interface) or “windows functionality” has become part of the machine that everyone now takes for granted.
=IMAGE=x1shelf.jpg=
To sell something to the public it needs to look good
Any home or client system software provider, free or otherwise, that wants to be taken seriously has to provide a graphical user interface (GUI) as theirprime method of user interaction. Microsoft include theirs as part of the main system, or kernel, as do many other system providers. Most GNU/Linuxdistributions include it in the default install. However, with GNU/Linux and other POSIX operating systems, the GUI infrastructure is not part of the kernel but a separate program with the mystical name of “The X Window System”. It calls itself “X11 Release 6” and everyone else simply knows it as “X”. There’s a lot more to this X than meets the eye, it has attributes and powers that are not well known and can do things that other windowing systems cannot. What is this X? What amazing super-GUI powers does it have? This article attempts to tear off its mask and reveal all.
What is X?
A more appropriate question to “What is X?” is “What is X not?”. X is not actually a GUI. The GUIs in GNU/Linux tend to be GNOME, or KDE or even MOTIF. Most GNU/Linux distributions are now delivered with a GUI configured as the default interface, and this can compare with any other computer system’s GUI. And the end user, who processes words in documents, calculates sheets in spreads, mails e’s in readers, browses the surf in webs and the such, need not know the technical ins and outs of it. However, there is a lot more that can be done with a small amount of know-how and a bit of command manipulation...
So then what exactly is X if not a GUI? X is an infrastructure that a GUI uses to do its stuff. For example, a GUI handles the buttons,text and combo boxes, windows etc., whereas X handles the low level drawing of fonts, lines and pictures on the screen and accepts keyboardand mouse inputs as well as the inter-program communication of these. It can also handle network distribution of users and remote sessions.
X is not a GUI—it is an infrastructure that a GUI uses
One of the most confusing aspects of X is the naming of the parts, in that the terms “server” and “client” are the opposite of what many would expect. An X server is the screen and keyboard, what a lot of MS Windows people would automatically think of as the ultimate client. An X client is a program that opens and uses windows, such as a browser, email client, word-processor and so on. To go into why this is so I will compare an X-server to a file server...
A file server is a machine on a network where files exist and other machines, or clients, can connect to it to open, read, write or manipulate files. Often, of course, the file server and the client is the same machine, but sometimes it isn’t. What a file server is serving is data in files.
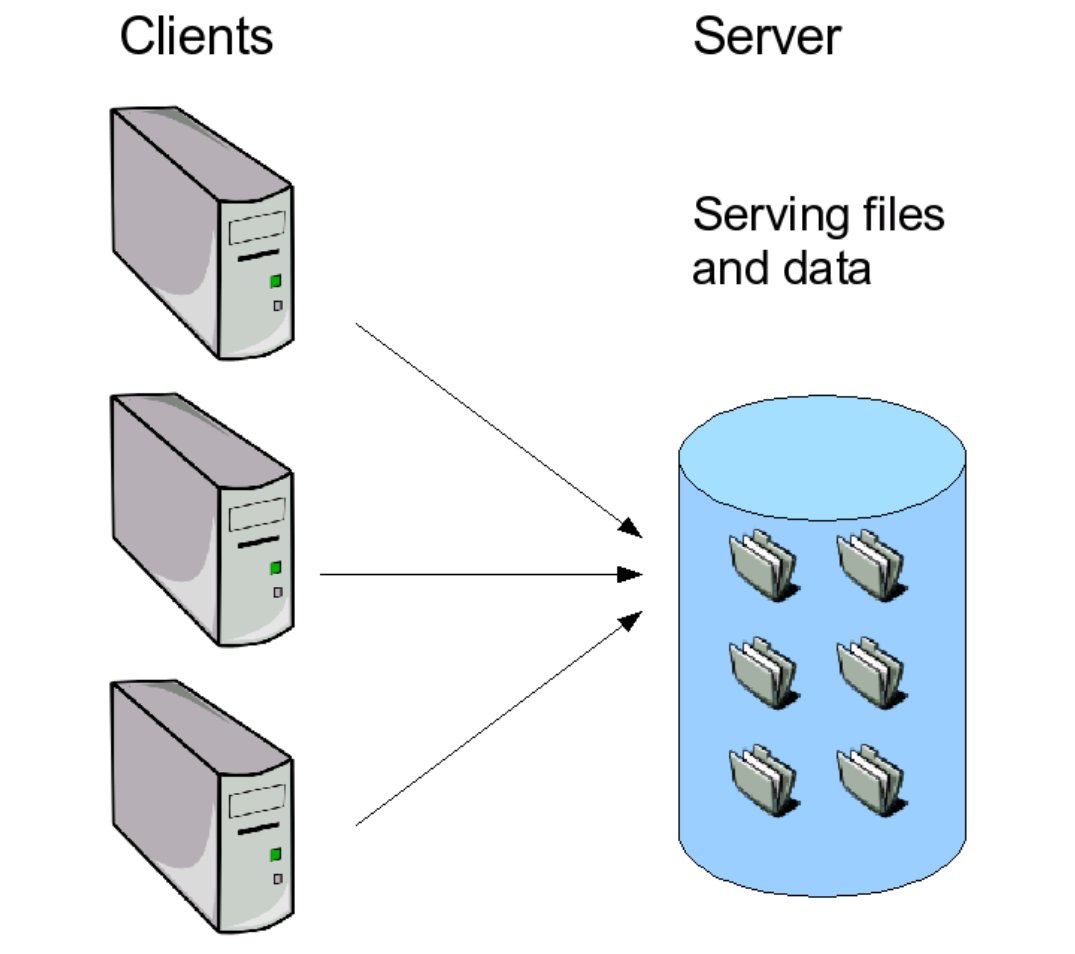
An X-server is a machine on a network where a “windowing” program exists and other machines, or X-clients, can connect to it and create windows, write or display text, pictures and so on, into a window and can read any input the user makes to that window. The X-clients are often run on the same machine, but sometimes they aren’t. What an X-server is serving is windows and your input.
=IMAGE=x1xserver.jpg=
The concept of an X-server is really no different to that of a file server
I will go through a detailed example of exactly what I mean. However, before commencing it is worth pointing out what follows is not how X is usually run. I am simply demonstrating some individual components to show how the infrastructure hangs together. First though, to install X...
If you have a GNU/Linux system you almost certainly have X already installed. To run through these below examples it is best to switch the GUI off initially if it is on. To do this go to the main virtual console by pressing CTRL-ALT-F1, logging in as root then enter the command “init 3”, then log out of root and log in as your user.
If you have a Windows system you can install the Cygwin version of X. Go to www.cygwin.com, click on the “install now” icon, follow the defaults. When the list of packages come up ensure the “X11” is marked as “Default” install. When installed double click on the Cygwin icon (or navigate to it through the “Start” menus) to get the “$” prompt.
The X server can be started manually at the command line; this can be done if X is not already running by simply entering:
X &
(X in capitals then an ampersand) at the dollar prompt. This will start an X-server in the background. On GNU/Linux this will be in a “virtual screen”, on Windows this will be in its own MS-Window. A black or gray patterned screen will appear with a plain graphical “X” in the middle that can be moved around by the mouse. This as it stands is totally useless—yup, a complete waste of time. Although you can move that X about by playing with the mouse, pressing keys and clicking on mouse buttons do nothing and it doesn’t even look pretty. This is like a formatted file server but with no files in it, interesting from a geeky point of view, has great potential, but currently not much to see.
=IMAGE=x1xblank.jpg=
An X-server running by itself—as such quite boring
Note: on MS-Windows and Cygwin, if you would rather use the entire screen to gain the “proper” X experience then add the “-fullscreen” option to the “X” command. Pressing the MS-Windows key (the one with the logo on it) will get you back to MS-Windows.
After the X-server has been started go back to the console where you entered the command (CTRL-ALT-F1 on GNU/Linux, or select the Cygwin window on MS-Windows), and enter the new commands:
xauth add :0 . `mcookie`
Please note the backquotes, punctuation and spaces in the command. This gives you permission to open windows on the X-server and use it. I will go into this later. After that, enter:
xterm -display :0 &
This opens a terminal shell on the X-server. To see this look at the “X-server” screen (by pressing CTRL-ALT-F7 on GNU/Linux, or selecting the X-server window on MS-Windows) and there should be a terminal program running in the top left hand corner. By moving your mouse over it you can enter commands (such as “ls”) and see the result.
=IMAGE=x1xterm.jpg=
An X-server with an xterm X-client connected to it
In the above, the command “X” starts an X-server, which simply sits their looking not-so-pretty waiting for a client to connect to it. Xterm is an X-client that connects to the server, opens a window and runs a shell.
An X-server is a program that simply sits their looking not-so-pretty waiting for an X-client to connect to it
There are command line options to open windows of different sizes and at different positions, but all who I have talked to would agree that this is a very user unfriendly way to do things. What is needed is a X-client called a window manager. This provides a user-interactive way to manipulate windows in a manner we have become accustomed. Cygwin X usually comes with WindowMaker installed, and can be started by either entering wmaker & in the xterm window, or by entering wmaker -display :0 & in the Cygwin console. Some GNU/Linux distributions may have WindowMaker too, though it’s not normally in the default installation; however “mwm” or “fvwm” often is, and can be started by entering mwm & (or fvwm &) in the xterm window or mwm -display :0 & (or fvwm -display :0 &) on the console. Should none of these work then there is the somewhat old and antiquated “twm” (which is part of the base X package) is almost guaranteed to be installed. Once a window manager is loaded then moving and resizing of windows is interactive, and launching new applications is easier. Try entering xclock & in the xterm window to find out the current time, or even xeyes & for an impression of the boss watching you.
=IMAGE=x1xbegin.jpg=
An X-server running the WindowMaker window manager and some other X-clients—things are beginning to get interesting
Although the look and feel presented in the above is not that impressive it epitomises the philosophy of X—it provides a versatile infrastructure giving you the choice to run whatever program best suits your needs. Far better look-and-feel suites of course can be, and are, run on X. However, instead of forcing you to use a predefined window manager as in MS-Windows, you have a choice from the many available in X systems.
The easiest way to quit an X-server is to hit CTRL-ALT-BACKSPACE.
=IMAGE=x1xdia.jpg=
A schematic diagram of some X programs connecting to an X-server
What’s in a display?
You would have noticed the “-display :0” arguments of the commands to open windows on the X-server. A “display” is the particular screen to connect to. By default, when X is started it will create a display called “:0”, that is display zero on the local machine. However, both GNU/Linux and Cygwin under MS-Windows have the ability to run more than one X-server.
Some computers have the ability to run more than one X-server simultaneously
To demonstrate, make sure you are not running any X servers on the machine then from the console (CTRL-ALT-F1 in GNU/Linux, or the Cygwin window in MS-Windows) enter....
X :0 &
to start the first X-server. Then switch back to the console when loaded, and enter
X :1 &
This will have started the second. Again, switch back to the console, then...
xauth add :0 . `mcookie`
if not already done, also...
xauth add :1 . `mcookie`
to grant yourself permissions to connect to the servers, Then enter the commands...
xterm -display :0 -bg yellow
xterm -display :1 -bg purple
If you go to the first X-server (CTRL-ALT-F7 on GNU/Linux, select the appropriate window in MS-Windows) you should see an xterm with a yellow background, and on the second X-server (CTRL-ALT-F8 on GNU/Linux) you should see one with a purple background. You will discover it is possible to run one window manager on one X-server, and another on the other. It is also possible to run the X-servers at different resolutions, and logged in as different users—though doing that is not described here. This is like having two sets of input/display devices (keyboard, mouse and monitor) connected to the machine.
However, that’s not all—there is a sequel!. The Display “:0” is in fact short for “:0.0”. The “dot zero” is assumed unless another number is defined. This is the screen number of the display. To differentiate, a display in X consists of a keyboard, a pointy device (like a mouse) and one or more screens. Think multiple monitors here. The display “:0.0” is the first monitor, “:0.1” is the second and so on. This is rarely used as most PCs and workstations only have one screen connected to it. However, X allows for more—the multi-screen aspect of X can be demonstrated using the X program “Xnest”, which is both an X-client and an X-server. It runs a virtual X-server in an X-window. To demonstrate this, from an “xterm” window (on a session that has a window manager running) run...
Xnest :3 -scrns 2 &
(Note the capital X.) This runs an “Xnest” client emulating an X-server with two screens using display number 3. Each screen is represented as a different X-window. Then from the “xterm” window...
xauth add :3 . `mcookie`
to give yourself permissions. Then....
xterm -display :3.0 -bg red
xterm -display :3.1 -bg blue
for two xterms on these (virtual) screens. Should you run “mwm” or “wmaker” on one of these, and “twm” on another you can also see some of the versatility of X. To quit these simply close the Xnest windows.
=IMAGE=x1xscreens.jpg=
An Xnest session emulating an X-server with two screens
A display in X consists of a keyboard, a pointy device (like a mouse) and one or more screens, as in multiple monitors
To save you entering the “-display” argument every time you enter a command, X-clients will use the display specified in the DISPLAY environmental variable should no “-display” argument be provided. Therefore...
xterm -display :0 &
is the same as...
DISPLAY=:0
export DISPLAY
xterm &
When an X session is fired up, or multiple X-clients for that matter, it automatically places the display it is connected to in the DISPLAY variable thus reducing the requirement for the user to specify it within the X session itself. There is a small caveat here of course: if you should change the DISPLAY variable in an xterm window it can mess up any X commands you enter from there subsequently.
Should no “-display” argument be defined and if the DISPLAY variable is not set then the X-clients will use the display :0.0 by default.
X in the real world
No one runs X the way described in the above examples—it would be far too cumbersome. The usual ways are with the shellscript “startx”, or with xdm, which really needs to be called by the POSIX init process (xdm is not available under MS-Windows/Cygwin).
To start X from the console, simply enter “startx”, or “xinit” if that does not work. This will start an X server on display :0 and run an xterm in it (though that is configurable and can do something different). To run an X-server on a display other than zero then the command startx -- :1, or even xinit -- :1 will start an X-server on display 1.
However, most X-servers are started using xdm, or one of its close cousins such as kdm and gdm, especially in the GNU/Linux world. Most distributions are set up to start xdm in run level 5, and not in run level 3. That means that entering the command “init 5” as root in a console will switch the X suite on, and entering “init 3” will switch it off. Most GNU/Linux distributions automatically boot up with X enabled, including RedHat and SuSE, so X is started on bootup. Xdm, by the way, stands for “X Display Manager” and kdm and gdm are, for all due intents and purposes, functionally identical. They just look prettier.
=IMAGE=x1xgdm.jpg=
A gdm (pretty cousin to xdm) graphical log in screen program, or greeter
Xdm (and kdm and gdm) present the user with an X-client which is a graphical log in screen called a “greeter”. Once you have entered your user name and password not only a window manager, but an entire desktop environment is usually loaded, such as GNOME or KDE, that can compare favourably with the best of the best other systems such as Microsoft Windows can offer.
Cygwin X can be started with a “-multiwindow” argument. This is in fact the default when using “startx”. This integrates MS-Windows’ own window manager and uses it for all the X programs too. Thus integrating the X programs into the MS-Windows display environment.
Distributed X
At the beginning of the article, I skimmed over the networking attributes of X. I’ll now go through them in more detail. When an X-client connects to an X-server it does exactly that. There is nothing virtual about it. It connects using its own protocol designed for the purpose. When the X-server is on the same machine as the X-client the means by which it connects is through something called “Unix Sockets”. This is one way that a program can communicate with another on the same machine. However, the X protocol can work over TCP/IP. In other words, you can run the X-server on one machine and the connecting X-clients on another.
You can run the X-server on one machine and the connecting X-clients on another
There are both advantages and disadvantages to running the X-server on a seperate machine to the X-client. An advantage is that the machine running the word-processor for example, is not cluttered up with the bloat of the screen handling process, and will run in a smaller footprint which can make it faster. Also it is possible to have windows of programs running on several machines opened in front of you. A disadvantage is that screen refreshes can be slower as some network traffic is required for these.
It is difficult to show network features with one machine so to demonstrate this you really need two machines either with MS-Windows with Cygwin installed or Linux or a mixture. If you are using MS-XP with SP2 you need to place the path of the XWin.exe (C:\Cygwin\usr\bin\X11R6\XWin.exe by default) into the “exceptions” of the MS-Windows firewall. On the GNU/Linux machines you need to let through TCP ports 6000 through 6009 and UDP port 177. You will also need to know the IP address of the two machines.
For the sake of this demonstration I’ll assume one machine to have the IP address of 192.168.0.1, and the other 192.168.0.2.
On the first machine (192.168.0.1) start the X-server using “startx”, then ensure a window manager is running. In the “xterm” window enter the command:
xhost add 192.168.0.2
or whatever the IP address of the other machine is. This will permit connections from that machine.
On the second machine, from a console, enter the command:
xterm -display 192.168.0.1:0 &
Then go back to the first machine which is running the X server and you should see a new xterm window. Further investigations in that should show that the shell in that xterm is running on the second machine.
What’s happening here is an X-client on the second machine is connecting to the X-server on the first opening a window there.
=IMAGE=x1xrdia.jpg=
A schematic diagram of X programs running on a different machine to the X-server
X and security
Wherever you have a network protocol you have security issues, and X is no exception here. The fact of the matter is that the X protocol is not suitable for anything else except a private local area network situated behind a firewall. Should you wish to use X through the internet then you need to tunnel it through a program like “ssh” or similar, which will be described later.
LANs have security issues too. If ignored one person on a LAN can open and close windows on another’s willy-nilly without permission. That wouldn’t be good. Don’t worry though, there are various ways you can protect machines and only permit allowed connections to an X-server. The first is using the “xhost” program as described above. However, this isn’t recommended as it tends to leave the X-server too open. I have only used it in the above example because it was the easiest way to demonstrate the networking attributes of X. A far better way is with the “xauth” program, which can use a number of ways to authenticate clients, the main one using “cookies”. In this, for an X-client to connect to the X-server it needs to know a piece of data randomly generated, or accessed, by the server known as a cookie. It works somewhat like a session password. If this cookie is not transmitted by the X-client, the X-server will reject the connection. I won’t go into the details of it here because starting X using xdm automatically sorts this out, and is the recommended way.
Over the network, the X server, by default, listens on port 6000 for display :0, 6001 for display :1 and so on.
Xdm in detail
The xdm program, and its gdm and kdm cousins, are small daemons that run in the background usually started by the “init” program at boot up, and run all the time. It does things such as start appropriate X-server(s) where necessary (it is not one itself), run the graphical login screen programs, sort out the xauth cookies when people log in and start the appropriate programs for each desktop and so on. There is a comprehensive configuration file that controls what it does. The first thing it usually does is to run the appropriate X-servers on the local machine. Usually this is just one, but can be more. It then runs the graphical log in a screen known as a “greeter” on the X-servers that it has been configured to do so. These are usually the X-servers that the xdm process starts. However, it can start it on other X-servers, such as workstations directly connected to the machine, or even not start it on any, including its own X-servers.
Xdm can be configured to accept special XDMCP requests through the network. These are special UDP packets that an X-server can transmit (usually on port 177) to request a client machine’s xdm to start a graphical login greeter process for it. This would then permit remote logins. On most distributions XDMCP can be enabled through a GUI from the desktop. On Red Hat Fedora Core this is done from the menu:
Desktop -> System Settings -> Login Screen: (root password)
Here on the XDMCP tab the check box titled “Enable XDMCP” should be enabled. All other settings should be unchanged. A similar configuration exercise would be needed for other distributions.
Xdm can be configured to accept special XDMCP requests through the network allowing remote logins.
When an X server needs to “be connected” by another machine running xdm then the X-server needs to be started with the “-query” or “-broadcast” option. The “-query” option tells the X-server to send an XDMCP request to a specific machine, whereas the “-broadcast” transmits one to all machines on the network and will use the first machine to reply.
For example...
X -query 192.168.0.2
or
X -broadcast
I use this in real life. When I am working on my windows machine, and need to do things on my Linux box, I open a Cygwin session and enter:
X -fullscreen -broadcast
This presents me with my graphical login greeter for my GNU/Linux box.
Spoilt for choice
There are occasions when there are more than one machine running xdm on the network. For this scenario a setting can be tweaked so that xdm runs a “chooser” instead of the usual login greeter. In this case a list of machines is presented to the user. Upon the selection of one, the X server is restarted, connecting to the appropriate machine chosen displaying that login greeter.
=IMAGE=x1xchooser.jpg=
Gdm’s chooser program: selecting a machine restarts the X-server and displays the appropriate machine’s greeter
This is useful for maintaining a large number of GNU/Linux or POSIX machines on a network. You only need one X-server on your desk (which can be MS-Windows and Cygwin), and you can run xdm on all the GNU/Linux machines you maintain. As xdm doesn’t need to run its own X-server these can be headless, in so far as that they need no video hardware or drivers. In short, you can have full graphical administration functionality on all GNU/Linux machines that you maintain on the network from a single workstation, with a minimum of resources used on the GNU/Linux machines.
You only need one X-server on your desk to graphically access a large number of machines.
X through the internet
As mentioned before, the X protocol is not really suitable for the internet from a security point of view. Getting xdm or the authentication to work correctly from afar would be difficult. However, you can tunnel the protocol through ssh. It is worth noting that for this to work the “ssh” server sshd needs to be configured to permit X requests. This is done by setting the “X11Forwarding” option to “yes” in the /etc/ssh/sshd_config file.
In the following examples it is assumed you are trying to access a remote server called “centralbox.com”, say the machine at your office, from a local user machine perhaps from your home.
To demonstrate running an X program using ssh start an X-server using “startx” on the local user machine. Ensure a window manager is running then in the Xterm connect using ssh to the central machine using the command:
ssh -C -X myuser@centralbox.com
where “myuser” is your user code. When this connects you can enter X-client commands on the ssh server and the windows will open on the user’s machine. As the Cygwin package also includes ssh this can be done from a MS-Windows/Cygwin box as well as a Linux one.
It is worth taking some time out to explain how ssh does this. When an ssh client connects to the ssh server using the “-X” command, the ssh server on the central machine sets up a “virtual” X-server on a higher display number (usually starting at 10); it then creates its own authentication cookie for it. When an X-client (on the ssh server) opens up a window it connects to display 10, the pseudo ssh X-server validates the X-client using its cookie and encrypts and transmits the request to the ssh client on your user machine. This then authenticates the request on the real X-server using the real cookie and passes through the X requests to it for displaying.
The “-C” argument is in fact optional. It compresses the data to transfer over the network decompressing it at the other end. This can improve performance especially over a slow internet connection.
This means that all transmissions through the network are encrypted and compressed. Also, the ssh server is unaware of the real X-server’s cookie, maintaining the X-server’s security integrity but at the same time allowing the remote user’s machine to use the GUI in an easy and transparent way.
Running X programs over the network through ssh means that all transmissions are encrypted and compressed, the integrity of the X-server is maintained and the interface is transparent
=IMAGE=x1xssh.jpg=
A schematic diagram of X programs running through the network using SSH X forwarding
Should you wish to run your desktop through ssh rather than an individual program then you simply run “Xnest” through the tunnel. Beforehand you would have had to enable XDMCP, then from an xterm on the user’s local machine run:
ssh -C -X myuser@centralbox.com
to connect to the central ssh server forwarding X signals and compressing data. After authentication and connection enter:
Xnest :20 -query localhost
which will then start a “nested” X-server on display 20 of the central machine, displaying the output of which on a window of the local machine. The login greeter then should appear.
If a different screen resolution is required the “-geometry” argument can be used to specify one:
Xnest :20 -query localhost -geometry 1280x1000
To follow what is happening here may seem a bit complicated, so watch out for this next bit. First of all, I need to explain the Xnest program in detail. This is both an X-client and X-server. The best way to imagine it is as an X-client that creates a window on the session it was started from. And, at the same time, an X-server that instead of displaying and accepting its goods on its own physical screen, keyboard and mouse, uses the window it created in the session from which it started.
Xnest and ssh allows you access your desktop remotely and securely
Now for the meat of it. On the ssh server you are running an X-client Xnest, which is connecting to the X-server on the ssh client through the network tunnel ssh provides. However, Xnest is also an X-server, which is running on the ssh server providing an environment where you can run your desktop remotely, and securely, through the network but as though you were on the local machine. Confused? Well, I did warn you. I hope the following diagram helps, but don’t worry if you still don’t get it, this is not essential knowledge.
=IMAGE=x1xsshd.jpg=
A schematic diagram of an X desktop running through the network using SSH X forwarding and Xnest
If two or more people are likely to connect at a time in this way, then each needs to use a different display number. A way to do this is to simply add a number to the display number the ssh server gives you:
NDISPLAY=`echo $DISPLAY | cut -d: -f2 | \
                 cut -d. -f1` # Get the main display no.
NDISPLAY=`expr $NDISPLAY + 30`# Add 30 to it
Xnest :$NDISPLAY -query localhost
If you use this I recommend placing it in a shellscript. The above should work if no more than thirty people are connected to the machine at any one time.
You can also run X through a VPN such as IPsec or PPTP and connect using XDMCP as described above.
Dynamic duo: X and VNC
Using the X protocol, even through ssh, can have a performance hit. The X protocol will transmit every line, area and character whether required or not. There’s no cache-comparisons or transmit-changes-only functionality. This means that if an area of the screen is redrawn three times between user inputs the X protocol will transmit that area three times whereas it only really needs to transmit the last of the three. This can make running X over a slow network like a dial-up painful. VNC’s RFB protocol helps to take care of this problem, and X interfaces have been written for it.
VNC is a cross-platform facility to access desktops remotely using a more conventional client/server mechanism. The VNC server is located on the machine where you would have the GUI and listens for connections from a VNC client. When a client connects, VNC transfers the entire desktop to the client where a user can work on it.
The program used for using VNC in a remote X-session environment is “Xvnc”. This is both an X-server and a VNC server. Xvnc, when started, listens on a VNC TCP port number (5900 + display number) for any VNC clients to connect to it. It also listens on the display socket and TCP port like any other X-server, but instead of displaying the requests on a monitor or screen it caches it in memory to transmit it to a VNC client that is connected to it.
VNC’s X-server—Xvnc—is included with most GNU/Linux distributions. If it isn’t installed, it can normally be done easily through the distribution’s package manager. The VNC client, on GNU/Linux, is called “vncviewer”. There’s also a native MS-Windows version of this, so it’s possible to log into GNU/Linux desktops from remote Windows machine without installing the considerably large Cygwin and X-Window packages. Should you need a VNC client for MS-Windows one can be downloaded from www.realvnc.com. And if the machine you are connecting from doesn’t have a VNC client installed all is not lost, as there’s a Java one that comes with the server.
VNC is a network-efficient means of running the desktop remotely
There are several ways the VNC server can be set up on a GNU/Linux box; I’ll deal with two of them here. Both require the VNC server to be fired up manually.
The first is using a wrapper called “vncserver”. To prepare for this you need to set up a VNC password. This is achieved by logging into the GNU/Linux server and entering the command “vncpasswd” at the $ prompt. You will then be prompted to enter a password, which needs not be the same as your log in password (in fact it’s better if it’s not) but needs to be secure, i.e a mixture of upper and lower case letters, numbers and symbols.
The way to connect remotely this way is to log in using ssh, but without the “-X” option:
ssh myuser@centralbox.com
then when connected, enter the command on the central machine...
vncserver :1
This will start an Xvnc process up and fire off a few X-clients running inside it (such as window manager and so on). It will accept X-clients on display “:1” and VNC client connections on TCP port “5901”. Should “:2” be used instead it will accept X-clients on display “:2” and connections on port number “5902” and so on. If you leave the display number from the command, then an unused one is assigned and reported as the output of the command. You can control the size of the screen by using the “-geometry” argument. This works the same way as described in the “Xnest” program.
After the server has fired up, from the user’s machine start up the VNC client. When asked for the VNC server enter “centralbox.com:1”. You should then be prompted for the VNC password; upon successful entry you will be presented with a desktop. If you don’t have a VNC client installed then you can use the Java one. To do this point a browser to “http://centralbox.com:5801” (5802 if display :2 was used and so on) and a java client will be fired up.
The precise X-client programs started here will depend on the shellscript “.vnc/xstartup” on the central server in the specific user’s home directory. This can be tuned accordingly.
When finished, in the original ssh screen enter...
vncserver -kill :1
which will stop the server.
=IMAGE=x1xvnc.jpg=
A schematic diagram of an X desktop running through the network using VNC
The second method is to use the XDMCP features with VNC. For this to work XDMCP needs to have been enabled on the central server as described above. To connect access the central server from the user’s local machine with ssh in the same way as above...
ssh myuser@centralbox.com
Then, when connected, enter the command...
Xvnc :1 -query localhost -securitytypes none -once
This will start Xvnc the same way as above except it will simply display the greeter in the X session. The “-geometry” argument works the same way here too, as does alternative display numbers. Connecting to this using VNC (or the Java) clients are no different with the exception that no password is asked for.
Dynamic trio: X, VNC and SSH
Although the above works, there are security issues. Ports 590x and 580x need to be opened up if there is a firewall. Everything with the exception of the VNC password is transmitted over the internet unencrypted. A far better method is to tunnel the connections through our old friend ssh.
To connect using this method, from the user local machine...
ssh -C -L5901:localhost:5901 \
       -L5801:localhost:5801 \
              myuser@centralbox.com
Please note the “-X” argument is not used here. Then, when connected, on the central machine enter:
vncserver :1 -localhost
or
Xvnc :1 -query localhost -securitytypes none -once -localhost
depending on how you want the X server to be. Back at the local machine the VNC server to connect to is “localhost:1” and the URL to point the browser at for the Java client is “http://localhost:5801”.
After finishing, don’t forget to enter the command vncserver -kill :1 if the “vncserver” command was used.
The above works for display :2 if 5802 and 5902 ports are used instead as before.
VNC through ssh provides a secure, efficient, fast and versatilemeans of accessing the desktop remotely
I will now go through go through the mechanics of this, but again be warned, it’s complicated too!
The ssh command creates two tunnels, one for TCP port 5901 and the other for 5801. The VNC clients (and possibly browser clients) then connect through these, encrypting the data, to form the connection. The attributes of the tunnel mean that the user clients need only connect to ports listening on the user’s local machine that are created by the ssh client for this purpose. The data is then encrypted and transferred to the central server where they are unencrypted and regenerated by the ssh server process. A connection is established from that to the VNC server which is now local to it.
What? That, complicated? Naahh...
=IMAGE=x1xsvnc.jpg=
A schematic diagram of an X desktop running through the network using VNC and SSH
This has the best of a number of worlds. The data transfer is encrypted and compressed by ssh and the GUI windows are properly cached by VNC, creating a reasonably fast and very secure open platform remote desktop facility. However, should more than one user need to connect this way to the central server simultaneously, then each user should be given a unique display number which they would always use.
For completeness I need to point out that there are other methods which can be used to fire up Xvnc, including starting it as a service. These are documented as part of the VNC distribution and I won’t go into it here.
Conclusion
A popular misconception exists that X is only available for GNU/Linux and some UNIXes. The fact is that X was designed to be platform independent and is available for many other systems as well. This article mentions many times the free X suite that runs under Microsoft’s Windows with the use of Cygwin. On top of that, this article demonstrates how a MS-Windows machine, as well as GNU/Linux ones, can be used as a terminal for a central GNU/Linux system both on a LAN and through the internet.
One project that makes good use of the versatility of X is the Linux Terminal Server project. This uses X features to create scenarios where many users are connected to a central GNU/Linux machine using thin clients producing massive running and installation cost savings.
This article has only scratched the surface of the X infrastructure. Hopefully though, it has demonstrated X’s concepts, proven its versatility and given a taste of its power. While the Microsoft Windows GUI is functional and intuitive, I’m finding it now no more so than GNOME or KDE on X running on GNU/Linux. And when I need to do some remote accessing or use other machines as terminals, I find the Microsoft Windows infrastructure to be encumbered, restrictive and clunky compared to the slickness of X. In short, if given a choice between Microsoft’s own windowing environment and that of the free software community, GNU/Linux and POSIX, then you can give me an “X” every time.